사용자 정의 이벤트의 색상
이벤트에 대한 사용자 정의 색상을 지정하는 방법은 총 세 가지가 있습니다:
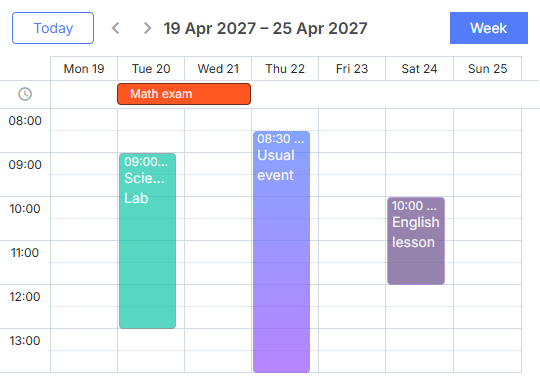
이벤트 객체의 속성에서 색상 지정
이벤트에 대한 사용자 정의 색상을 지정하려면 데이터 객체에 2개의 추가 속성을 더하거나 두 속성 중 하나만 추가하면 됩니다:
- textColor - 이벤트의 글꼴 색상을 지정합니다;
- color - 이벤트의 배경 색상을 지정합니다.

데이터 객체에서 이벤트의 색상을 설정하는 예:
scheduler.parse([
   {id:1, start_date:"2027-05-21",end_date:"2027-05-25",text:"Task1", color:"red"},
   {id:2, start_date:"2027-06-02",end_date:"2027-06-05",text:"Task2", color:"blue"}
],"json");
...
scheduler.getEvent(1).color = "yellow";
scheduler.updateEvent(1);
참고로, 이들 속성은 특수한 속성입니다. 기본적으로 Scheduler는 이벤트에 해당 속성이 있는지 항상 확인하고, 있을 경우 이벤트의 컨테이너와 텍스트에 관련 값을 적용합니다. 그렇지 않으면 Scheduler는 이벤트에 대해 미리 정의된 색상을 사용합니다.
속성은 임의의 유효한 CSS 색상 값이 될 수 있으며, 예를 들어 아래의 표기법 모두가 유효합니다:
ev.color = "#FF0000";
ev.color = "red";
ev.color = "rgb(255,0,0)";
이벤트에 추가 CSS 클래스 적용하기
이벤트에 색상을 지정하는 두 번째 방법은 추가 CSS 클래스(들)를 이벤트에 적용하는 것입니다.
기법
이벤트에 CSS 클래스를 적용하려면 event_class 템플릿을 사용합니다.
템플릿의 기본 구현은 다음과 같습니다:
scheduler.templates.event_class = function(start, end, ev){
     return "";
}
이 함수는 이벤트 클래스에 추가될 문자열을 반환합니다. 따라서 이벤트의 상태에 따라 서로 다른 클래스를 반환할 수 있습니다.
예시
다음과 같이 매니저와 직원에게 서로 다른 색상의 이벤트를 할당하고 싶다고 가정해 봅시다: 매니저는 녹색, 직원은 주황색으로. 이 경우 두 가지를 수행합니다:
- 모델에 추가 데이터 속성(예: 'type')을 추가합니다. 이 속성은 사용자의 유형을 저장합니다: 'manager' 또는 'employee'.
 2. 이 유형들에 대해 관련 CSS 클래스를 지정합니다. 예를 들어 'manager_event'와 'employee_event'로 명명합니다. 이러한 이름에 대한 CSS 정의는 다음과 같이 보일 것입니다:
[기본 CSS 클래스 재정의](Redefining the default CSS classes)
    .manager_event {
        --dhx-scheduler-event-background: #009966;
        --dhx-scheduler-event-color: black;
    }

    .employee_event {
        --dhx-scheduler-event-background: #FF9933;
        --dhx-scheduler-event-color: black;
    }
Scheduler의 이전 버전(v6.0 이하)에서는 CSS 변수 사용이 불가능하며, 다음과 같은 스타일로 이벤트에 색상을 적용할 수 있습니다:
    /*일간 또는 주간 보기의 이벤트*/
    .dhx_cal_event.manager_event div{
        background-color: #009966 !important;
        color: black !important;
    }
    .dhx_cal_event.employee_event div{
        background-color: #FF9933 !important;
        color: black !important;
    }

    /*월간 보기의 다중일 이벤트*/
    .dhx_cal_event_line.manager_event{
        background-color: #009966 !important;
        color: black !important;
    }
    .dhx_cal_event_line.employee_event{
        background-color: #FF9933 !important;
        color: black !important;
    }

    /*모듈 시간 고정 이벤트, 월간 보기*/
    .dhx_cal_event_clear.manager_event{
        color: black !important;
    }
    .dhx_cal_event_clear.employee_event{
        color: black !important;
    }
- 그리고 마지막으로 event_class 템플릿을 재정의합니다.
[Applying additional CSS classes to events:](Applying additional CSS classes to events:)
scheduler.templates.event_class = function (start, end, event) {
    if (event.type == 'manager') return "manager_event";
    return "employee_event";
};
데이터로 색상 로딩
색상이 백엔드에서 오는 데이터의 일부인 경우(예: 작업 색상이 단계(stage)와 연관되거나 페이지에서 하드코딩할 수 없는 작업에 할당된 리소스), 데이터를 기반으로 스타일을 수동으로 생성하는 것이 좋은 해결책일 수 있습니다.
다음과 같은 사용자 모음이 있고, 이들을 작업에 배정할 수 있다고 가정해 봅시다. 작업의 스타일은 사용자 레코드의 속성으로 정의되어야 합니다:
[
    {"key":1, "label":"John", "backgroundColor":"#03A9F4", "textColor":"#FFF"},
    {"key":2, "label":"Mike", "backgroundColor":"#f57730", "textColor":"#FFF"},
    {"key":3, "label":"Anna", "backgroundColor":"#e157de", "textColor":"#FFF"},
    {"key":4, "label":"Bill", "backgroundColor":"#78909C", "textColor":"#FFF"},
    {"key":7, "label":"Floe", "backgroundColor":"#8D6E63", "textColor":"#FFF"}
]
이 사용 사례에서 사용자와 그 색상은 애플리케이션의 서로 다른 부분에서 생성되고 관리되며 Scheduler는 일반적으로 사용자 ID와 색상을 미리 알지 못합니다.
다음과 같이 처리할 수 있습니다:
- 이 컬렉션에 대해 이름이 있는 serverList를 정의합니다
scheduler.serverList("people");
-
지원되는 데이터 형식 중 하나를 사용하거나 커스텀 xhr를 통해 페이지에 옵션을 로드합니다.
-
옵션이 로드되면 데이터를 기반으로 CSS 스타일을 생성할 수 있습니다:
scheduler.attachEvent("onLoadEnd", function(){
    // 스타일 요소에 대한 임의의 id를 사용합니다
    const styleId = "dynamicSchedulerStyles";

    // 색상이 포함된 옵션을 다시 로드하는 경우 - 이전에 생성된
    // 스타일 요소를 재사용합니다

    let element = document.getElementById(styleId);
    if(!element){
        element = document.createElement("style");
        element.id = styleId;
        document.querySelector("head").appendChild(element);
    }
    let html = [];
    const resources = scheduler.serverList("people");

    // 각 옵션에 대한 CSS 스타일을 생성하고 스타일 요소에 CSS를 작성합니다:

    resources.forEach(function(r){
        html.push(`.event_resource_${r.key} {
            --dhx-scheduler-event-background:${r.backgroundColor};
            --dhx-scheduler-event-color:${r.textColor};
        }`);
    });
    element.innerHTML = html.join("");
});
- 그다음 클래스 템플릿에서 생성한 관련 클래스를 할당할 수 있습니다:
scheduler.templates.event_class = function (start, end, event) {
    let css = [];

    if(task.owner_id){
        css.push("event_resource_" + event.owner_id);
    }

    return css.join(" ");
};