dhtmlxScheduler와 Node.js
이 튜토리얼에서는 Node.js를 사용하여 서버 측에 REST API를 기반으로 Scheduler를 구축하는 방법을 안내합니다. 만약 다른 기술을 사용하고 있다면, 아래에 나열된 통합 옵션을 참고하시기 바랍니다:
- dhtmlxScheduler와 ASP.NET Core
- dhtmlxScheduler와 ASP.NET MVC
- dhtmlxScheduler와 PHP
- dhtmlxScheduler와 PHP:Slim
- dhtmlxScheduler와 PHP:Laravel 연동하기
- dhtmlxScheduler와 SalesForce LWC 통합하기
- dhtmlxScheduler와 Ruby on Rails 연동하기
- dhtmlxScheduler와 dhtmlxConnector 연동하기
Node.js Scheduler 설정은 서버와의 통신을 위해 REST API에 의존합니다. 다행히 Node.js에는 이미 준비된 여러 솔루션이 있으므로 모든 것을 처음부터 만들 필요는 없습니다.
이 튜토리얼에서는 Express 프레임워크와 MySQL을 데이터 저장소로 사용합니다.
전체 소스 코드는 GitHub에서 확인할 수 있습니다.
1단계. 프로젝트 초기화
프로젝트 생성
yarn 또는 npm을 사용하여 새 애플리케이션을 생성하세요:
$ mkdir scheduler-howto-nodejs
$ cd ./scheduler-howto-nodejs
$ yarn init // 또는 npm init
초기화 과정에서 몇 가지 간단한 질문에 답하게 됩니다:
$ question name (scheduler-howto-nodejs):
$ question version (1.0.0):
$ question description: My scheduler backend
$ question entry point (index.js): server.js
$ question repository url:
$ question author: Me
$ question license (MIT): MIT
$ question private:
$ success Saved package.json
이 과정이 끝나면 package.json 파일이 아래와 같이 생성됩니다:
{
    "name": "scheduler-backend",
    "version": "1.0.0",
    "main": "server.js",
    "author": "Me",
    "license": "MIT",
}
의존성 추가 및 모듈 설치
앞서 언급한 대로, 데모에서는 Express와 MySQL을 사용합니다.
MySQL 서버가 준비되어 있거나, Free MySQL Hosting과 같은 서비스를 사용하는 것도 고려해보세요.
아래 명령어로 express, mysql, body-parser, date-format-lite 모듈을 설치하세요:
$ yarn add express mysql body-parser date-format-lite
또는
$ npm install express mysql body-parser date-format-lite
server.js를 엔트리 포인트로 지정했으므로, 다음과 같은 내용을 가진 파일을 생성하세요:
server.js
const express = require("express"); // Express 사용
const bodyParser = require("body-parser"); // POST 요청 파싱
const app = express(); // 애플리케이션 생성
const port = 3000; // 리스닝 포트

// POST 요청 파싱에 필요
// 아래 라인은 application/x-www-form-urlencoded 파싱에 사용됨
app.use(bodyParser.urlencoded({extended:true}));

// 서버 시작
app.listen(port, () => {
    console.log("Server is running on port " + port + "...");
});
다음으로, package.json에 "scripts" 섹션을 추가하세요:
"scripts": {
    "start": "node server.js"
}
이후 package.json은 다음과 비슷하게 보일 것입니다:
{
    "name": "scheduler-howto-node",
    "version": "1.0.0",
    "main": "server.js",
    "license": "MIT",
    "scripts": {
        "start": "node server.js"
    },
    "dependencies": {
        "body-parser": "^1.20.0",
        "date-format-lite": "^17.7.0",
        "express": "^4.18.1",
        "mysql": "^2.18.1",
    }
}
이제 서버를 아래 명령어로 실행할 수 있습니다:
$ yarn start
또는
$ npm start
2단계. 페이지에 Scheduler 추가
프론트엔드 HTML, CSS, JS 파일을 저장할 디렉터리를 생성하세요:
$ mkdir ./public
public 폴더 내에 index.html 파일을 다음과 같이 생성하세요:
public/index.html
<!doctype html>
<html>
<head>
<title>DHTMLX Sсheduler example</title>
<meta charset="utf-8">
<!-- scheduler -->
<script src="https://cdn.dhtmlx.com/scheduler/edge/dhtmlxscheduler.js"
charset="utf-8"></script>
<link href="https://cdn.dhtmlx.com/scheduler/edge/dhtmlxscheduler.css"
rel="stylesheet" type="text/css" charset="utf-8">
<style> html, body{
margin:0px;
padding:0px;
height:100%;
overflow:hidden;
}
</style>
</head>
<body>
<div id="scheduler_here" class="dhx_cal_container"
style='width:100%; height:100%;'>
<div class="dhx_cal_navline">
<div class="dhx_cal_prev_button"> </div>
<div class="dhx_cal_next_button"> </div>
<div class="dhx_cal_today_button"></div>
<div class="dhx_cal_date"></div>
<div class="dhx_cal_tab" name="day_tab"></div>
<div class="dhx_cal_tab" name="week_tab"></div>
<div class="dhx_cal_tab" name="month_tab"></div>
</div>
<div class="dhx_cal_header"></div>
<div class="dhx_cal_data"></div>
</div>
<script> scheduler.config.load_date="%Y-%m-%d %H:%i";
scheduler.init("scheduler_here", new Date(2022, 0, 20), "week");
scheduler.setLoadMode("day");
// load data from backend
scheduler.load("/events", "json");
// connect backend to scheduler
const dp = scheduler.createDataProcessor({
url: "/events",
mode: "REST"
});
</script>
</body>
</html>
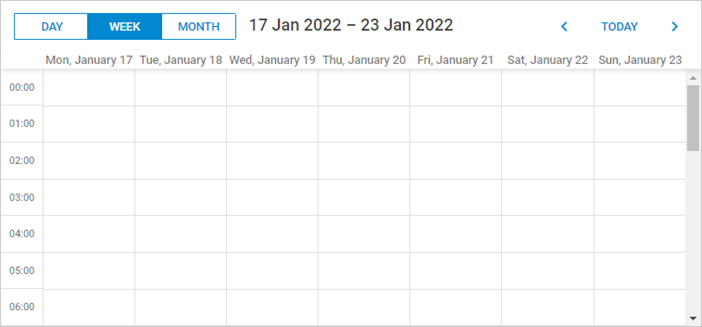
이 코드는 기본 HTML 레이아웃을 설정하고, CDN에서 dhtmlxScheduler를 포함하며, init 메서드를 사용해 스케줄러를 초기화합니다. 문서 body와 스케줄러 컨테이너 모두 100% 높이로 설정하여 스케줄러가 컨테이너에 맞게 표시됩니다.
라우트 설정
새 페이지에 접근할 수 있도록, server.js에서 "app.listen(...);" 라인 이전에 아래 코드를 추가하세요:
server.js
// "./public" 디렉터리에서 정적 페이지 반환
app.use(express.static(__dirname + "/public"));
앱을 재시작하여 변경 사항을 적용하세요.
이제 브라우저에서 http://localhost:3000/ 을 열면 index.html 페이지가 표시됩니다.
3단계. 데이터베이스 준비
스케줄러 UI가 준비되었으니, 이제 데이터베이스에 연결하고 이벤트를 읽고 쓸 수 있는 메서드를 정의해야 합니다.
데이터베이스 생성
먼저 데이터베이스를 생성하세요. 선호하는 MySQL 클라이언트나 콘솔을 사용할 수 있습니다.
MySQL 클라이언트에서 다음을 실행하세요:
CREATE DATABASE  IF NOT EXISTS `scheduler`;
USE `scheduler`;

DROP TABLE IF EXISTS `events`;
CREATE TABLE `events` (
 `id` bigint(20) unsigned AUTO_INCREMENT,
 `start_date` datetime NOT NULL,
 `end_date` datetime NOT NULL,
 `text` varchar(255) DEFAULT NULL,
 PRIMARY KEY (`id`)
) DEFAULT CHARSET=utf8;
또는 위 SQL을 dump.sql 파일로 저장한 후 MySQL 콘솔에서 아래와 같이 임포트할 수 있습니다:
$ mysql -uuser -ppass scheduler < dump.sql
다음으로, server.js에 MySQL 연결 설정을 상수로 정의하세요:
server.js
// MySQL은 db 접근에 사용되며, util은 쿼리 프로미스화에 사용됨
const util = require("util");
const mysql = require('mysql');

// 데이터베이스에 맞는 본인의 설정 사용
const mysqlConfig = {
    "connectionLimit": 10,
    "host": "localhost",
    "user": "root",
    "password": "",
    "database": "scheduler"
};
설정 후, 아래와 같이 앱에서 데이터베이스에 연결하세요:
server.js
// mysql 연결 풀 열기
const connectionPool = mysql.createPool(mysqlConfig);
connectionPool.query = util.promisify(connectionPool.query);
이 코드는 connection pooling을 사용하며, util.promisify를 통해 쿼리를 Promise로 래핑합니다. 필수는 아니지만, 이 방법은 코드를 더 깔끔하고 관리하기 쉽게 만들어줍니다.
다음 단계에서는 데이터베이스 접근을 별도의 Storage 클래스로 캡슐화하여, 연결 및 CRUD 작업을 담당하게 됩니다.
4단계. CRUD 구현
데이터 접근 구현
데이터 읽기 및 쓰기 로직은 Storage 모듈에 정리됩니다. 이 클래스는 MySQL 연결을 받아 지정된 테이블에서 CRUD 작업(이벤트 전체 조회, 새 이벤트 삽입, 기존 이벤트 수정, 이벤트 삭제)을 수행합니다.
storage.js라는 파일을 만들고 아래 코드를 추가하세요:
storage.js
require("date-format-lite"); // 날짜 포맷 추가

class Storage {
    constructor(connection, table) {
        this._db = connection;
        this.table = "events";
    }

    // 테이블에서 이벤트 조회, 파라미터가 있으면 동적 로딩
    async getAll(params) {
        let query = "SELECT * FROM ??";
        let queryParams = [
            this.table
        ];

        let result = await this._db.query(query, queryParams);

        result.forEach((entry) => {
            // 날짜 및 시간 포맷팅
            entry.start_date = entry.start_date.format("YYYY-MM-DD hh:mm");
            entry.end_date = entry.end_date.format("YYYY-MM-DD hh:mm");
        });
        return result;
    }

    // 새 이벤트 생성
    async insert(data) {
        let result = await this._db.query(
            "INSERT INTO ?? (`start_date`, `end_date`, `text`) VALUES (?,?,?)",
            [this.table, data.start_date, data.end_date, data.text]);

        return {
            action: "inserted",
            tid: result.insertId
        }
    }

    // 이벤트 수정
    async update(id, data) {
        await this._db.query(
            "UPDATE ?? SET `start_date` = ?, `end_date` = ?, `text` = ? WHERE id = ?",
            [this.table, data.start_date, data.end_date, data.text, id]);

        return {
            action: "updated"
        }
    }

    // 이벤트 삭제
    async delete(id) {
        await this._db.query(
            "DELETE FROM ?? WHERE `id`=? ;",
            [this.table, id]);

        return {
            action: "deleted"
        }
    }
}

module.exports = Storage;
라우팅
이제 페이지의 스케줄러가 storage에 접근할 수 있도록 라우트를 설정해야 합니다.
이를 위해 router라는 또 다른 헬퍼 모듈을 만드세요:
router.js
function callMethod (method) {
    return async (req, res) => {
        let result;

        try {
            result = await method(req, res);
        } catch (e) {
            result =  {
                action: "error",
                message: e.message
            }
        }

        res.send(result);
    }
};

module.exports = {
    setRoutes (app, prefix, storage) {
        app.get(`${prefix}`, callMethod((req) => {
            return storage.getAll(req.query);
        }));

        app.post(`${prefix}`, callMethod((req) => {
            return storage.insert(req.body);
        }));

        app.put(`${prefix}/:id`, callMethod((req) => {
            return storage.update(req.params.id, req.body);
        }));

        app.delete(`${prefix}/:id`, callMethod((req) => {
            return storage.delete(req.params.id);
        }));
    }
};
이 모듈은 애플리케이션이 스케줄러에서 보내는 요청 URL을 감지하고, 해당 storage 메서드를 호출하도록 구성합니다.
모든 메서드는 try-catch 블록으로 감싸져 있어, 에러 발생 시 클라이언트에 적절한 에러 응답을 반환합니다. 자세한 내용은 에러 처리에서 확인할 수 있습니다.
또한, 예외 메시지가 API 응답에 직접 포함된다는 점에 유의하세요. 개발 중에는 유용하지만, 운영 환경에서는 MySQL 오류 등 민감한 정보 노출을 방지하기 위해 메시지 노출을 제한하는 것이 좋습니다.
함께 동작시키기
모든 부분이 준비되면, Storage를 Router를 통해 애플리케이션에 연결할 수 있습니다:
server.js
const router = require("./router");

// mysql에 연결 열기
const connectionPool = mysql.createPool(mysqlConfig);
connectionPool.query = util.promisify(connectionPool.query);

// 기본 CRUD 요청에 리스너 추가
const Storage = require("./storage");
const storage = new Storage(connectionPool);
router.setRoutes(app, "/events", storage);
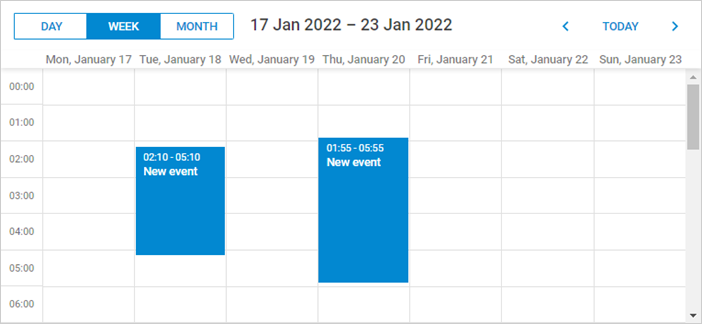
애플리케이션을 재시작한 후, 스케줄러에서 이벤트를 생성, 삭제, 수정할 수 있으며 모든 변경사항이 페이지를 새로고침해도 유지됩니다.
동적 로딩
현재 스케줄러는 시작 시 events 테이블의 모든 레코드를 불러옵니다. 데이터 양이 적을 때는 문제가 없지만, 플래닝이나 예약과 같이 오래된 기록이 삭제되거나 아카이브되지 않는 애플리케이션에서는 데이터가 빠르게 증가할 수 있습니다. 몇 달이 지나면 페이지가 로드될 때마다 여러 메가바이트의 이벤트 데이터를 요청할 수도 있습니다.
동적 로딩은 이러한 문제를 방지하는 데 도움이 됩니다. 스케줄러는 표시되는 날짜 범위를 요청 파라미터에 추가하여 백엔드가 해당 범위에 속하는 이벤트만 반환하도록 합니다. 사용자가 날짜 범위를 변경할 때마다 스케줄러는 해당 구간의 데이터만 가져옵니다.
클라이언트에서 동적 로딩을 활성화하려면 setLoadMode 옵션에 "day", "week", "month" 중 하나의 값을 사용하세요. 일반적으로 "day"가 적합합니다.
setLoadMode 메서드를 사용하여 클라이언트 측에서 동적 로딩을 활성화하세요:
public/index.html
scheduler.config.load_date="%Y-%m-%d %H:%i";
scheduler.init("scheduler_here", new Date(2022, 0, 20), "week");
scheduler.setLoadMode("day");
// 백엔드에서 데이터 불러오기
scheduler.load("/events", "json");
스케줄러는 요청 쿼리에 from과 to 파라미터를 포함하므로, 단순한 WHERE 절을 추가하여 요청된 날짜 범위만 불러올 수 있습니다:
storage.js
async getAll(params) {
    let query = "SELECT * FROM ??";
    let queryParams = [
        this.table
    ];

    if (params.from && params.to) {         query += " WHERE `end_date` >= ? AND `start_date` < ?";
        queryParams.push(params.from);
        queryParams.push(params.to);
    }

    let result = await this._db.query(query, queryParams);

    result.forEach((entry) => {
    // 날짜 및 시간 포맷팅
        entry.start_date = entry.start_date.format("YYYY-MM-DD hh:mm");
        entry.end_date = entry.end_date.format("YYYY-MM-DD hh:mm");
    });
    return result;
}
반복 이벤트
반복 이벤트 (예: "매일 반복되는 이벤트")를 지원하려면 몇 가지 추가 단계가 필요합니다.
확장 기능 활성화
스케줄러 페이지에서 반복 이벤트 확장 기능을 활성화합니다:
public/index.html
<!-- scheduler 반복 작업 확장 기능 -->
scheduler.plugins({
    recurring: true
});
모델 업데이트
다음으로, 데이터 모델에 세 개의 필드를 추가합니다:
- event_pid
- event_length
- rec_type
다음 SQL 명령어로 기존 events 테이블에 이 컬럼들을 추가할 수 있습니다:
ALTER TABLE `events` ADD COLUMN `event_pid` bigint(20) unsigned DEFAULT '0';
ALTER TABLE `events` ADD COLUMN `event_length` bigint(20) unsigned DEFAULT '0';
ALTER TABLE `events` ADD COLUMN `rec_type` varchar(25) DEFAULT '""';
또는, 다음과 같이 테이블을 처음부터 생성할 수도 있습니다:
CREATE TABLE `events` (
 `id` bigint(20) unsigned AUTO_INCREMENT,
 `start_date` datetime NOT NULL,
 `end_date` datetime NOT NULL,
 `text` varchar(255) DEFAULT NULL,
 `event_pid` bigint(20) unsigned DEFAULT '0',
 `event_length` bigint(20) unsigned DEFAULT '0',
 `rec_type` varchar(25) DEFAULT '""',
 PRIMARY KEY (`id`)
) DEFAULT CHARSET=utf8;
백엔드 업데이트
마지막으로, 반복 이벤트를 처리할 수 있도록 storage 메서드를 업데이트합니다.
먼저, insert 메서드를 업데이트하여 SQL 쿼리에 새 컬럼들을 포함시킵니다.
또한, 반복 시리즈의 단일 반복을 삭제할 때 새로운 레코드를 생성해야 하는 특별한 경우를 처리해야 합니다. 클라이언트는 이 경우 insert 액션을 호출합니다:
storage.js
// 새로운 이벤트 생성
async insert(data) {
   let sql = "INSERT INTO ?? " +
      "(`start_date`, `end_date`, `text`, `event_pid`, `event_length`, `rec_type`) " +       "VALUES (?, ?, ?, ?, ?, ?)";
   const result = await this._db.query(
      sql,
      [
         this.table,
         data.start_date,
         data.end_date,
         data.text,
         data.event_pid || 0, //!
         data.event_length || 0, //!
         data.rec_type //!
      ]);

   // 반복 시리즈의 단일 반복 삭제
   let action = "inserted";    if (data.rec_type == "none") {      action = "deleted";    }
   return {
     action: action,
     tid: result.insertId
   };
}
update 메서드도 SQL 쿼리에 대해 유사한 변경이 필요합니다.
또한, 반복 시리즈가 수정될 경우 해당 시리즈의 모든 수정된 반복을 삭제해야 합니다:
storage.js
// 이벤트 업데이트
async update(id, data) {
  if (data.rec_type && data.rec_type != "none") {       // 반복 시리즈를 업데이트할 때 모든 수정된 반복을 삭제
      // https://docs.dhtmlx.com/scheduler/server_integration.html#recurringevents
      await this._db.query(
        "DELETE FROM ?? WHERE `event_pid`= ?;",
        [this.table, id]);
  }

  await this._db.query(
      "UPDATE ?? SET " +
      "`start_date` = ?, `end_date` = ?, `text` = ?, " +
      "`event_pid` = ?, `event_length`= ?, `rec_type` = ? "+       "WHERE id = ?",
      [
          this.table,
          data.start_date,
          data.end_date,
          data.text,
          data.event_pid || 0,           data.event_length || 0,           data.rec_type,           id
      ]);

  return {
     action: "updated"
  };
}
마지막으로, delete 메서드를 업데이트하여 두 가지 특별한 경우를 처리합니다:
- 삭제할 이벤트에
event_pid가 비어있지 않다면, 반복 시리즈의 수정된 반복을 삭제하는 것입니다. 레코드를 삭제하는 대신rec_type='none'으로 설정하여 스케줄러가 해당 반복을 건너뛰게 합니다. - 전체 반복 시리즈를 삭제할 경우, 해당 시리즈의 모든 수정된 인스턴스도 삭제해야 합니다.
storage.js
// 이벤트 삭제
async delete(id) {
    // 반복 이벤트 지원을 위한 로직
    // https://docs.dhtmlx.com/scheduler/server_integration.html#recurringevents
    let event = await this._db.query(
        "SELECT * FROM ?? WHERE id=? LIMIT 1;",
        [this.table, id]);

    if (event.event_pid) {
        // 반복 시리즈의 수정된 반복 삭제
        // 삭제하는 대신 rec_type을 "none"으로 업데이트
        event.rec_type = "none";
        return await this.update(id, event);
    }

    if (event.rec_type && event.rec_type != "none") {
        // 반복 시리즈 삭제, 모든 수정된 반복도 삭제
        await this._db.query(
            "DELETE FROM ?? WHERE `event_pid`=? ;",
            [this.table, id]);
    }

    await this._db.query(
        "DELETE FROM ?? WHERE `id`= ?;",
        [this.table, id]);

    return {
        action: "deleted"
    }
}
애플리케이션 보안
dhtmlxScheduler는 유연성을 위해 설계된 클라이언트 측 컴포넌트로, 내장 보안 기능을 포함하지 않습니다. 클라이언트 측 코드만으로는 신뢰할 수 있는 보안을 제공할 수 없으므로, 백엔드 개발자가 애플리케이션 보안을 책임져야 합니다.
고려해야 할 주요 사항은 다음과 같습니다:
SQL 인젝션: 이 예제는 파라미터화된 SQL 쿼리를 사용하여 SQL 인젝션 공격을 예방합니다.
XSS 공격: 클라이언트는 백엔드로 전송하기 전 사용자 입력을 정제하지 않으며, 서버 데이터도 화면에 표시하기 전에 정제하지 않습니다.
일부 위험을 완화하는 간단한 방법 중 하나는 helmet 모듈을 사용하는 것입니다. 이 모듈은 기본적인 보안 헤더를 추가합니다.
helmet을 설치하려면 다음 명령어를 사용하세요:
$ yarn install helmet
그런 다음 server.js에서 app.listen(...) 전에 다음 코드를 추가하세요:
server.js
const helmet = require("helmet");
app.use(helmet());
에러 처리
router 설정 덕분에, 백엔드 API는 예외가 발생하면 error 상태를 반환합니다.
클라이언트 측에서는 dataProcessor의 onAfterUpdate 이벤트를 사용하여 이러한 에러를 처리할 수 있습니다:
public/index.html
dp.attachEvent("onAfterUpdate", function(id, action, tid, response){
   if (action == "error") {
       // 여기서 에러를 처리하세요
        alert("Server error: " + response.message);
   }
});
문제 해결
Scheduler를 Node.js와 통합하는 모든 단계를 따라 했지만 이벤트가 페이지에 나타나지 않는 경우, 백엔드 통합 문제 해결 문서를 참고하세요. 일반적인 문제를 파악하고 해결하는 방법을 안내합니다.
다음 단계
이제 완전히 동작하는 Scheduler를 사용할 수 있습니다. 전체 코드는 GitHub에 공개되어 있으니, 클론하거나 다운로드하여 프로젝트에 사용할 수 있습니다.
또한 Scheduler의 다양한 기능 가이드나 다른 백엔드 프레임워크와의 통합 튜토리얼도 참고할 수 있습니다.
맨 위로