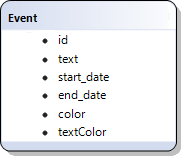
Custom Event's Color
이벤트 색상을 사용자 정의하는 방법에는 세 가지가 있습니다:
이벤트 객체의 속성에 색상 지정하기
이벤트에 사용자 정의 색상을 지정하려면, 이벤트 데이터 객체에 다음 속성 중 하나 또는 둘 다를 추가하세요:
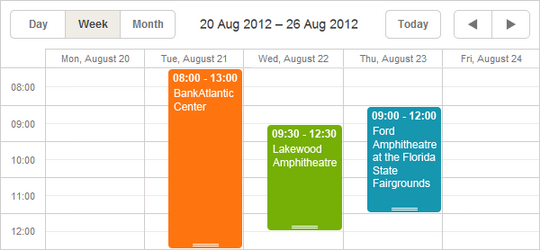
- textColor - 이벤트의 글자 색상 지정;
- color - 이벤트의 배경 색상 지정.
Setting the event's color in the data object
scheduler.parse([
   {id:1, start_date:"2019-05-21",end_date:"2019-05-25",text:"Task1", color:"red"},
   {id:2, start_date:"2019-06-02",end_date:"2019-06-05",text:"Task2", color:"blue"}
],"json");
...
scheduler.getEvent(1).color = "yellow";
scheduler.updateEvent(1);
이 속성들은 특별한 속성입니다. scheduler는 자동으로 이를 감지하여 이벤트 컨테이너와 텍스트에 지정된 색상을 적용합니다. 만약 이 속성이 없다면 기본 색상이 사용됩니다.
이 속성들은 모든 유효한 CSS 색상 포맷을 지원합니다. 예를 들어:
ev.color = "#FF0000";
ev.color = "red";
ev.color = "rgb(255,0,0)";
이벤트에 추가 CSS 클래스 적용하기
이벤트의 색상을 지정하는 또 다른 방법은 커스텀 CSS 클래스를 적용하는 것입니다.
방법
event_class 템플릿을 사용하여 이벤트에 CSS 클래스를 적용할 수 있습니다.
기본적으로 템플릿은 다음과 같습니다:
scheduler.templates.event_class = function(start, end, ev){
     return "";
}
이 함수는 이벤트의 class 속성에 추가될 문자열을 반환합니다. 이벤트 상태에 따라 다른 클래스를 반환할 수 있습니다.
Related sample: Coloring events
예시
예를 들어, 이벤트가 관리자(manager)인지 직원(employee)인지에 따라 색상을 다르게 지정하고 싶다고 가정해봅시다: 관리자는 초록색, 직원은 주황색으로 표시합니다. 방법은 다음과 같습니다:
- 데이터 모델에 'type'과 같은 속성을 추가하여 사용자의 유형을 저장하세요: 'manager' 또는 'employee'.
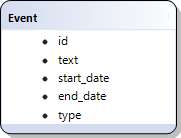
- 이 유형에 해당하는 CSS 클래스를 생성하세요. 예를 들어 'manager_event'와 'employee_event'를 생성합니다. CSS 예시는 다음과 같습니다:
Redefining the default CSS classes
Scheduler 6.0 이하 버전에서는 CSS 변수 지원이 없으므로 아래와 같이 스타일을 지정할 수 있습니다:<style>
.manager_event { --dhx-scheduler-event-background: #009966; --dhx-scheduler-event-color: black; } .employee_event { --dhx-scheduler-event-background: #FF9933; --dhx-scheduler-event-color: black; }
</style><style>
/* day 또는 week 뷰에서의 이벤트 */ .dhx_cal_event.manager_event div{ background-color: #009966 !important; color: black !important; } .dhx_cal_event.employee_event div{ background-color: #FF9933 !important; color: black !important; } /* month 뷰에서의 멀티데이 이벤트 */ .dhx_cal_event_line.manager_event{ background-color: #009966 !important; color: black !important; } .dhx_cal_event_line.employee_event{ background-color: #FF9933 !important; color: black !important; } /* month 뷰에서 고정 시간 이벤트 */ .dhx_cal_event_clear.manager_event{ color: black !important; } .dhx_cal_event_clear.employee_event{ color: black !important; }
</style> - 마지막으로, event_class 템플릿을 오버라이드하여 클래스를 할당하세요:
Applying additional CSS classes to events:
scheduler.templates.event_class = function (start, end, event) {
    if (event.type == 'manager') return "manager_event";
    return "employee_event";
};
Related sample: Coloring events
Related sample: Styling events with templates
데이터로부터 색상 불러오기
색상이 백엔드 데이터에서 오고, 예를 들어 작업의 색상이 단계나 할당된 리소스에 따라 달라지고 색상을 코드에 하드코딩할 수 없는 경우, 데이터로부터 동적으로 스타일을 생성할 수 있습니다.
예를 들어, 작업에 할당된 사용자가 있고, 작업 스타일이 사용자 속성에 따라 달라진다고 가정해봅시다:
[
    {"key":1, "label":"John", "backgroundColor":"#03A9F4", "textColor":"#FFF"},
    {"key":2, "label":"Mike", "backgroundColor":"#f57730", "textColor":"#FFF"},
    {"key":3, "label":"Anna", "backgroundColor":"#e157de", "textColor":"#FFF"},
    {"key":4, "label":"Bill", "backgroundColor":"#78909C", "textColor":"#FFF"},
    {"key":7, "label":"Floe", "backgroundColor":"#8D6E63", "textColor":"#FFF"}
]
이 경우 사용자와 색상 정보는 scheduler와 별도로 관리되며, scheduler는 사용자 ID나 색상을 미리 알지 못합니다.
실제 적용 방법은 다음과 같습니다:
- 이 컬렉션을 위한 명명된 serverList를 정의합니다:
scheduler.serverList("people");
지원되는 데이터 포맷 중 하나를 사용하거나 커스텀 XHR 요청으로 이 옵션을 페이지에 로드합니다.
로드 후, 데이터로부터 동적으로 CSS 스타일을 생성합니다:
scheduler.attachEvent("onLoadEnd", function(){
    // 스타일 요소의 고유 ID 사용
    var styleId = "dynamicSchedulerStyles";

    // 이미 존재하는 스타일 요소 재사용

    var element = document.getElementById(styleId);
    if(!element){
        element = document.createElement("style");
        element.id = styleId;
        document.querySelector("head").appendChild(element);
    }
    var html = [];
    var resources = scheduler.serverList("people");

    // 각 사용자에 대해 CSS 규칙을 생성하여 스타일 요소에 삽입

    resources.forEach(function(r){
        html.push(`.event_resource_${r.key} {
            --dhx-scheduler-event-background:${r.backgroundColor};
            --dhx-scheduler-event-color:${r.textColor};
        }`);
    });
    element.innerHTML = html.join("");
});
- 그리고 나서, event_class 템플릿에서 생성된 클래스를 할당합니다:
scheduler.templates.event_class = function (start, end, event) {
    var css = [];

    if(event.owner_id){
        css.push("event_resource_" + event.owner_id);
    }

    return css.join(" ");
};