커스텀 엘리먼트 생성하기
라이트박스에 커스텀 컨트롤을 추가하려면 다음과 같이 새로운 객체를 정의합니다:
gantt.form_blocks["my_editor"]={
    render:function(sns){ //sns - 섹션의 설정 객체
        return "html code of the editor here";
    },
    set_value:function(node,value,task,section){
        //node - 위에서 정의한 html과 연관된 html 엘리먼트
        //value - map_to 속성에 의해 정의된 값
        //task - 태스크 객체
        //section- 섹션의 설정 객체
        ... 값을 엘리먼트에 설정하는 코드 ...
    },
    get_value:function(node,task,section){
        //node - 위에서 정의한 html과 연관된 html 엘리먼트
        //task - 태스크 객체
        //section - 섹션의 설정 객체
        return "에디터에서 현재 값 반환";
    },
    focus:function(node){
        //node - 위에서 정의한 html과 연관된 html 엘리먼트
        ...엘리먼트에 포커스를 주는 코드...
    }
}
render 함수에서 반환하는 HTML 코드 내에서는 셀프 클로징 태그를 사용하지 않는 것이 좋습니다. 일부 브라우저에서 파싱 문제가 발생할 수 있습니다:
//이것은 잘못된 예시입니다
render:function(){
    return "<div id='box'/>";
}

//대신, 여는 태그와 닫는 태그를 사용하세요:
render:function(){
    return "<div id='box'></div>"; // 권장
}
Related sample: Custom control in the lightbox
라이트박스 컨트롤은 다음과 같은 메서드로 구성됩니다:
- render (sns): string - 섹션을 위한 HTML 엘리먼트의 문자열을 반환합니다
- sns - (LightboxSection) - 섹션의 설정 객체
- set_value (node, value, task, section): any - Task 객체의 값을 받아 섹션에 적용합니다
- node - (HTMLElement) - 섹션의 HTML과 연관된 HTML 엘리먼트
- value - (any) - map_to 속성에 의해 정의된 값
- task - (Task) - 태스크 객체
- section - (LightboxSection) - 섹션의 설정 객체
- get_value (node, task, section): any - 섹션에서 값을 가져와 Task 객체에 저장합니다
- node - (HTMLElement) - 섹션의 HTML과 연관된 HTML 엘리먼트
- task - (Task) - 태스크 객체
- section - (LightboxSection) - 섹션의 설정 객체
- focus (node): void - 섹션에 포커스를 설정합니다
- node - (HTMLElement) - 섹션의 HTML과 연관된 HTML 엘리먼트
두 개의 입력 필드를 가진 커스텀 에디터
두 개의 입력 필드를 가진 커스텀 에디터를 만드는 예시입니다:
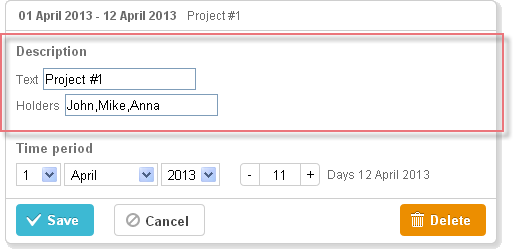
gantt.form_blocks["my_editor"] = {
render: function (sns) {
return "<div class='dhx_cal_ltext' style='height:60px;'>"+
"Text <input class='editor_description' type='text'>"+
"<br/>Holders <input class='editor_holders' type='text'>"+
"</div>";
},
set_value: function (node, value, task) {
node.querySelector(".editor_description").value = value || "";
node.querySelector(".editor_holders").value = task.users || "";
},
get_value: function (node, task) {
task.users = node.querySelector(".editor_holders").value;
return node.querySelector(".editor_description").value;
},
focus: function (node) {
var a = node.querySelector(".editor_description");
a.select();
a.focus();
}
};
gantt.config.lightbox.sections = [
{ name:"description", height:200, map_to:"text", type:"my_editor", focus:true},
{ name:"time", height:72, type:"duration", map_to:"auto"}
];
Related sample: Custom control in the lightbox
커스텀 서드파티 에디터
여러 값을 선택할 수 있는 커스텀 멀티셀렉트 컨트롤을 만드는 것도 가능합니다.
예를 들어, jQuery Chosen plugin을 기반으로 한 컨트롤을 사용하여 하나의 태스크에 여러 리소스를 할당할 수 있습니다. 기본 Gantt resource control과 달리, 이 컨트롤은 리소스의 수량 지정 없이 단순히 리소스만 할당합니다. 간단한 컨트롤이 필요한 경우에 적합합니다.
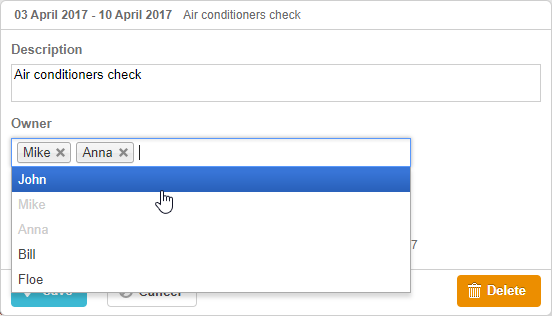
Related sample: 3rd party multiselect control
Gantt 차트에 jQuery Chosen 기반 컨트롤을 통합하려면:
- 필요한 소스 파일을 페이지에 포함하세요
<script
    src="https://code.jquery.com/jquery-3.3.1.min.js?v=5.2.4"
    integrity="sha256-FgpCb/KJQlLNfOu91ta32o/NMZxltwRo8QtmkMRdAu8="
    crossorigin="anonymous"></script>

<script src="https://cdnjs.cloudflare.com/ajax/libs/chosen/1.8.7/chosen.jquery.js?v=5.2.4"></script>
<link rel="stylesheet" type="text/css"
    href="https://cdnjs.cloudflare.com/ajax/libs/chosen/1.8.7/chosen.css?v=5.2.4">
- 컨트롤 로직을 정의하세요
gantt.form_blocks["multiselect"] = {
 render: function (sns) {
  var height = (sns.height || "23") + "px";
  var html = "<div class='gantt_cal_ltext gantt_cal_chosen gantt_cal_multiselect'"+
     "style='height:"+ height + ";'><select data-placeholder='...'"+
        "class='chosen-select' multiple>";
  if (sns.options) {
   for (var i = 0; i < sns.options.length; i++) {
    if(sns.unassigned_value !== undefined && sns.options[i].key==sns.unassigned_value){
        continue;
    }
    html+="<option value='" +sns.options[i].key+ "'>"+sns.options[i].label+"</option>";
  }
}
  html += "</select></div>";
  return html;
},

set_value: function (node, value, ev, sns) {
    node.style.overflow = "visible";
    node.parentNode.style.overflow = "visible";
    node.style.display = "inline-block";
    var select = $(node.firstChild);

    if (value) {
        value = (value + "").split(",");
        select.val(value);
    }
    else {
        select.val([]);
    }

    select.chosen();
    if(sns.onchange){
        select.change(function(){
            sns.onchange.call(this);
        })
    }
    select.trigger('chosen:updated');
    select.trigger("change");
},

get_value: function (node, ev) {
    var value = $(node.firstChild).val();
    //value = value ? value.join(",") : null
    return value;
},

focus: function (node) {
    $(node.firstChild).focus();
 }
};
- type:"multiselect"로 라이트박스 섹션에 컨트롤을 추가하세요
gantt.config.lightbox.sections = [
    {name:"description",height:38,map_to:"text",type:"textarea",focus: true},
    {name:"owner",height:60, type:"multiselect", options:gantt.serverList("people"),
        map_to:"owner_id", unassigned_value:5 },
    {name: "time", type: "duration", map_to: "auto"}
];
unassigned_value 속성은 선택할 수 없는 리소스를 숨깁니다. 이 속성에 제외할 리소스의 ID를 설정하세요. 위 예시에서는 id=5인 리소스가 컨트롤에 나타나지 않습니다.
커스텀 서드파티 날짜 선택기
라이트박스에 커스텀 날짜 선택기 컨트롤을 추가하여 시작일과 종료일을 지정해 태스크의 기간을 설정할 수도 있습니다.
라이트박스에서 jQuery Datepicker 사용
예를 들어, jQuery UI Datepicker를 사용하여 Datepicker 컨트롤을 만들 수 있습니다.
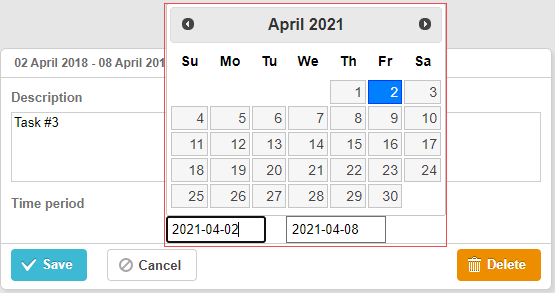
Related sample: 3rd party Datepicker control
Gantt 차트에서 jQuery Datepicker 컨트롤을 사용하려면:
- 페이지에 jQuery 라이브러리 파일을 포함하세요:
<script src="https://code.jquery.com/jquery-3.5.1.min.js"></script>
<script src="https://code.jquery.com/ui/1.12.1/jquery-ui.min.js"></script>
<link  rel="stylesheet" type="text/css"
    href="https://code.jquery.com/ui/1.12.1/themes/base/jquery-ui.css">
- 컨트롤 로직을 구현하세요:
(function () {
    function startDatepicker(node){
        return $(node).find("input[name='start']");
    }
    function endDateInput(node){
        return $(node).find("input[name='end']");
    }

    gantt.form_blocks["datepicker"] = {
        render: function (sns) { //sns - 섹션의 설정 객체
            return "<div class='gantt-lb-datepicker'>"+
                "<input type='text' name='start'>"+
                "<input type='text' name='end'>"+
                "</div>";;
        },
        set_value: function (node, value, task, section) {
            //node - 위에서 정의한 html과 연관된 html 엘리먼트
            //value - map_to 속성에 의해 정의된 값
            //task - 태스크 객체
            //section- 섹션의 설정 객체

            startDatepicker(node).datepicker({
                dateFormat: "yy-mm-dd",
                onSelect: function (dateStr) {
                    var endValue = endDateInput(node).datepicker('getDate');
                    var startValue = startDatepicker(node).datepicker('getDate');

                    if(startValue && endValue){
                        if(endValue.valueOf() <= startValue.valueOf()){
                            endDateInput(node).datepicker("setDate",
                                gantt.calculateEndDate({
                                    start_date: startValue, duration: 1, task:task
                                })
                            );
                        }
                    }
                }
            });

            startDatepicker(node).datepicker("setDate", task.start_date);

            endDateInput(node).datepicker({
                dateFormat: "yy-mm-dd",
                onSelect: function (dateStr) {
                    //  gantt.ext.inlineEditors.save()
                }
            });
            endDateInput(node).datepicker("setDate", task.end_date);
        },
        get_value: function (node, task, section) {

            if(task.start_date && task.end_date) {
                var start = startDatepicker(node).datepicker('getDate');
                var end =  endDateInput(node).datepicker('getDate');

                if(end.valueOf() <= start.valueOf()){
                    end = gantt.calculateEndDate({
                        start_date: start, duration: 1, task:task
                    });
                }
                task.start_date = start;
                task.end_date = end;
            }

            task.duration = gantt.calculateDuration(task);
        },
        focus: function (node) {

        }
    }
})();
- 그런 다음 type:"datepicker"로 라이트박스 섹션에서 컨트롤을 사용하세요:
gantt.config.lightbox.sections = [
  { name: "description", height: 70, map_to: "text", type: "textarea", focus: true },
  { name: "time", height: 72, map_to: "auto", type: "datepicker" }
];
라이트박스에서 Bootstrap Datepicker 사용하기
라이트박스 내부에 Bootstrap Datepicker를 추가하는 방법은 jQuery Datepicker를 통합하는 방식과 유사합니다.

Related sample: Bootstrap Datepicker control
Gantt Chart에 Bootstrap Datepicker 컨트롤을 통합하려면 다음 단계를 따르세요:
페이지에 Bootstrap 라이브러리 소스 파일을 포함합니다.
컨트롤 로직을 정의합니다:
(function () {
    const startDatepicker = (node) => $(node).find("input[name='start']");
    const endDateInput = (node) => $(node).find("input[name='end']");

    gantt.form_blocks["datepicker"] = {
        render: (sns) => {
          const height = sns.height || 45;
            return "<div class='gantt-lb-datepicker' style='height:" + height + "px;'>"+
                        "<input type='text' name='start'> - "+
                        "<input type='text' name='end'>"+
                    "</div>";;
        },
        set_value: (node, value, task, section) => {
            const datepickerConfig = {
                format: 'yyyy-mm-dd',
                autoclose: true,
                container: gantt.$container
            };
            startDatepicker(node).datepicker(datepickerConfig);
            startDatepicker(node).datepicker('setDate',
                value ? value.start_date : task.start_date
            );

            endDateInput(node).datepicker(datepickerConfig);
            endDateInput(node).datepicker('setDate',
                value ? value.end_date : task.end_date
            );

            startDatepicker(node).datepicker().on('changeDate', function(e) {
                const endValue = endDateInput(node).datepicker('getDate');
                const startValue = startDatepicker(node).datepicker('getDate');

                if (startValue && endValue) {
                    if (endValue.valueOf() <= startValue.valueOf()) {
                        endDateInput(node).datepicker('setDate',
                            gantt.calculateEndDate({
                                start_date: startValue, duration: 1, task:task
                            })
                        );
                    }
                }
            });
        },
        get_value: (node, task, section) => {
            const start = startDatepicker(node).datepicker('getDate');
            let end =  endDateInput(node).datepicker('getDate');

            if (end.valueOf() <= start.valueOf()) {
                end = gantt.calculateEndDate({
                    start_date: start,
                    duration: 1,
                    task:task
                });
            }
            if (task.start_date && task.end_date) {
                task.start_date = start;
                task.end_date = end;
            }

            task.duration = gantt.calculateDuration(task);

            return {
                start_date: start,
                end_date: end,
                duration: task.duration
            };
        },
        focus: (node) => {
        }
    }
})();
- 그 다음, type:"datepicker"로 지정하여 이 컨트롤을 라이트박스 섹션으로 사용하세요:
gantt.config.lightbox.sections = [
  { name: "description", height: 70, map_to: "text", type: "textarea", focus: true },
  { name: "time", height: 45, map_to: "auto", type: "datepicker" }
];
커스텀 서드파티 Duration 컨트롤
라이트박스에 커스텀 Duration 컨트롤을 추가하는 것도 가능합니다. 이 컨트롤을 사용하면 작업의 시작일과 기간(일 단위)을 함께 설정할 수 있습니다.
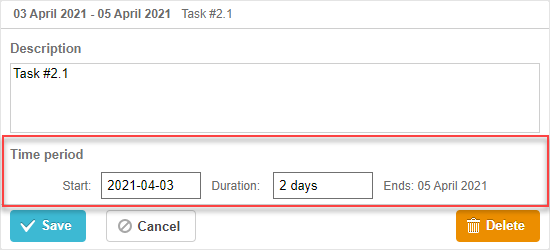
Related sample: 3rd party Duration control
jQuery 기반의 커스텀 Duration 컨트롤을 추가하는 방법은 다음과 같습니다:
- 먼저, 페이지에 jQuery 라이브러리 소스 파일을 포함하세요:
<script src="https://code.jquery.com/jquery-3.5.1.min.js"></script>
<script src="https://code.jquery.com/ui/1.12.1/jquery-ui.min.js"></script>
<link  rel="stylesheet" type="text/css"
    href="https://code.jquery.com/ui/1.12.1/themes/base/jquery-ui.css">
- 그 다음, 컨트롤의 로직을 정의합니다:
(function () {
    function startDatepicker(node){
        return $(node).find("input[name='start']");
    }
    function durationInput(node){
        return $(node).find("input[name='duration']");
    }
    function endDateLabel(node){
        return $(node).find("span.gantt-lb-datepicker-label");
    }

    var formatter = gantt.ext.formatters.durationFormatter({
        enter: "day",
        store: "day",
        format: "auto"
    });

    gantt.form_blocks["datepicker_duration"] = {
        render: function (sns) { //sns - the section's configuration object
            return "<div class='gantt-lb-datepicker'>"+
                "<label>Start:<input type='text' name='start'></label>"+
                "<label>Duration: <input type='text' name='duration'></label>"+
                "<span class='gantt-lb-datepicker-label'></span>"
                "</div>";
        },
        set_value: function (node, value, task, section) {
            //node - an html object related to the html defined above
            //value - a value defined by the map_to property
            //task - the task object
            //section- the section's configuration object

            startDatepicker(node).datepicker({
                dateFormat: "yy-mm-dd",
                onSelect: function (dateStr) {
                    var endValue = durationInput(node).datepicker('getDate');
                    var startValue = startDatepicker(node).datepicker('getDate');

                    if(startValue && endValue){
                        if(endValue.valueOf() <= startValue.valueOf()){
                            durationInput(node).datepicker("setDate",
                                gantt.calculateEndDate({
                                    start_date: startValue, duration: 1, task:task
                                })
                            );
                        }
                    }
                }
            });

            startDatepicker(node).datepicker("setDate", task.start_date);

            durationInput(node).val(formatter.format(task.duration));
            endDateLabel(node).text(
                "Ends: " + gantt.templates.task_date(task.end_date)
            );
        },
        get_value: function (node, task, section) {

            if(task.start_date && task.end_date) {
                var start = startDatepicker(node).datepicker('getDate');
                var end = task.end_date;
                var duration = formatter.parse(durationInput(node).val());

                if(duration && !isNaN(Number(duration))){
                    end = gantt.calculateEndDate({
                        start_date: start, duration: duration, task:task
                    });
                }
                task.start_date = start;
                task.duration = duration;
                task.end_date = end;
            }

            task.duration = gantt.calculateDuration(task);
            return {
                start_date: task.start_date,
                end_date: task.end_date,
                duration: task.duration
            }
        },
        focus: function (node) {

        }
    }
})();
- 마지막으로, type:"datepicker_duration"으로 이 컨트롤을 라이트박스 섹션에 추가하세요:
gantt.config.lightbox.sections = [
  { name: "description", height: 70, map_to: "text", type: "textarea", focus: true },
  { name: "time", height: 72, map_to: "auto", type: "datepicker_duration" }
];