dhtmlxScheduler와 PHP:Slim 3
이 튜토리얼에서는 Slim 3 프레임워크와 백엔드의 REST API를 사용하여 PHP 기반 Scheduler를 구축하는 기본 과정을 다룹니다.
이 튜토리얼은 구버전 Slim Framework v3.x를 사용합니다. 최신 버전은 Slim Framework v4.x 가이드를 참고하세요.
다른 플랫폼 및 프레임워크와의 통합을 위한 튜토리얼도 제공됩니다:
- "dhtmlxScheduler와 ASP.NET Core"
- "dhtmlxScheduler와 ASP.NET MVC"
- "dhtmlxScheduler와 Node.js"
- "dhtmlxScheduler와 PHP"
- "dhtmlxScheduler와 PHP:Laravel 연동하기"
- "dhtmlxScheduler와 PHP:Slim"
- "dhtmlxScheduler와 SalesForce LWC 통합하기"
- "dhtmlxScheduler와 Ruby on Rails 연동하기"
- "dhtmlxScheduler와 dhtmlxConnector 연동하기"
PHP 애플리케이션을 개발할 때, 모든 것을 처음부터 만드는 대신 검증된 프레임워크를 사용하는 것이 일반적입니다.
이 예제에서는 Slim 3 프레임워크를 REST API와 함께 서버 사이드에서 사용하며, 데이터 저장소로는 MySQL을 사용합니다. CRUD 작업은 PDO를 이용하여 구현되며, 이는 다른 프레임워크와도 유연하게 연동할 수 있도록 설계되었습니다.
GitHub에서 전체 데모를 확인할 수 있습니다. 단계별 안내를 따라 애플리케이션을 구축해 보세요.
전체 소스 코드는 GitHub에서 확인할 수 있습니다.
1단계. 프로젝트 초기화
프로젝트 생성
시작 지점으로는 Slim 3의 스켈레톤 애플리케이션을 사용합니다.
Composer를 이용해 애플리케이션을 생성하세요:
$ composer create-project slim/slim-skeleton scheduler-slim-howto
$ cd scheduler-slim-howto/
$ composer require illuminate/database "~5.1"
2단계. 페이지에 Scheduler 추가
다음으로, 스케줄러를 페이지에 추가합니다. 이 과정은 두 단계로 간단하게 진행됩니다.
뷰 파일 생성
templates 폴더 안에 scheduler.phtml 파일을 생성하세요:
<!doctype html>
<html>
<head>
<title> Getting started with dhtmlxScheduler</title>
<meta charSet="utf-8"/>
<script src="https://cdn.dhtmlx.com/scheduler/edge/dhtmlxscheduler.js"></script>
<link href="https://cdn.dhtmlx.com/scheduler/edge/dhtmlxscheduler.css"
rel="stylesheet" type="text/css" charSet="utf-8">
<style>
html, body{
margin:0px;
padding:0px;
height:100%;
overflow:hidden;
}
</style>
</head>
<body>
<div id="scheduler_here" className="dhx_cal_container">
<div className="dhx_cal_navline">
<div className="dhx_cal_prev_button"> </div>
<div className="dhx_cal_next_button"> </div>
<div className="dhx_cal_today_button"></div>
<div className="dhx_cal_date"></div>
<div className="dhx_cal_tab" name="day_tab"></div>
<div className="dhx_cal_tab" name="week_tab"></div>
<div className="dhx_cal_tab" name="month_tab"></div>
</div>
<div className="dhx_cal_header"></div>
<div className="dhx_cal_data"></div>
</div>
<script>
scheduler.config.xml_date="%Y-%m-%d %H:%i";
scheduler.init('scheduler_here', new Date(2019,0,20), "week");
scheduler.load("/events");
var dp = scheduler.createDataProcessor("/events");
dp.setTransactionMode("REST"); // use to transfer data with REST
dp.init(scheduler);
</script>
</body>
</html>
라우트 설정
새 페이지가 준비되면, src/routes.php에서 라우트를 설정하여 브라우저로 접근할 수 있게 합니다:
$app->get('/', function (Request $request, Response $response, array $args) {
    return $this->renderer->render($response, 'scheduler.phtml', $args);
});
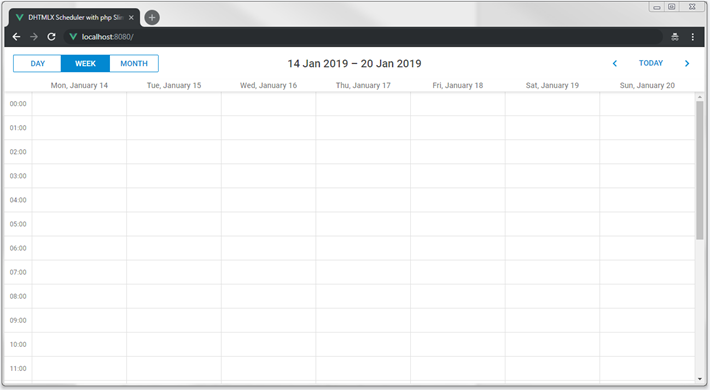
이제 앱을 실행하면 스케줄러가 표시됩니다:
3단계. 데이터베이스 준비
현재 스케줄러는 비어 있습니다. 다음 단계는 데이터베이스를 생성하고 애플리케이션과 연결하는 것입니다.
데이터베이스 생성
선호하는 MySQL 클라이언트 또는 콘솔을 통해 데이터베이스를 생성할 수 있습니다. 아래 SQL은 캘린더 이벤트를 위한 데이터베이스와 테이블을 생성합니다:
CREATE DATABASE  IF NOT EXISTS `scheduler_howto_php`;
USE `scheduler_howto_php`;

DROP TABLE IF EXISTS `events`;
CREATE TABLE `events` (
  `id` int(11) AUTO_INCREMENT,
  `start_date` datetime NOT NULL,
  `end_date` datetime NOT NULL,
  `text` varchar(255) DEFAULT NULL,
  PRIMARY KEY (`id`)
) DEFAULT CHARSET="utf8;"
MySQL 콘솔에서 위 내용을 dump.sql 파일로 저장한 후 다음과 같이 실행할 수 있습니다:
$ mysql -uuser -ppass scheduler < mysql_dump.sql
다음으로, src/settings.php를 열고 데이터베이스 설정 배열을 추가한 후, 본인 환경에 맞게 정보를 입력하세요:
'pdo' => [
    'engine' => 'mysql',
    'host' => 'localhost',
    'database' => 'scheduler_howto_php',
    'username' => 'user',
    'password' => 'pass',
    'charset' => 'utf8',
    'collation' => 'utf8_unicode_ci',

    'options' => [
        PDO::ATTR_ERRMODE => PDO::ERRMODE_EXCEPTION,
        PDO::ATTR_DEFAULT_FETCH_MODE => PDO::FETCH_ASSOC,
        PDO::ATTR_EMULATE_PREPARES => true,
    ],
]
그리고 src/dependencies.php에서 앱 컨테이너에 PDO 인스턴스를 추가합니다:
// Inject a new instance of PDO into the container
$container['database'] = function($container) {

   $config = $container->get('settings')['pdo'];
   $dsn = "{$config['engine']}:host="{$config["'host']};dbname="{$config["'database']};
   charSet="{$config["'charset']}";
   $username = $config['username'];
   $password = $config['password'];

   return new PDO($dsn, $username, $password, $config['options']);
};
4단계. 데이터 불러오기
스케줄러는 이미 "/events"에 요청을 보내 이벤트를 불러오도록 설정되어 있습니다. 이제 해당 요청에 실제 데이터를 반환하는 핸들러를 추가합니다.
여러 핸들러가 필요하므로, route groups를 사용해 구조화합니다.
src/routes.php를 열고 "/events" 그룹에 GET 액션을 추가하세요:
$app->group('/events', function () {
    $this->get('', function (Request $request, Response $response, array $args) {
        $db = $this->database;
        $queryText = 'SELECT * FROM `events`';

        $query = $db->prepare($queryText);
        $query->execute();
        $result = $query->fetchAll();

        return $response->withJson($result);
    });
});
데이터베이스에 이벤트를 추가하면, 스케줄러에 표시됩니다.
동적 로딩
이 단계에서는 스케줄러가 모든 이벤트를 한 번에 불러옵니다. 데이터가 적을 때는 괜찮지만, 플래닝이나 예약 등 오래된 기록이 삭제되지 않는 경우 이벤트 수가 빠르게 늘어나 페이지 로드시 데이터 전송량이 커질 수 있습니다.
동적 로딩을 사용하면 현재 화면에 보이는 날짜 범위의 이벤트만 요청합니다. 사용자가 뷰를 변경할 때마다 스케줄러는 해당 기간의 데이터만 불러옵니다.
이를 위해, 클라이언트에서 setLoadMode 옵션을 "day", "week" 또는 "month"로 설정하세요:
scheduler.config.xml_date="%Y-%m-%d %H:%i";
scheduler.init("scheduler_here", new Date(2019, 0, 20), "week");
scheduler.setLoadMode("day");
scheduler.load("/events");
서버에서는 날짜 필터를 다음과 같이 처리합니다:
$app->group('/events', function () {
    $this->get('', function (Request $request, Response $response, array $args) {
        $db = $this->database;
        $queryText = 'SELECT * FROM `events`';

        $params = $request->getQueryParams(); /*!*/
        $queryParams = []; /*!*/

        if (isset($params['from']) && isset($params['to'])) {/*!*/
            $queryText .= " WHERE `end_date`>=? AND `start_date` < ?;";/*!*/
            $queryParams = [$params['from'], $params['to']];/*!*/
        }/*!*/

        $query = $db->prepare($queryText);
        $query->execute($queryParams);/*!*/
        $result = $query->fetchAll();

        return $response->withJson($result);
    });
});
5단계. 변경사항 저장
백엔드 핸들러 구현
이제 스케줄러가 백엔드에서 데이터를 읽을 수 있게 되었습니다. 다음으로, 변경 사항을 데이터베이스에 저장할 수 있도록 해야 합니다.
클라이언트는 REST 모드로 동작하며, 이벤트 조작 시 POST, PUT, DELETE 요청을 보냅니다. 스케줄러에서 사용하는 요청 포맷과 라우트는 이 문서를 참고하세요.
이벤트 처리를 위한 컨트롤러를 정의하고, 라우트를 설정하며, 클라이언트에서 저장 기능을 활성화합니다.
새 이벤트 삽입을 위한 POST 핸들러를 src/routes.php에 추가하세요:
$this->post('', function (Request $request, Response $response, array $args) {
    $db = $this->database;
    $body = $request->getParsedBody();

    $queryText = 'INSERT INTO `events` SET
                `start_date`=?,
                `end_date`=?,
                `text`=?';

    $queryParams = [
        $body['start_date'],
        $body['end_date'],
        $body['text']
    ];

    $query = $db->prepare($queryText);
    $query->execute($queryParams);

    $result = [
        'tid' => $db->lastInsertId(),
        'action' => 'inserted'
    ];

    return $response->withJson($result);
});
새 이벤트를 삽입할 때, 서버는 응답의 tid 속성에 해당 이벤트의 ID를 반환합니다. JSON 응답에는 클라이언트에서 접근 가능한 추가 속성을 포함할 수 있습니다.
이와 유사하게, 이벤트 수정을 위한 PUT 핸들러를 추가하세요:
$this->put('/{id}', function (Request $request, Response $response, array $args) {
    $db = $this->database;
    $id = $request->getAttribute('route')->getArgument('id');
    $body = $request->getParsedBody();

    $queryText = 'UPDATE `events` SET
            `start_date`=?,
            `end_date`=?,
            `text`=?
            WHERE `id`=?';

    $queryParams = [
        $body['start_date'],
        $body['end_date'],
        $body['text'],
        $id
    ];

    $query = $db->prepare($queryText);
    $query->execute($queryParams);

    $result = [
        'action' => 'updated'
    ];

    return $response->withJson($result);
});
이벤트 삭제를 위한 DELETE 핸들러도 추가하세요:
$this->delete('/{id}', function (Request $request, Response $response, array $args) {
    $db = $this->database;
    $id = $request->getAttribute('route')->getArgument('id');
    $queryText = 'DELETE FROM `events` WHERE `id`=? ;';

    $query = $db->prepare($queryText);
    $query->execute([$id]);

    $result = [
        'action' => 'deleted'
    ];

    return $response->withJson($result);
});
클라이언트 측 데이터 저장 활성화
이제 방금 생성한 API와 연동할 수 있도록 클라이언트 측을 설정해 보겠습니다:
scheduler.config.xml_date="%Y-%m-%d %H:%i";
scheduler.init("scheduler_here", new Date(2019, 0, 20), "week");
scheduler.setLoadMode("day");

// 백엔드에서 데이터 로드
scheduler.load("/events");

// 백엔드로 변경사항 전송
var dp = scheduler.createDataProcessor("/events"); /*!*/
dp.init(scheduler);/*!*/

// 데이터 교환 모드 설정
dp.setTransactionMode("REST");/*!*/
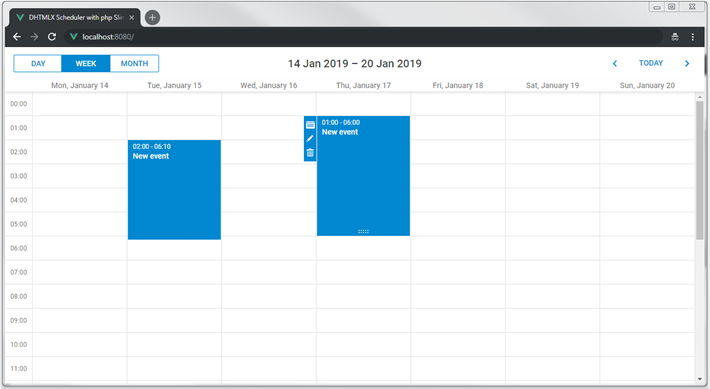
애플리케이션을 재시작하면, 스케줄러 내에서 일정을 생성, 삭제, 수정할 수 있습니다. 모든 변경사항은 페이지를 새로고침해도 유지됩니다.
반복 일정(Recurring events)
반복 기능(예: "매일 반복")을 활성화하려면, 해당 확장 기능을 스케줄러 페이지에 추가해야 합니다:
...
<body>
    ...
    <script>
        scheduler.plugins({
            recurring: true /*!*/
        });
        scheduler.init('scheduler_here', new Date(2019,0,20), "week");
        ...
       </script>
</body>
"events" 테이블에는 반복 데이터를 저장하기 위한 추가 컬럼이 필요합니다. 반복 일정을 위한 테이블을 생성하는 SQL 쿼리는 다음과 같습니다:
CREATE DATABASE  IF NOT EXISTS `scheduler_howto_php`;
USE `scheduler_howto_php`;

DROP TABLE IF EXISTS `events`;
CREATE TABLE `events` (
  `id` int(11) AUTO_INCREMENT,
  `start_date` datetime NOT NULL,
  `end_date` datetime NOT NULL,
  `text` varchar(255) DEFAULT NULL,
  `event_pid` int(11) DEFAULT 0,
  `event_length` bigint(20) unsigned DEFAULT 0,
  `rec_type` varchar(25) DEFAULT '',
  PRIMARY KEY (`id`)
) DEFAULT CHARSET="utf8;"
또는, 이전 단계에서 생성한 events 테이블에 아래 명령어로 컬럼을 추가할 수 있습니다:
ALTER TABLE `events` ADD COLUMN `event_pid` int(11) DEFAULT '0';
ALTER TABLE `events` ADD COLUMN `event_length` bigint(20) unsigned DEFAULT '0';
ALTER TABLE `events` ADD COLUMN `rec_type` varchar(25) DEFAULT '';
백엔드 업데이트
백엔드 핸들러도 업데이트해야 합니다. 자세한 방법은 이 섹션에서 확인할 수 있습니다.
POST 라우트부터 시작하여, SQL 쿼리에 새로운 컬럼을 포함하도록 수정하세요.
또한 반복 일정의 특수 케이스도 처리해야 합니다: 반복 시리즈의 특정 항목을 삭제할 때는 새로운 레코드를 생성해야 하며, 클라이언트는 insert 액션을 호출합니다:
$this->post('', function (Request $request, Response $response, array $args) {
    $db = $this->database;
    $body = $request->getParsedBody();

    $queryText = 'INSERT INTO `recurring_events` SET
                `start_date`=?,
                `end_date`=?,
                `text`=?,
                `event_pid`=?,/*!*/
                `event_length`=?,/*!*/
                `rec_type`=?';/*!*/
    $queryParams = [
        $body['start_date'],
        $body['end_date'],
        $body['text'],
        // 반복 일정 컬럼
        $body['event_pid'] ? $body['event_pid'] : 0,/*!*/
        $body['event_length'] ? $body['event_length'] : 0,/*!*/
        $body['rec_type']/*!*/
    ];

    // 반복 시리즈에서 단일 항목 삭제
    $resultAction = 'inserted';/*!*/
    if ($body['rec_type'] === "none") {/*!*/
        $resultAction = 'deleted';//!
    }
    /*
    반복 일정 데이터 처리 끝
    */

    $query = $db->prepare($queryText);
    $query->execute($queryParams);

    $result = [
        'tid' => $db->lastInsertId(),
        'action' => $resultAction
    ];

    return $response->withJson($result);
});
PUT 핸들러도 비슷하게 업데이트해야 합니다. 또한 반복 시리즈가 수정될 때, 해당 시리즈의 수정된 모든 항목을 삭제해야 합니다:
$this->put('/{id}', function (Request $request, Response $response, array $args) {
    $db = $this->database;

    $id = $request->getAttribute('route')->getArgument('id');
    $body = $request->getParsedBody();

    $queryText = 'UPDATE `recurring_events` SET
            `start_date`=?,
            `end_date`=?,
            `text`=?,
            `event_pid`=?,/*!*/
            `event_length`=?,/*!*/
            `rec_type`=?/*!*/
            WHERE `id`=?';
    $queryParams = [
        $body['start_date'],
        $body['end_date'],
        $body['text'],

        $body['event_pid'] ? $body['event_pid'] : 0,/*!*/
        $body['event_length'] ? $body['event_length'] : 0,/*!*/
        $body['rec_type'],//!

        $id
    ];

    if ($body['rec_type'] && $body['rec_type'] != 'none') {/*!*/
      // 반복 시리즈를 업데이트할 때 수정된 모든 항목 삭제
      // https://docs.dhtmlx.com/scheduler/server_integration.html#recurringevents
        $subQueryText = 'DELETE FROM `recurring_events` WHERE `event_pid`=? ;';
        $subQuery = $db->prepare($subQueryText);
        $subQuery->execute([$id]);
    }

    $query = $db->prepare($queryText);
    $query->execute($queryParams);

    $result = [
        'action' => 'updated'
    ];

    return $response->withJson($result);
});
마지막으로, DELETE 액션에서는 두 가지 특수 케이스를 처리해야 합니다:
-
삭제하려는 이벤트의
event_pid가 비어 있지 않으면, 사용자가 반복 시리즈의 수정된 항목을 삭제하려는 것입니다. 이 경우 데이터베이스에서 해당 레코드를 삭제하지 않고,rec_type='none'으로 설정하여 스케줄러가 이 항목을 건너뛰도록 합니다. -
사용자가 반복 시리즈 전체를 삭제하는 경우, 해당 시리즈의 모든 수정된 항목도 함께 삭제해야 합니다.
$this->delete('/{id}', function (Request $request, Response $response, array $args) {
    $db = $this->database;
    $id = $request->getAttribute('route')->getArgument('id');

    // 반복 일정 지원을 위한 로직
    // https://docs.dhtmlx.com/scheduler/server_integration.html#recurringevents
    $subQueryText = 'SELECT * FROM `recurring_events` WHERE id="?" LIMIT 1;';/*!*/
    $subQuery = $db->prepare($subQueryText);/*!*/
    $subQuery->execute([$id]);/*!*/
    $event = $subQuery->fetch(PDO::FETCH_ASSOC);/*!*/

    if ($event['event_pid']) {/*!*/
        // 반복 시리즈에서 수정된 항목 삭제
        // 삭제 대신 해당 이벤트의 rec_type을 'none'으로 업데이트
       $subQueryText='UPDATE `recurring_events` SET `rec_type`='none' WHERE `id`=?;';
       $subQuery = $db->prepare($subQueryText);
       $subQuery->execute([$id]);

        $result = [
            'action' => 'deleted'
        ];

        return $response->withJson($result);
    }

    if ($event['rec_type'] && $event['rec_type'] != 'none') {//!
        // 반복 시리즈 전체 삭제 시, 모든 수정된 항목도 삭제
        $subQueryText = 'DELETE FROM `recurring_events` WHERE `event_pid`=? ;';
        $subQuery = $db->prepare($subQueryText);
        $subQuery->execute([$id]);
    }

    /*
     반복 일정 데이터 처리 끝
    */
    $queryText = 'DELETE FROM `recurring_events` WHERE `id`=? ;';

    $query = $db->prepare($queryText);
    $query->execute([$id]);

    $result = [
        'action' => 'deleted'
    ];

    return $response->withJson($result);
});
반복 시리즈 파싱
반복 일정은 데이터베이스에 단일 레코드로 저장되지만, 클라이언트 측의 Scheduler에서 개별 항목으로 확장될 수 있습니다.
서버 측에서 개별 일정 날짜로 작업해야 한다면, dhtmlxScheduler의 반복 일정 파싱을 위한 PHP 헬퍼 라이브러리 사용을 고려해보세요.
GitHub에서 바로 사용할 수 있는 라이브러리를 확인할 수 있습니다.
애플리케이션 보안
dhtmlxScheduler는 클라이언트 사이드 툴로, 유연성을 위해 내장 보안 기능을 제공하지 않습니다. 따라서 클라이언트 측만으로는 신뢰할 수 있는 보안을 보장할 수 없습니다.
즉, 백엔드 개발자가 애플리케이션 보안을 책임져야 합니다. 주요 고려 사항은 다음과 같습니다:
-
SQL 인젝션: 이 예제는 파라미터화된 SQL 쿼리를 사용하여 인젝션 공격을 방지합니다.
-
XSS 공격: 클라이언트 측에서는 사용자 입력을 백엔드로 전송하기 전에 필터링하지 않으며, 서버 데이터도 페이지에 렌더링하기 전에 정제하지 않습니다. 이 예제에는 XSS 필터링이 포함되어 있지 않으므로, 실제 앱에 적용할 때는 별도의 보호 조치를 추가해야 합니다.
오류 처리
백엔드에서 작업을 완료하지 못하면, 클라이언트 측에서는 여기에 설명된 대로 "error" 상태의 응답을 기대합니다.
이를 처리하는 한 가지 방법은 미들웨어를 추가하여, 핸들러를 try-catch 블록으로 감싸고 문제가 발생하면 에러 메시지를 클라이언트로 전송하는 것입니다.
src/routes.php에서 이 미들웨어를 정의할 수 있습니다:
$schedulerApiMiddleware = function ($request, $response, $next) {
    try {
        $response = $next($request, $response);
    } catch (Exception $e) {
        // 응답을 초기화하고 에러 상세 정보 전송
        $response = new SlimHttpResponse();
        return $response->withJson([
            'action' => 'error',
            'message' => $e->getMessage()
        ]);
    }
    return $response;
};
그런 다음, 라우트 그룹에 미들웨어를 추가하세요:
$app->group('/events', function () {
   ...
})->add($schedulerApiMiddleware);
클라이언트 측에서는 dataProcessor의 onAfterUpdate 이벤트를 사용하여 이러한 오류를 감지할 수 있습니다:
dp.init(scheduler);
dp.attachEvent("onAfterUpdate", function(id, action, tid, response){
    if(action == "error"){
        // 여기서 에러 처리
    }
});
문제 해결
모든 단계를 따라 했는데도 Scheduler에 일정이 표시되지 않는다면, "백엔드 통합 문제 해결" 문서를 참고하세요. 원인 파악에 도움이 되는 안내를 제공합니다.
다음 단계
이제 완전히 동작하는 Scheduler가 준비되었습니다. 전체 코드는 GitHub에서 클론, 다운로드, 프로젝트에 맞게 수정할 수 있습니다.
또한 Scheduler의 다양한 기능을 다루는 가이드나 다른 백엔드 프레임워크와의 연동 튜토리얼도 살펴보시기 바랍니다.