Tooltips (v6.0)
The article refers to dhtmlxScheduler 6.0 or earlier versions. If you use dhtmlxScheduler 7.0+, see details here.
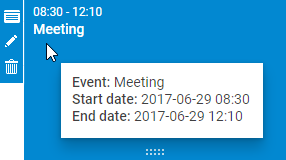
To display tooltips for events, you should activate the Tooltip extension once on the page.
scheduler.plugins({
    tooltip: true
});
After that tooltips will be displayed with the default settings.
To configure tooltips, you have the following API:
Methods
- hide() - hides the tooltip
- show(event,text) - shows the tooltip at the browser event location with a specified content. The method takes two parameters:
- event - browser event
- text - tooltip content, will be added to innerHTML of the tooltip element
tooltip.hide();
tooltip.show(event, text);
Configuration properties
- className - the name of the CSS class that will be applied to tooltips
- timeout_to_display - the delay in milliseconds, before tooltip is displayed for an event (by default, 50)
- timeout_to_hide - the delay in milliseconds, before the tooltip hides (by default, 50)
- delta_x - the right (if positive) offset of the cursor position (by default, 15)
- delta_y - the top (if positive) offset of the cursor position (by default, -20)
scheduler.config.className = 'dhtmlXTooltip tooltip';
scheduler.config.timeout_to_display = 50;
scheduler.config.timeout_to_hide = 50;
scheduler.config.delta_x = 15;
scheduler.config.delta_y = -20;
Templates
- tooltip_text - specifies the text of tooltips
- tooltip_date_format - specifies the format of start and end dates displayed in the tooltip
var format = scheduler.date.date_to_str("%Y-%m-%d %H:%i");
scheduler.templates.tooltip_text = function(start,end,event) {
    return "<b>Event:</b> "+event.text+"

<b>Start date:</b> "+
    format(start)+"

<b>End date:</b> "+format(end);
};
Need help?
Got a question about the documentation? Reach out to our technical support team for help and guidance. For custom component solutions, visit the Services page.