Контрол Template
Это контейнер, который содержит некоторый HTML-контент внутри.
gantt.config.lightbox.sections = [
{name:"description", height:38, map_to:"text", type:"textarea", focus:true},
{name:"template", height:16, type:"template", map_to:"my_template"}, /*!*/
{name:"time", height:72, type:"duration", map_to:"auto"}
];
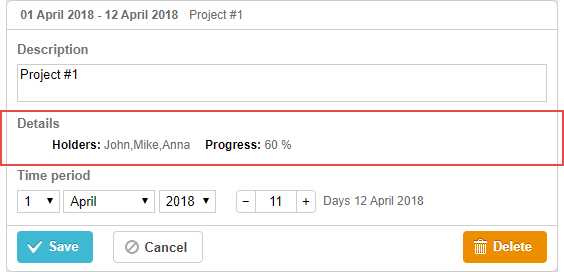
gantt.locale.labels.section_template = "Details";
gantt.attachEvent("onBeforeLightbox", function(id) {
var task = gantt.getTask(id);
task.my_template = "<span id='title1'>Holders: </span>"+ task.users
+"<span id='title2'>Progress: </span>"+ task.progress*100 +" %";
return true;
});
Инициализация
Чтобы добавить контрол template в лайтбокс, выполните следующие действия:
- Добавьте секцию в конфигурацию лайтбокса:
gantt.config.lightbox.sections = [
    {name:"description", height:38, map_to:"text", type:"textarea", focus:true},
    {name:"template", height:16, type:"template", map_to:"my_template"}, /*!*/
    {name:"time", height:72, type:"duration", map_to:"auto"}
];
- Задайте метку для секции:
gantt.locale.labels.section_template = "Details";
- Заполните содержимое контрола с помощью события, например, события onBeforeLightbox:
gantt.attachEvent("onBeforeLightbox", function(id) {
      var task = gantt.getTask(id);
       task.my_template = "<span id='title1'>Holders: </span>"+ task.users
    +"<span id='title2'>Progress: </span>"+ task.progress*100 +" %";
    return true;
});
Свойства
Ниже приведены основные свойства, часто используемые с контролом template (полный список смотрите здесь):
- name - (string) задаёт имя секции
- height - (number) устанавливает высоту секции
- map_to - (string) свойство данных, к которому привязана секция
- type - (string) определяет тип контрола секции
- focus - (boolean) если установлено в true, секция получает фокус при открытии лайтбокса
Need help?
Got a question about the documentation? Reach out to our technical support team for help and guidance. For custom component solutions, visit the Services page.