미니 캘린더(날짜 선택기)
미니 캘린더(날짜 선택기)는 HTML 컨테이너 안에 컴팩트한 월간 뷰를 표시할 수 있는 편리한 확장 기능입니다.
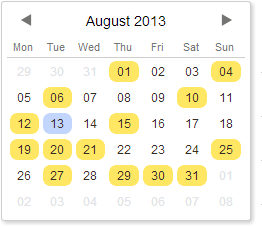
Related sample: Mini calendar without the scheduler
앱에 미니 캘린더를 포함하려면, 페이지에 minical 확장 기능을 추가해야 합니다.
헤더에 추가하기
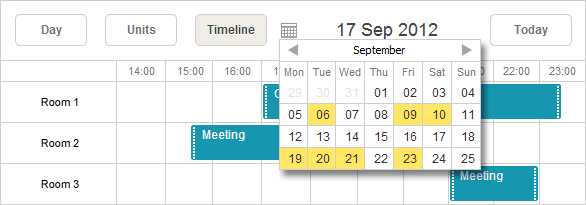
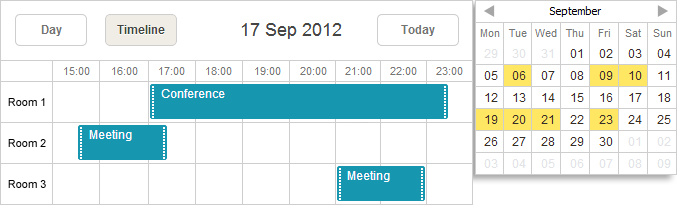
스케줄러의 헤더에 미니 캘린더(날짜 선택기)를 추가하려면 다음 단계를 따르세요(아래 이미지 참고):
- 확장 파일을 페이지에 포함하세요:
scheduler.plugins({
    minical: true
});
- 미니 캘린더의 컨테이너를 정의하고 스케줄러 마크업에 추가하세요:
<div class="dhx_cal_navline"> ... <div class="dhx_cal_date"></div> <div class="dhx_minical_icon" id="dhx_minical_icon" onclick="show_minical()"> </div> </div>
- 미니 캘린더를 초기화(renderCalendar 메서드 사용) 및 제거(destroyCalendar 메서드 사용)하는 로직을 구현하세요:
function show_minical(){
    if (scheduler.isCalendarVisible()){
        scheduler.destroyCalendar();
    } else {
        scheduler.renderCalendar({
            position:"dhx_minical_icon",
            date:scheduler._date,
            navigation:true,
            handler:function(date,calendar){
                scheduler.setCurrentView(date);
                scheduler.destroyCalendar()
            }
        });
    }
}
Related sample: Mini calendar in the scheduler header
헤더에 추가하기 (서드파티 날짜 선택기)
이 섹션에서는 서드파티 미니 캘린더(날짜 선택기)를 스케줄러 헤더에 통합하는 방법을 설명합니다.
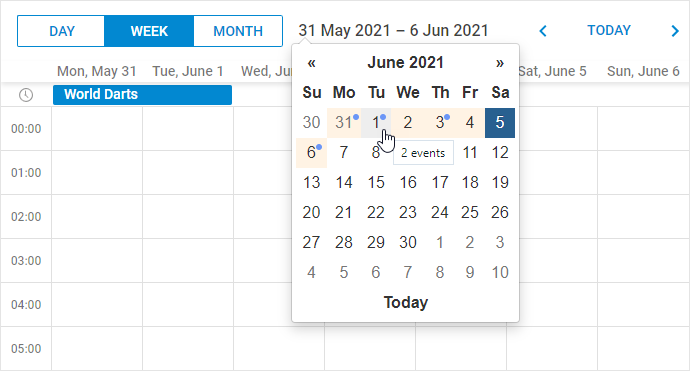
Related sample: 3rd party Mini Calendar in the header
예제에서는 jQuery와 Bootstrap Datepicker를 사용해 미니 캘린더를 추가합니다. 다른 라이브러리를 사용할 경우 코드를 적절히 조정해야 하지만, 전체적인 접근 방식은 비슷합니다.
1. 캘린더 헤더 클릭 시 날짜 선택기 표시
먼저, 스케줄러 헤더 안에 미니 캘린더(또는 다른 컨트롤)를 위한 DIV 컨테이너를 정의하세요. 마크업 초기화 방법을 사용할 경우 다음과 같이 작성합니다:
<div id="scheduler_here" class="dhx_cal_container" style="width:100%; height:100%;">
<div class="dhx_cal_navline">
<div class="dhx_cal_prev_button"> </div>
<div class="dhx_cal_next_button"> </div>
<div class="dhx_cal_today_button"></div>
<div class="dhx_cal_date"></div>
<!--- HERE -->
<div class="input-group date" style="display: none;">
<input type="text" class="form-control">
<div class="dhx_minical_icon input-group-addon" id="dhx_minical_icon"> </div>
</div>
<!--- end HERE -->
헤더 설정을 사용할 경우, 커스텀 요소를 다음과 같이 추가하세요:
scheduler.config.header = [
"day",
"week",
"month",
{html:'<div class="input-group date" style="display: none;">'+
'<input type="text" class="form-control">'+
'<div class="dhx_minical_icon input-group-addon" id="dhx_minical_icon"> </div>'+
'</div>'},
"date",
"prev",
"today",
"next"
];
scheduler.init("scheduler_here");
다음으로, 스케줄러가 준비된 후 네비게이션 패널의 날짜를 클릭하면 날짜 선택기가 표시되도록 클릭 이벤트를 설정하세요:
scheduler.attachEvent("onSchedulerReady", function(){

    const $node = $('#scheduler_here .input-group.date').datepicker({
        autoclose: true,
        todayHighlight: true,
        todayBtn: "linked",
    });

    $("#scheduler_here").delegate(".dhx_cal_date", "click", function () {
        $node.datepicker("show");
    });

    $node.datepicker().on("show", function () {
        $node.datepicker("update", scheduler.getState().date);

        // center popup below date label
        centerDatepicker($(".dhx_cal_date"));
    });
    ...

});
centerDatepicker 함수는 드롭다운 날짜 선택기를 올바르게 위치시키는 데 사용됩니다:
    ...
    function centerDatepicker(referenceElement) {

        if (!$('.datepicker-dropdown').is(':visible')) {
            return;
        }
        // center popup below date label
        var offset = $(".dhx_cal_date").offset();
        var width = $(".dhx_cal_date").width();
        var popupWidth = $(".datepicker-dropdown").width();
        $(".datepicker-dropdown").css({
            top: offset.bottom + "px",
            left: (width - popupWidth) / 2 + "px"
        });
    }
2. 사용자가 날짜를 선택하면 스케줄러의 현재 날짜를 업데이트
날짜 선택기를 표시한 후, 날짜를 선택하면 스케줄러의 날짜를 업데이트하세요:
    $node.datepicker().on("changeDate", function () {
        scheduler.setCurrentView($node.datepicker("getDate"));
    });
3. 스케줄러에 표시 중인 날짜를 날짜 선택기에서 강조 표시
스케줄러에 현재 표시 중인 날짜를 강조하려면 간단한 CSS 클래스를 적용하세요:
.datepicker table .scheduler-date{
    background-color: #fff3e4;
}
스케줄러에 보이는 모든 날짜 셀에 이 클래스를 추가합니다:
    function fillDatepicker(scheduler) {
        // reset highlighted events and active dates
        ...
        $(".datepicker-dropdown").find("[data-date]").removeClass("scheduler-date");

        // highlight scheduler date
        var visibleDates = getVisibleDates(scheduler);
        visibleDates.forEach(function (date) {
            $(".datepicker-dropdown").find(
                "[data-date='" + date + "']"
            ).addClass("scheduler-date");
        });
        ...
    }
현재 보이는 날짜를 가져오려면 scheduler.getState를 사용하세요:
    function getVisibleDates(scheduler) {
        var minVisible = scheduler.getState().min_date;
        var maxVisible = scheduler.getState().max_date;

        var current = minVisible;
        var result = [];
        while (current.valueOf() < maxVisible.valueOf()) {
            var currentUTC = Date.UTC(
                current.getFullYear(),current.getMonth(),current.getDate()
            );
            result.push(currentUTC.valueOf());

            current = scheduler.date.add(current, 1, "day");
        }
        return result;
    }
4. 날짜 선택기에서 이벤트가 있는 날짜 표시
스케줄러에서 이벤트가 있는 날짜를 강조하려면 또 다른 CSS 클래스를 추가하세요:
.datepicker table .has-event::after {
    content: " ";
    width: 6px;
    height: 6px;
    position: absolute;
    background-color: #6b96f7;
    border-radius: 4px;
}
이렇게 하면 미니 캘린더에서 이벤트가 있는 날짜가 강조 표시됩니다.
날짜 위에 마우스를 올릴 때 해당 날짜의 이벤트 개수를 툴팁으로 표시하려면, 날짜 선택기에 현재 표시 중인 월의 이벤트를 가져오세요:
    function getVisibleEvents(calendarDate, scheduler) {
        var min = scheduler.date.month_start(new Date(calendarDate));
        var max = scheduler.date.add(calendarDate, 1, "month");
        min = scheduler.date.week_start(min);
        if(scheduler.date.week_start(new Date(max)) < max){
            max = scheduler.date.week_start(new Date(max));
            max = scheduler.date.add(max, 1, "week");
        }
        var events = scheduler.getEvents(min, max);
        var days = {};

        events.forEach(function (event) {
            var eventDate = event.start_date;
            while(eventDate < event.end_date){
                var day = Date.UTC(
                    eventDate.getFullYear(),
                    eventDate.getMonth(),
                    eventDate.getDate()
                );

            if (!days[day.valueOf()]) {
                    days[day.valueOf()] = 0;
                }
                days[day.valueOf()]++;
                eventDate = scheduler.date.add(eventDate, 1, "day");
                eventDate = scheduler.date.day_start(eventDate);
            }
        });

        var result = [];
        for (var i in days) {
            result.push({ timestamp: i, count: days[i] });
        }
        return result;
    }
이 방법은 스케줄러에서 이벤트 데이터를 가져오기 때문에, 현재 로드된 이벤트만 강조 표시됩니다. 앱에서 동적 로딩을 사용하는 경우, 일부 이벤트만 로드되므로 모든 이벤트가 표시되지 않을 수 있습니다.
대안으로 서버에서 이벤트 데이터를 요청할 수 있습니다.
이벤트 타임스탬프와 개수를 얻은 후, 날짜 선택기를 다음과 같이 업데이트할 수 있습니다:
    function fillDatepicker(scheduler) {
        // reset highlighted events and active dates
        $(".datepicker-dropdown").find("[data-date]").removeClass("has-event");
        $(".datepicker-dropdown").find("[data-date]").removeAttr("title");
        ...

        // highlight events
        const eventCells = getVisibleEvents($node.datepicker("getDate"), scheduler);
        eventCells.forEach(function (cellEvents) {
            $(".datepicker-dropdown").find(
                "[data-date='" + cellEvents.timestamp + "']"
            ).addClass("has-event");
            $(".datepicker-dropdown").find(
                "[data-date='" + cellEvents.timestamp + "']"
            ).attr("title", cellEvents.count + " events");
        });
    }
5. 표시된 날짜 레이블을 스케줄러의 활성 날짜와 동기화
마지막으로, 창 크기가 변경될 때 날짜 선택기를 다시 중앙에 위치시키고, 사용자가 날짜 선택기에서 날짜를 변경할 때 강조 표시를 업데이트하세요:
    $(window).on('resize', function () {
        setTimeout(function(){
            centerDatepicker($(".dhx_cal_date"));
        }, 10);
    });
    $node.datepicker().on("changeDate", function () {
        scheduler.setCurrentView($node.datepicker("getDate"));
    });
    $node.datepicker().on("changeMonth", function () {
        refreshDatepicker(scheduler);
    });
    $node.datepicker().on("changeYear", function () {
        refreshDatepicker(scheduler);
    });
    $node.datepicker().on("changeDecade", function () {
        refreshDatepicker(scheduler);
    });
    $node.datepicker().on("changeCentury", function () {
        refreshDatepicker(scheduler);
    });
    function refreshDatepicker(scheduler) {
        // call from timeout so code fires after the datepicker popup is updated
        setTimeout(function () {
            fillDatepicker(scheduler);
        });
    }
스케줄러의 활성 날짜를 별도의 요소에 표시하는 경우, onViewChange 이벤트를 감지하여 해당 레이블을 업데이트하세요:
scheduler.attachEvent("onViewChange", function (newMode , newDate){
    const state = scheduler.getState();
    const minDate = state.min_date;
    const maxDate = state.max_date;
    const dateToStr = scheduler.date.str_to_date("%d-%m-%Y");

    $(dateHeader).html(dateToStr(minDate) + " - " + dateToStr(minDate));
});
이 핸들러는 샘플 코드에서는 사용되지 않습니다. 내장된 날짜 헤더가 자동으로 업데이트되기 때문입니다. 기본 날짜 헤더를 숨기는 경우나, 활성 날짜를 여러 곳에 표시하고 싶을 때만 사용하세요.
라이트박스에서 사용하기
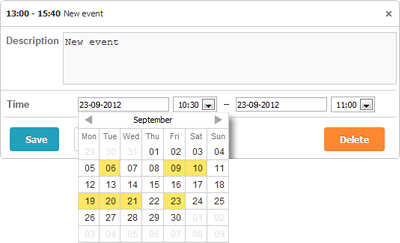
미니 캘린더(날짜 선택기)는 라이트박스 안에서 "시작" 및 "종료" 날짜를 선택하는 데에도 사용할 수 있습니다.
라이트박스에 미니 캘린더를 추가하려면 다음 단계를 따르세요:
- 페이지에서 확장 기능을 활성화하세요:
scheduler.plugins({
    minical: true
});
- time 섹션의 type을 calendar_time으로 변경하세요:
//기본 라이트박스 정의
scheduler.config.lightbox.sections=[
  {name:"description", height:200, map_to:"text", type:"textarea", focus:true},
  {name:"time", height:72, type:"time", map_to:"auto"}
];
//type:"time" -> type:"calendar_time"으로 변경
scheduler.config.lightbox.sections = [
  {name:"description", height:200, map_to:"text", type:"textarea", focus:true},
  {name:"time", height:72, type:"calendar_time", map_to:"auto" }
];
Related sample: Mini calendar in the lightbox
스케줄러 외부에서 사용하기
미니 캘린더(날짜 선택기)는 페이지 어디에나 배치할 수 있습니다.
스케줄러 외부의 HTML 컨테이너에 미니 캘린더를 추가하려면 다음 단계를 따르세요:
- 페이지에서 확장 기능을 활성화하세요:
scheduler.plugins({
    minical: true
});
- 페이지에 미니 캘린더 컨테이너를 정의하세요:
<div id="scheduler_here" class="dhx_cal_container" ...>
...
</div>

<div style='float: left; padding:10px;'>
        <div id="cal_here" style='width:250px;'></div>
</div>
- renderCalendar 메서드를 호출해 미니 캘린더를 렌더링하세요:
const calendar = scheduler.renderCalendar({
    container:"cal_here",
    navigation:true,
    handler:function(date){
        scheduler.setCurrentView(date, scheduler._mode);
    }
});
Related sample: Mini calendar outside the scheduler
템플릿 및 스타일
템플릿
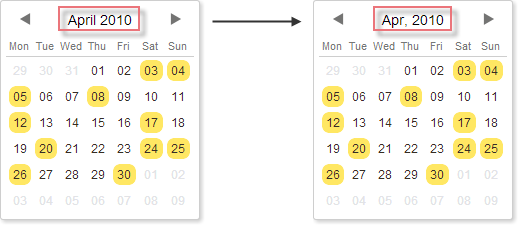
mini calendar(날짜 선택기)에서 날짜가 표시되는 방식을 쉽게 변경하려면 Mini Calendar Templates 문서에서 설명된 다양한 템플릿을 사용할 수 있습니다.
scheduler.templates.calendar_month = scheduler.date.date_to_str("%M, %Y");
scheduler.init('scheduler_here',new Date(2019,2,1),"day");
...
const calendar = scheduler.renderCalendar({..});
CSS 클래스
mini calendar(날짜 선택기)에서 날짜의 표시 방식을 조정하려면 아래 CSS 클래스를 오버라이드할 수 있습니다:
| CSS class | 적용 대상 |
|---|---|
| .dhx_cal_container.dhx_mini_calendar .dhx_month_head | 하루의 셀 |
| .dhx_cal_container.dhx_mini_calendar .dhx_month_head.dhx_year_event | 이벤트가 할당된 하루의 셀 |
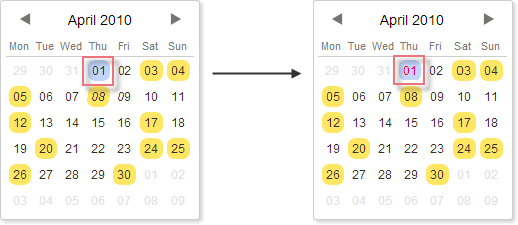
| .dhx_cal_container.dhx_mini_calendar .dhx_now .dhx_month_head | 현재 날짜에 해당하는 셀 |
| .dhx_cal_container.dhx_mini_calendar .dhx_calendar_click | 현재 활성화된 날짜의 셀 |
<style>
.dhx_cal_container.dhx_mini_calendar .dhx_calendar_click{
    color:red;
}
</style>
<script>
    const calendar = scheduler.renderCalendar({...});
</script>
markCalendar() 메서드로 날짜 표시하기
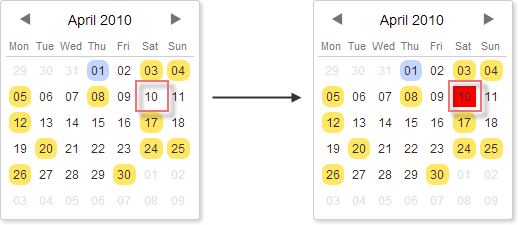
특정 날짜에 CSS 클래스를 지정하려면 markCalendar 메서드를 사용할 수 있습니다:
<style>
.my_style{
    background: red !important;
}
</style>
<script>
    const calendar = scheduler.renderCalendar({...});
    ...
    scheduler.markCalendar(calendar, new Date(2019,3,1), "my_style");
</script>
API
| destroyCalendar | 이전에 생성된 mini-calendar를 제거합니다 |
| isCalendarVisible | mini-calendar가 현재 스케줄러에 열려 있는지 확인합니다 |
| linkCalendar | 스케줄러의 활성 날짜가 변경될 때 mini calendar의 활성 날짜도 함께 갱신되도록 합니다 |
| markCalendar | 특정 날짜에 CSS 클래스를 적용합니다 |
| renderCalendar | mini calendar를 생성합니다 |
| unmarkCalendar | 특정 날짜에서 CSS 클래스를 제거합니다 |
| updateCalendar | mini calendar에서 지정한 날짜를 표시합니다 |
이벤트 처리
mini calendar는 사용자가 월을 변경하거나, 날짜에 마우스를 올리거나, 날짜를 클릭하는 등 일반적인 상호작용에 대한 콜백을 지원합니다. 이러한 콜백은 설정 객체의 events 속성에서 지정할 수 있습니다:
const dateToStr = (date) => date ? scheduler.templates.format_date(date) : null;
const calendar = scheduler.renderCalendar({
    container: "cal_here",
    navigation: true,
    events: {
        onBeforeMonthChange: function(oldDate, newDate) {
            scheduler.message(`Before change from ${dateToStr(oldDate)}
                to ${dateToStr(newDate)}`);
            return true;
        },
        onMonthChange: function(oldDate, newDate) {
            scheduler.message(`Changed from ${dateToStr(oldDate)}
                to ${dateToStr(newDate)}`);
        },
        onDateClick: function(date, e) {
            scheduler.setCurrentView(date);
            scheduler.message(`Selected date ${dateToStr(date)}`);
        },
        onDateMouseOver: function(date, e){
            scheduler.message(`Mouse over ${dateToStr(date)}`)

        }
    }
});