Combo
이 섹션에서는 DHTMLX Combo component에서 제공하는 콤보 박스에 대해 설명합니다.
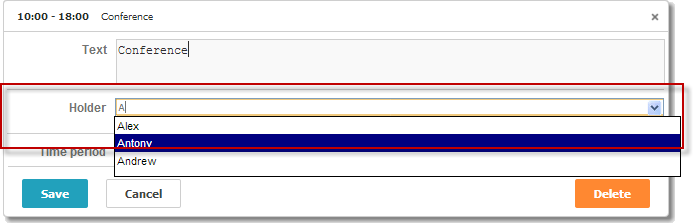
var holders = [
    { key: 1, label: 'James' },
    { key: 2, label: 'Alex' },
    { key: 3, label: 'Antony' },
    { key: 4, label: 'Andrew' }
];

scheduler.locale.labels.section_holder = "Holder";

scheduler.config.lightbox.sections = [
    { name:"description", height:50, map_to:"text", type:"textarea", focus:true },
    { name:"holders", options:holders, map_to:"holders", type:"combo",
    image_path:"../common/dhtmlxCombo/imgs/", height:30, filtering:true},
    { name:"time", height:72, type:"time", map_to:"auto"}
];
Related sample: Combo box in the lightbox
초기화
라이트박스에 Combo 컨트롤을 추가하려면 다음 단계를 따르세요:
- dhtmlxCombo 파일 포함:
<script src="../codebase/dhtmlxscheduler.js" ...></script>
<link rel="stylesheet" href="../codebase/dhtmlxscheduler.css" ...>

<link rel="stylesheet" href="common/dhtmlxCombo/dhtmlxcombo.css" ..>
<script src="common/dhtmlxCombo/dhtmlxcombo.js" ...></script>
- 페이지에서 editors 확장 기능 활성화:
scheduler.plugins({
    editors: true
});
- 라이트박스 구성에 섹션 추가:
scheduler.config.lightbox.sections = [
    { name:"description", ... },
    { name:"holders", options:holders, map_to:"holders", type:"combo",
    image_path:"../common/dhtmlxCombo/imgs/", height:30, filtering:true},
    { name:"time", ...}
];
- 섹션의 라벨 설정:
scheduler.locale.labels.section_holders = "Holder";
Related sample: Combo box in the lightbox
속성
'combo' 컨트롤에서 자주 사용되는 주요 속성은 아래와 같습니다. (전체 목록은 여기에서 확인할 수 있습니다):
| name | (string) 섹션의 이름 |
| height | (number) 섹션의 높이 |
| map_to | (string) 섹션과 매핑될 데이터 속성의 이름 |
| type | (textarea,time,select,template,multiselect,radio,checkbox,combo) 섹션 컨트롤의 타입 |
| options | (array of objects) 컨트롤의 선택 옵션을 정의합니다 ('select', 'multiselect', 'radio', 'combo' 컨트롤에 사용). 배열의 각 객체는 하나의 옵션을 나타내며, 다음 속성을 가집니다:
|
| image_path | (string) dhtmlxCombo 이미지의 경로 |
| filtering | (boolean, string) 자동 필터링 지원을 활성화합니다(입력 시 옵션이 필터링됨). 선택 사항 이 파라미터는 다음 값 중 하나를 가질 수 있습니다:
|
| script_path | (string) 서버에서 콤보 옵션을 제공하는 서버 스크립트의 경로. 선택 사항 |
| cache | (boolean) 스크립트 응답의 캐시 사용 여부(활성화 권장). 선택 사항 |
컨트롤에 데이터 채우기
Combo 컨트롤에 값을 제공하려면 options 파라미터를 사용하세요:
scheduler.config.lightbox.sections =
    {
        name:"holders", type:"combo",
        ...
        options:[
            { key: 1, label: 'James' },
            { key: 2, label: 'Alex' },
            { key: 3, label: 'Antony' },
            { key: 4, label: 'Andrew' }
    ]},
    ...
];
options 파라미터의 각 항목은 두 가지 필수 속성을 가져야 합니다:
- key - 옵션의 id
- label - 옵션의 라벨
서버에서 데이터로 컨트롤 채우기
Combo 옵션을 서버에서 불러오려면 script_path 속성을 사용하여 요청을 처리하는 서버 스크립트의 URL을 지정하세요.
scheduler.config.lightbox.sections = [
    { name: "country", type: "combo", script_path: "data/combo_select", ... },
        ...
];
script_path 속성은 콤보가 AJAX를 통해 옵션을 불러올 URL을 정의합니다.
콤보 선택기는 dhtmlxCombo를 기반으로 하므로, 서버는 호환되는 형식으로 데이터를 반환해야 합니다. 콤보에 데이터를 추가하는 방법에 대한 자세한 내용은 Loading Options 문서를 참고하세요.
두 가지 시나리오에서 요청이 발생합니다:
1) 라이트박스가 열리고 콤보에 선택된 값이 있을 때, 컨트롤은 해당 옵션의 라벨을 불러오기 위해 요청을 보냅니다.
요청에는 id 쿼리 파라미터가 포함됩니다:
GET /url?id=1
응답은 지정된 id를 가진 항목만 포함하는 배열이어야 하며, 다음과 같이 포맷됩니다:
[
   { "value": 1, "text": "Marketing"}
]
2) 사용자가 콤보 입력란에 타이핑을 시작하면, 컨트롤은 필터링된 옵션을 불러옵니다.
요청에는 입력한 텍스트가 mask 쿼리 파라미터로 포함됩니다:
GET /url?mask=al
서버는 mask와 일치하는 모든 항목을 반환해야 합니다:
[
   { "value": 1, "text": "Albania"},
   { "value": 3, "text": "Algeria"},
]
PHP Connector 라이브러리를 사용하는 경우, 서버 측 코드는 다음과 같을 수 있습니다:
<?php
    require_once('../../connector-php/codebase/combo_connector.php');
    require_once("../common/config.php");

    $combo = new ComboConnector($res, $dbtype);

    $combo->event->attach("beforeFilter", "by_id");
    function by_id($filter) {
        if (isset($_GET['id']))
            $filter->add("item_id", $_GET['id'], '=');
    }

    $combo->dynamic_loading(3);
    $combo->render_table("Countries","item_id","item_nm");

?>
Related sample: Populating a combo box from the server
자동 필터링 모드
자동 필터링 모드는 사용자가 입력할 때 옵션이 자동으로 필터링되는 기능입니다. 이 모드를 활성화하려면 filtering 속성을 true로 설정하세요:
scheduler.config.lightbox.sections = [
    { name:"holders", type:"combo", filtering:true, ... },
    ...
];
자동 필터링은 데이터가 클라이언트 또는 서버에서 불러와지는 방식과 관계없이 사용할 수 있습니다.
더 자세한 내용은 dhtmlxCombo의 Filtering 문서를 참고하세요.
맨 위로