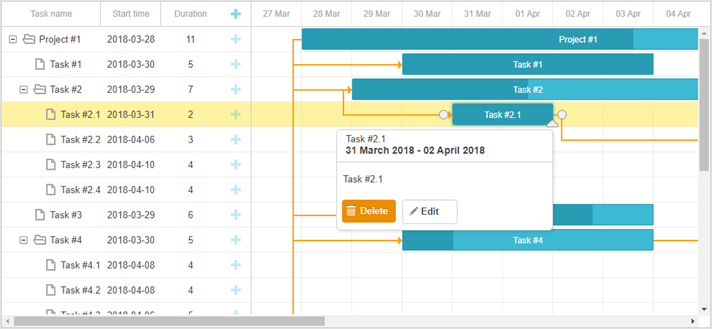
퀵 인포 (터치 지원)
이 라이브러리에는 Quick Info 확장 기능이 포함되어 있어, 사용자가 화면에서 작업을 탭하면 작업 세부정보가 팝업��으로 표시됩니다.
이 확장 기능을 시작하려면, gantt.plugins 메서드를 사용하여 "Quick Info" 플러그인을 활성화하세요.
gantt.plugins({
    quick_info: true
});
quick_info 확장 기능을 비활성화하려면, show_quick_info 속성을 false로 설정하세요:
gantt.config.show_quick_info = false;
gantt.init("gantt_here");
API 개요
Quick Info 확장 기능은 설정을 조정하거나 동작을 제어하거나 팝업의 모양을 사용자 정의할 수 있는 다양한 API를 제공�합니다.
gantt.ext.quickInfo 객체의 API 또는 아래에 나열된 공개 dhtmlxGantt API를 사용할 수 있습니다:
메서드
- showQuickInfo - 특정 작업에 대한 팝업 작업 폼을 엽니다
- hideQuickInfo - 팝업 작업 폼을 닫습니다 (열려있는 경우)
이벤트
- onQuickInfo - 팝업 편집 폼이 나타날 때 트리거됩니다
- onAfterQuickInfo - 팝업 편집 폼이 닫힌 후 트리거됩니다
속성
- quick_info_detached - 작업 폼이 선택한 작업 근처에 나타날지, 화면의 왼쪽/오른쪽에 나타날지 제어합니다
- quickinfo_buttons - 팝업 작업 세부정보 폼 내부의 버튼 컬렉션을 저장합니다
템플릿
- quick_info_class - 팝업 편집 폼에 적용되는 CSS 클래스를 정의합니다
- quick_info_content - 팝업 편집 폼 내부의 내용을 정의합니다
- quick_info_date - 팝업 편집 폼에 표시되는 날짜를 정의합니다
- quick_info_title - 팝업 편집 폼의 제목을 정의합니다
QuickInfo 객체
기본적으로 Quick Info 확장 기능은 선택된 작업 위에 자동으로 팝업을 표시합니다.
v7.0부터 Quick Info 기능은 gantt.ext.quickInfo 객체로 확장되어, 팝업을 수동으로 제어할 수 있는 메서드를 제공합니다.
gantt.ext.quickInfo 객체에서 사용할 수 있는 메서드는 다음과 같습니다:
- show() - 특정 작업에 대한 퀵 인포 팝업을 엽니다. 하나의 매개변수를 받습니다:
- id - (string|number) 작업/링크/리소스의 id
- show() - 지정한 좌표에서 퀵 인포 팝업을 엽니다. 매개변수:
- top - (number) X 좌표
- left - (number) Y 좌표
- hide() - 퀵 인포 팝업을 닫습니다. 선택적 매개변수를 받을 수 있습니다:
- [ force ] - (boolean) gantt.config.quick_info_detached가 false일 때 팝업을 즉시 닫을지 여부를 결정합니다. true를 전달하면 팝업이 즉시 제거되고, 그렇지 않으면 짧은 애니메이션과 함께 사라집니다.
- setContainer() - 퀵 인포가 표시될 컨테이너를 설정합니다.
- container - (string|HTMLElement) QuickInfo 컨테이너. 지정하지 않으면, gantt.$task, gantt.$grid, gantt.$layout 중 처음 발견된 노��드에 QuickInfo가 배치됩니다.
- getNode() - 퀵 인포 팝업의 HTMLElement를 반환하거나, 초기화되지 않은 경우 null을 반환합니다
- setContent(config) - (object) 퀵 인포에 내용을 채웁니다. 다음 구조의 구성 객체를 받습니다:
- taskId - (string|number) 선택적, 액션 버튼을 특정 작업에 연결
- header - 선택적, 팝업 헤더로 다음을 포함할 수 있습니다:
- title - (string) 선택적, 팝업 제목
- date - (string) 선택적, 팝업 날짜
- content - (string) 선택적, 팝업 내용
- buttons - (string[]) 선택적, 팝업에 포함할 버튼 목록
헤더나 버튼이 제공되지 않으면 해당 섹션은 팝업에서 숨겨집니다.
Quick Info 표시하기
팝업은 gantt.ext.quickInfo.show() 메서드를 사용하여 특정 작업, 링크, 리소스 패널 또는 화면의 원하는 위치에 표시할 수 있습니다:
// 특정 작업에 대한 팝업 표시
var task = gantt.getTask(10);
gantt.ext.quickInfo.show(task.id);

// 특정 좌표에 팝업 표시
gantt.ext.quickInfo.show(100, 200);
다음은 리소스에 대한 팝업을 표시하는 예시입니다:
const quickInfo = gantt.ext.quickInfo;
gantt.attachEvent("onGanttReady", function(){
    quickInfo.setContainer(document.body);
})

gantt.attachEvent("onEmptyClick", function (e) {
  const domHelpers = gantt.utils.dom;
  const resourceElement = domHelpers.closest(e.target, "[data-resource-id]");
  if(resourceElement){
    const resourceId = resourceElement.getAttribute("data-resource-id");
    const resource = gantt.$resourcesStore.getItem(resourceId);
    const position = resourceElement.getBoundingClientRect();
    quickInfo.show(position.right, position.top);

    const assignedTasks = gantt.getResourceAssignments(resourceId).map(function(assign){
        return gantt.getTask(assign.task_id).text;
    });

    quickInfo.setContent({
        header: {
        title: resource.text,
        date: ""
    },
        content: "Assigned tasks: " + assignedTasks.join(", "),
        buttons: []
    });
  }
});
아래는 특정 링크에 대한 팝업을 표�시하는 방법입니다:
const quickInfo = gantt.ext.quickInfo;
gantt.attachEvent("onLinkClick", function(id,e){
//여기에 사용자 정의 로직 추�가
const link = gantt.getLink(id);
const linksFormatter = gantt.ext.formatters.linkFormatter();
const domHelpers = gantt.utils.dom;
const position = domHelpers.getRelativeEventPosition(e, gantt.$task_data);
const sourceTask = gantt.getTask(link.source);
const targetTask = gantt.getTask(link.target);
quickInfo.show(position.x, position.y);
let linkDescr = "";
if (link.type === gantt.config.links.start_to_start){
linkDescr = "Start to start";
} else if (link.type === gantt.config.links.start_to_finish){
linkDescr = "Start to finish";
} else if (link.type === gantt.config.links.finish_to_finish){
linkDescr = "Finish to Finish";
} else {
linkDescr = "Finish to start";
}
quickInfo.setContent({
header: {
title: `${linkDescr} link`,
date: ""
},
content: `Source: ${sourceTask.text}
Target: ${targetTask.text}`,
buttons: []
});
});
Quick Info 숨기기
팝업을 닫으려면 gantt.ext.quickInfo.hide() 메서드를 사용하세요. 이 메서드의 동작은 gantt.config.quick_info_detached 설정에 따라 다르며, 두 가지 옵션�이 있습니다:
- 매개변수 없이 호출하면, 팝업이 짧은 애니메이션 후 닫힙니다
gantt.config.quick_info_detached = false;
gantt.init("gantt_here");

// 애니메이션과 함께 팝업 숨기기
gantt.ext.quickInfo.hide();
- 팝업을 즉시 닫으려면, true를 인자로 전달하세요:
gantt.config.quick_info_detached = false;
gantt.init("gantt_here");

// 팝업 즉시 숨기기
gantt.ext.quickInfo.hide(true);
gantt.config.quick_info_detached가 true인 경우, 팝업은 항상 즉시 닫힙니다.
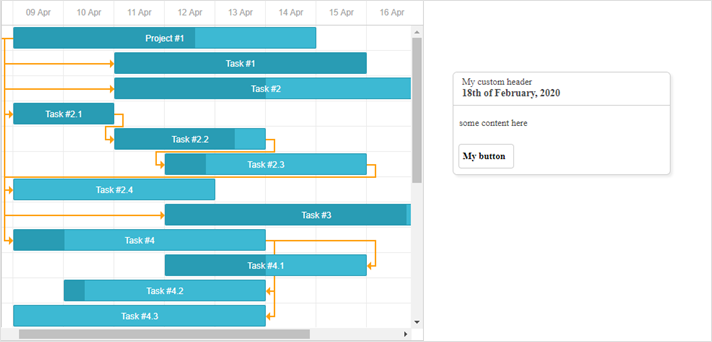
사용자 정의 QuickInfo 만들기
기본적으로 퀵 인포 팝업에는 제목, 날짜, 내용, 버튼이 포함되며 다음과 같이 표시됩니다:

팝업의 모양을 사용자 정의하거나 직접 만들고 싶다면, **gantt.ext.quickInfo.setContent()**를 사용하여 HTML 콘텐츠를 정의할 수 있습니다:
gantt.locale.labels.custom_button = "My button"
gantt.ext.quickInfo.setContent({
    header:{
        title: "My custom header",
        date: "18th of February, 2020"
    },
    content: "some content here",
    buttons: ["custom_button"]
})
이렇게 하면 다음과 같은 퀵 인포 팝업이 생성됩니다:

사용자 정의 동작이 있는 버튼 추가하기
$click 객체를 사용하면 팝업 내부에 배치된 버튼에 사용자 정의 동작을 추가할 수 있습니다:
gantt.config.quickinfo_buttons="[""icon_delete","icon_edit","advanced_details_button"];
gantt.locale.labels["advanced_details_button"] = "Advanced Info";
gantt.init("gantt_here");

gantt.$click.buttons.advanced_details_button="function(id){"
    gantt.message("These are advanced details");
    return false; //기본 동작 차단
};
QuickInfo 컨테이너 설정하기
**gantt.ext.quickInfo.setContainer()**를 사용하면 퀵 인포 팝업을 원하는 커스텀 컨테이너 안에 표시할 수 있습니다:
const quickInfo = gantt.ext.quickInfo;
quickInfo.setContainer(document.body); /*!*/
gantt.ext.quickInfo.show(1300,100);
gantt.locale.labels.custom_button = "My button"
gantt.ext.quickInfo.setContent({
    header:{
        title: "My custom header",
        date: "18th of February, 2020"
    },
    content: "some content here",
    buttons: ["custom_button"]
});
이제, 사용자 정의 콘텐츠가 포함된 팝업이 document.body 내부, Gantt 컨테이너 외부에 표시됩니다: