自动调度
此功能仅在 PRO 版中提供。
该库包含 auto_scheduling 扩展,它使 Gantt 能够根据任务之间的关系自动安排任务。
例如,假设有两个通过依赖关系连接的任务,其中第二个任务在第一个任务结束后立即开始。如果第一个任务的计划发生变化,自动调度会相应地更新第二个任务的开始日期。通过定义任务之间的关系,而无需手动调整每个任务的日期,这有助于维护项目进度。
如何使用
要启用自动调度,请通过 gantt.plugins 方法开启 auto_scheduling 插件:
gantt.plugins({
    auto_scheduling: true
});
然后,将 auto_scheduling 属性设置为 true:
gantt.config.auto_scheduling = true;
即使开启了自动调度,仍然可以根据需要手动安排任务。
前向/后向计划
项目计划策略
任务规划可以遵循两种方法:前向计划和后向计划。这取决于以下配置设置:
- schedule_from_end - (boolean) 决定计划策略类型
- project_start - (Date) 设置项目开始日期;在应用前向计划时作为默认任务开始日期,默认为 null
- project_end - (Date) 设置项目结束日期;在应用后向计划时作为默认任务时间,默认为 null
前向计划
前向计划是默认模式,此时 gantt.config.schedule_from_end 设置为 false。
// 前向计划已激活
gantt.config.schedule_from_end = false;
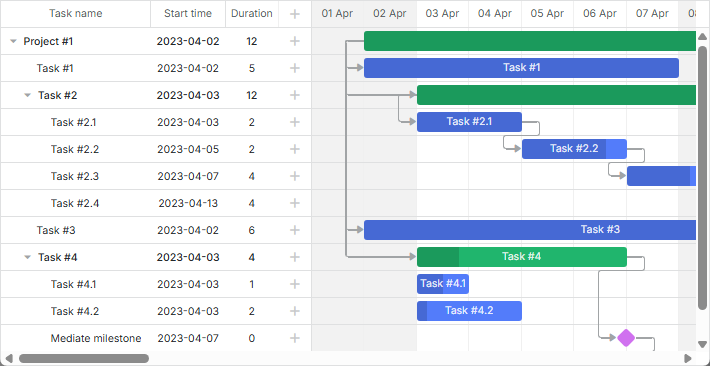
在此模式下,任务从项目开始日期或最早的任务日期开始调度,目标是在没有其他约束的情况下尽早开始任务。
你可以选择使用 gantt.config.project_start 定义项目开始日期:
gantt.config.project_start = new Date(2019, 2, 1);
Auto-Schedule From Project Start & Constraints
后向计划
后向计划根据项目结束日期来安排任务。要使用后向计划,请将 gantt.config.schedule_from_end 设置为 true,并通过 gantt.config.project_end 指定项目结束日期:
gantt.config.schedule_from_end = true;
gantt.config.project_end = new Date(2019, 4, 1);
此时,任务会尽可能晚地安排,最后一个任务在项目结束日期结束。
Auto-Schedule From Project End (backward)
任务的时间约束
dhtmlxGantt 允许你为任务应用额外的时间约束。
时间约束仅适用于任务和 里程碑。项目本身不受影响。
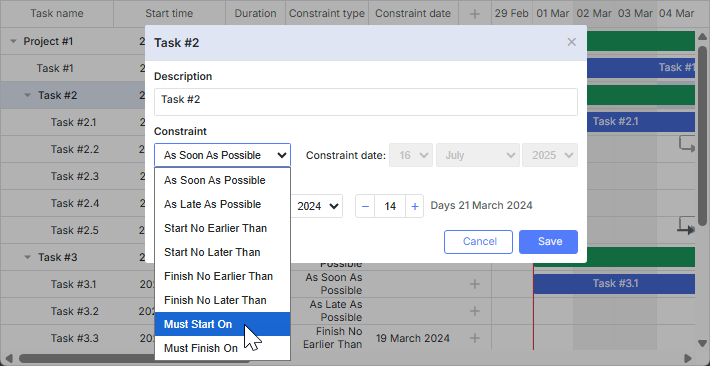
通过弹窗设置约束
可以通过任务弹窗中的 Constraint 控件 设置约束。
gantt.config.lightbox.sections = [
    { name:"description", height:38, map_to:"text", type:"textarea", focus:true},
    { name:"constraint", type:"constraint" }, /*!*/
    { name:"time", type:"duration", map_to:"auto" }
];
通过内联编辑器设置约束
也可以通过为约束类型和日期分别设置网格列,并使用内联编辑器来指定约束。
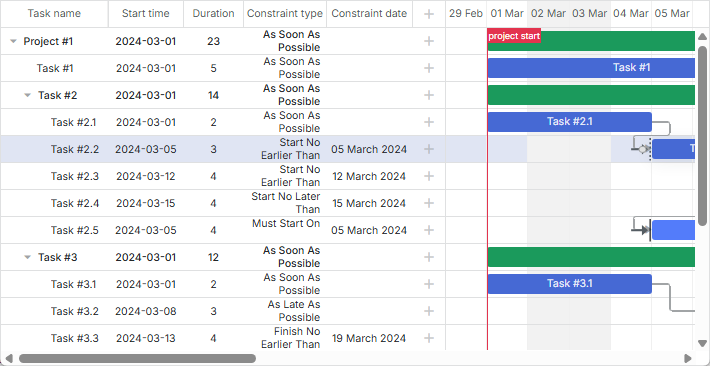
请分别使用 constraint_type 和 constraint_date 作为列名。
const constraintTypeEditor = {
    type: "select", map_to: "constraint_type", options: [
        { key: "asap", label: gantt.locale.labels.asap },
        { key: "alap", label: gantt.locale.labels.alap },
        { key: "snet", label: gantt.locale.labels.snet },
        // 更多选项
    ]
};

const constraintDateEditor = {
    type: "date",
    map_to: "constraint_date",
    min: new Date(2019, 0, 1),
    max: new Date(2020, 0, 1)
};

gantt.config.columns = [
    { // 前一列},
    {
        name:"constraint_type", align:"center", width:100, template:function (task){
            return gantt.locale.labels[gantt.getConstraintType(task)];
        }, resize: true, editor: constraintTypeEditor
    },
    {
        name:"constraint_date", align:"center", width:120, template:function (task) {
        // 模板逻辑
        },
        resize: true, editor: constraintDateEditor
    },
    { name: "add", width: 44 }
];
Auto-Schedule From Project Start & Constraints
约束类型
可用的时间约束类型有:
-
尽早开始 - 对于独立任务,若启用 strict 模式,任务会在项目开始时启动。若未启用 strict 模式,则在指定日期启动。对于有依赖的任务,任务会在所有前置任务完成后尽早开始。
-
尽晚完成 - 独立任务会在项目结束时完成。有依赖的任务会在其紧接的后续任务开始时完成。
其他约束类型适用于所有任务类型:
-
不早于...开始 - 任务在指定日期或之后开始。
-
不晚于...开始 - 任务在指定日期或之前开始。
-
不早于...完成 - 任务在指定日期或之后完成。
-
不晚于...完成 - 任务在指定日期或之前完成。
-
必须在...开始 - 任务必须在指定日期开始。
-
必须在...完成 - 任务必须在指定日期完成。
独立任务是指没有任何前置或后续任务的任务--既没有链接,也没有与其他任务或父任务的关系。
设置任务之间的滞后和提前时间
滞后和提前时间有助于定义更复杂的任务依赖关系。
滞后指的是前置任务完成后,后续任务开始前的延迟。提前指的是后续任务在前置任务完成前就开始的重叠时间。
后续任务有两种类型:
-
在前置任务结束前开始的任务(提前)。例如,1 天提前表示后续任务在前置任务结束前一天开始。
-
在前置任务结束后延迟一段时间才开始的任务(滞后)。例如,1 天滞后表示后续任务在前置任务结束后一天开始。
滞后和提前的数值通过链接对象的 link.lag 属性设置:
- 滞后:正整数
- 提前:负的滞后值
默认情况下,依赖链接的滞后为 0。
从 UI 编辑链接值
Gantt 没有内置的 UI 用于编辑滞后或其他链接属性,但你可以按照 相关章节 的指导自行实现。
Related example: Edit-lag Popup
为特定任务禁用自动调度
要关闭某个任务的自动调度并手动安排它,请将该任务的 auto_scheduling 属性设置为 false:
var task = gantt.getTask(id);
task.auto_scheduling = false;
或者,你可以通过 onBeforeTaskAutoSchedule 事件处理器为任务阻止自动调度:
gantt.attachEvent("onBeforeTaskAutoSchedule",function(task, start, link, predecessor){
    if(task.completed) {
        return false;
    }
    return true;
});
已完成任务的调度
默认情况下,自动调度会将已完成的任务(progress 值为 1)与未完成任务同等处理。
你可以通过启用 auto_scheduling_use_progress 选项来更改此行为:
gantt.config.auto_scheduling_use_progress = true;

gantt.init("gantt_here");
启用后,已完成的任务将不再计入关键路径及自动调度。
更多详情请参阅 API 页面。
API 概览
可用的方法和属性如下:
- auto_scheduling
- auto_scheduling_strict
- auto_scheduling_initial
- auto_scheduling_project_constraint
- autoSchedule
- isUnscheduledTask
- findCycles
- isCircularLink
- getConnectedGroup
启用
通过将 auto_scheduling 属性设置为 true 启用自动调度:
gantt.config.auto_scheduling = true;
严格模式
默认情况下,只有当新日期违反约束时才会重新安排任务。要始终将任务安排到最早可能日期,请启用 auto_scheduling_strict 属性:
gantt.config.auto_scheduling_strict = true;
注意,在 6.1.0 - 7.1.3 版本中,此设置仅在启用 auto_scheduling_compatibility 选项时有效。
初始自动调度
auto_scheduling_initial 属性控制数据加载时是否运行自动调度。其默认值为 true:
gantt.config.auto_scheduling_initial = true;
继承项目约束
auto_scheduling_project_constraint 属性决定无指定约束的任务是否继承其父项目的约束:
gantt.config.auto_scheduling_project_constraint = true;
重新计算项目
要重新计算整个项目进度,请使用 autoSchedule 方法:
gantt.autoSchedule();
要从特定任务开始重新计算,请将任务 id 作为参数传递给同一方法:
gantt.autoSchedule(taskId);
检查任务是否未调度
要检查某个任务是否未调度,请使用 isUnscheduledTask 方法,并传入任务对象:
var isUnscheduled = gantt.isUnscheduledTask(task);
检测循环引用
要查找图表中的所有循环引用,请使用 findCycles 方法:
gantt.findCycles();
检查链接是否为循环
要验证某个链接是否为循环链接,请使用 isCircularLink 方法:
var isCircular = gantt.isCircularLink(link);
获取相关任务和链接
要获取与特定任务相关的任务和链接列表,可以使用 getConnectedGroup 方法:
gantt.getConnectedGroup(18);
// => {links:["16", "17", "18"], tasks:[18, 17, 19, 20]}
事件列表
以下是可用事件的列表:
- onBeforeAutoSchedule
- onAfterAutoSchedule
- onBeforeTaskAutoSchedule
- onAfterTaskAutoSchedule
- onCircularLinkError
- onAutoScheduleCircularLink
// 自动调度开始前
gantt.attachEvent("onBeforeAutoSchedule",function(taskId){
    // 此处可添加自定义逻辑
    return true;
});

// 自动调度结束后
gantt.attachEvent("onAfterAutoSchedule",function(taskId, updatedTasks){
    // 此处可添加自定义逻辑
});

// 某个任务重新调度前
gantt.attachEvent("onBeforeTaskAutoSchedule",function(task,start,link,predecessor){
    // 此处可添加自定义逻辑
    return true;
});

// 某个任务重新调度后
gantt.attachEvent("onAfterTaskAutoSchedule",function(task,start,link,predecessor){
    // 此处可添加自定义逻辑
});

// 检测到循环引用且无法继续自动调度时
gantt.attachEvent("onCircularLinkError",function(link, group){
    // 此处可添加自定义逻辑
});

// 自动调度过程中发现循环链接时
gantt.attachEvent("onAutoScheduleCircularLink",function(groups){
    // 此处可添加自定义逻辑
});
版本兼容性
当通过鼠标拖动任务或通过 lightbox 更改任务日期时,任务会自动获得两种约束类型之一:根据所选的计划方式,分别为 start no earlier than+%start date% 或 finish no later than+%end date%。
这意味着任务不会被安排在通过 UI 设置的较晚日期之前。这一行为对于不熟悉约束的用户来说可能会感到意外,尤其是因为约束默认不会在图表上显示。
如需显示约束,可以通过 addTaskLayer 方法启用约束的显示。
Auto-Schedule From Project Start & Constraints
这种行为与 gantt v6.1 之前版本的自动排程逻辑不同,并且被认为是正确的,因为它与 MS Project 的自动规划方式一致。
如果你更喜欢之前的行为,可以通过禁用约束恢复到 6.1 之前的自动排程方式:
gantt.config.auto_scheduling_compatibility = true;