dhtmlxScheduler 与 SalesForce LWC 集成指南
本教程将指导您如何将 dhtmlxScheduler 集成到 SalesForce Lightning Web Component 中。
如果您使用的是其他技术,您可能需要查看以下其他集成选项:
- dhtmlxScheduler와 ASP.NET Core
- dhtmlxScheduler와 ASP.NET MVC
- dhtmlxScheduler와 PHP
- dhtmlxScheduler와 PHP:Slim
- dhtmlxScheduler와 PHP:Laravel 연동하기
- dhtmlxScheduler와 Ruby on Rails 연동하기
- dhtmlxScheduler와 dhtmlxConnector 연동하기
我们将使用 SalesForce CLI 来创建 Lightning Web Component 并将其部署到您的组织。有关安装详情,请参考此文章。此外,您还可以为 Visual Studio Code 安装 Salesforce Extension Pack,以简化开发组织的操作。"
完整源代码可在 GitHub 获取。
以下是一个视频教程,演示如何在 Salesforce LWC 中构建 Scheduler。
前置条件
请确保已安装 SalesForce CLI。如未安装,请参考此文章进行设置。
步骤 1. 创建项目
如果您还没有开发者账号,请注册一个免费的开发者账号。这篇文章提供了详细的指导。
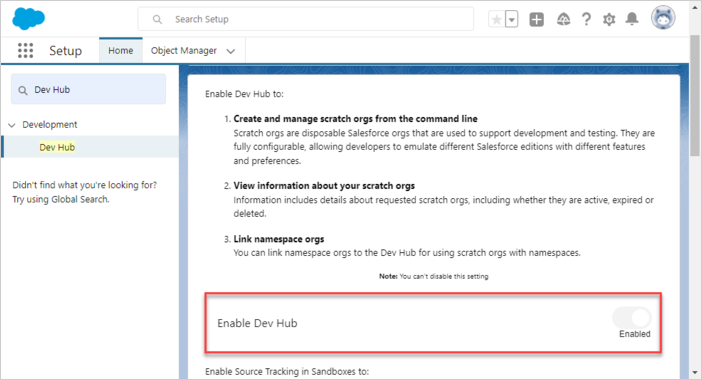
在左侧搜索栏中查找并选择 Dev Hub:
随后,在打开的设置窗口中启用 Dev Hub:
接下来,为您的 Salesforce DX 项目创建一个基础文件夹:
$ mkdir ~/salesforce
通过 CLI 生成 Salesforce DX 项目:
$ cd ~/salesforce
$ sfdx project generate -n scheduler-salesforce-app
    target dir = C:UsersUsersalesforce
        create scheduler-salesforce-appconfigproject-scratch-def.json
        create scheduler-salesforce-appguides/README.md
        create scheduler-salesforce-appsfdx-project.json
        create scheduler-salesforce-app.huskypre-commit
        create scheduler-salesforce-app.vscodeextensions.json
        create scheduler-salesforce-app.vscodelaunch.json
        create scheduler-salesforce-app.vscodesettings.json
        create scheduler-salesforce-appforce-appmaindefaultlwc.eslintrc.json
        create scheduler-salesforce-appforce-appmaindefaultaura.eslintrc.json
        create scheduler-salesforce-appscriptssoqlaccount.soql
        create scheduler-salesforce-appscriptsapexhello.apex
        create scheduler-salesforce-app.eslintignore
        create scheduler-salesforce-app.forceignore
        create scheduler-salesforce-app.gitignore
        create scheduler-salesforce-app.prettierignore
        create scheduler-salesforce-app.prettierrc
        create scheduler-salesforce-appjest.config.js
        create scheduler-salesforce-apppackage.json
进入新创建的项目文件夹:
$ cd scheduler-salesforce-app
步骤 2. 授权
通过 Web Server Flow 授权您的组织,运行以下命令:
$ sfdx org login web -d

Successfully authorized ...@...com with org ID ...
接下来,更新项目配置文件(sfdx-project.json),将 "sfdcLoginUrl" 参数设置为您的 "My Domain URL"。您可以在组织的 "My Domain" 设置页面找到该 URL。例如:

"sfdcLoginUrl" : "https://xbs2-dev-ed.my.salesforce.com"
使用以下命令创建 Scratch Org:
$ sfdx org create scratch -f config/project-scratch-def.json -d
Creating Scratch Org...
RequestId: 2SR8a000000PLf5GAG (https://xbs2-dev-ed.my.salesforce.com/2SR8a000000PLf5GAG)
OrgId: 00D8G000000EEMs
Username: test-3baxo2k0tpej@example.com
✓ Prepare Request
✓ Send Request
�✓ Wait For Org
✓ Available
✓ Authenticate
✓ Deploy Settings
Done
Your scratch org is ready.
步骤 3. 向 Salesforce 添加 Scheduler
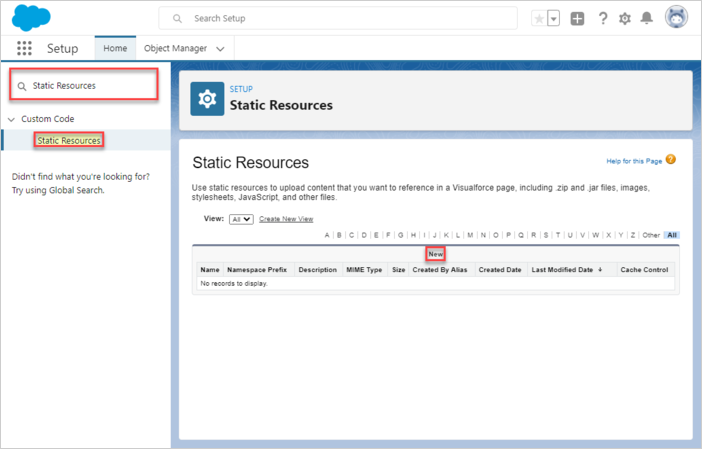
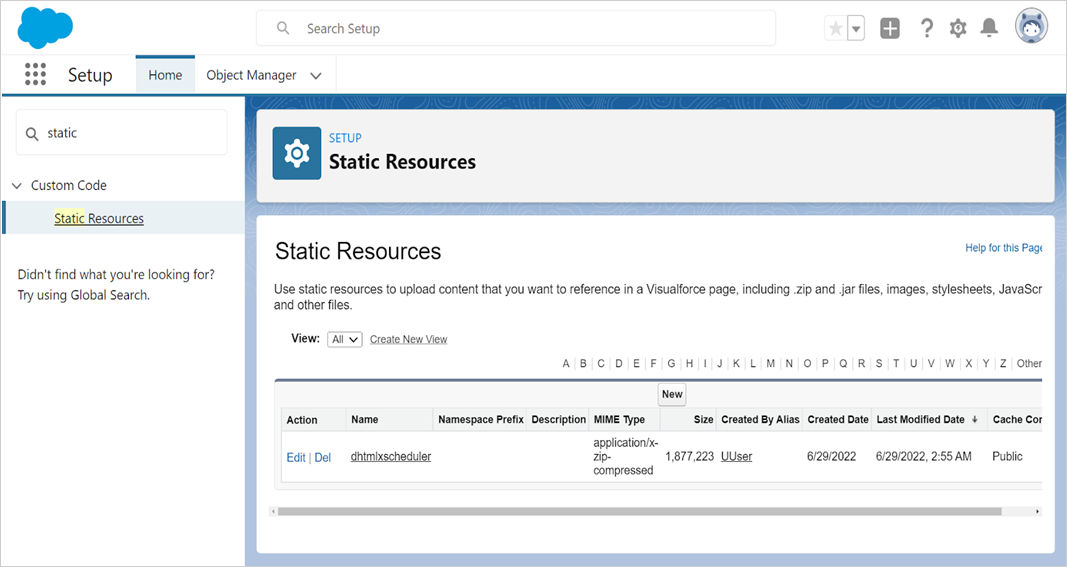
要使用该库,需要将其作为静态资源上传到 Salesforce。通过以下命令打开您的 Scratch Org:
$ sfdx org open
然后,进入 "Static Resources" 标签页并点击 "New" 按钮:
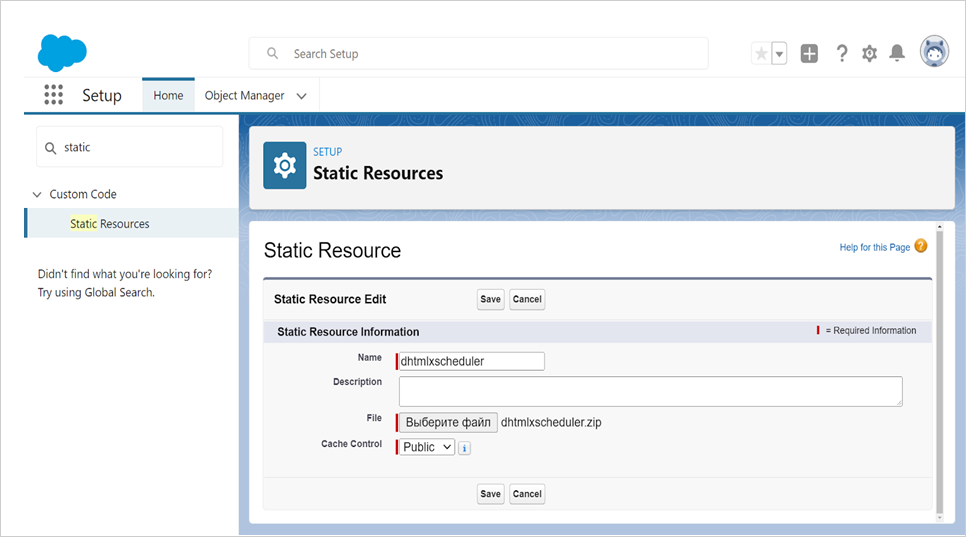
为资源命名(此处为 dhtmlxscheduler),上传包含库文件(dhtmlxscheduler.js 和 dhtmlxscheduler.css)的 ZIP 包,并将 Cache Control 设置为 "Public" 以提升性能。点击 "Save"。
此时,dhtmlxScheduler 已在 Salesforce 中可用。
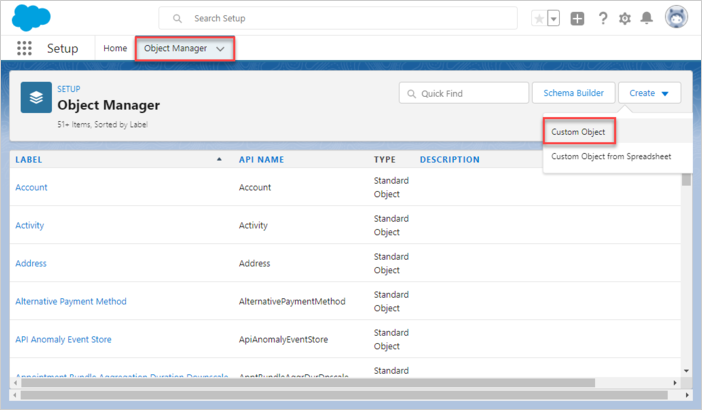
步骤 4. 创建数据模型
事件(Events)是 dhtmlxScheduler 的核心实体。实际应用中,管理事件的一个有效方式是将其所有属性作为纯 JSON 存储于 Salesforce。为此,需要创建一个新的 Event 对象。打开 Object Manager,选择 "Create",然后选择 "Custom Object":
事件对象
将事件对象命名为 SchedulerEvent 或 SchedulerEvents。
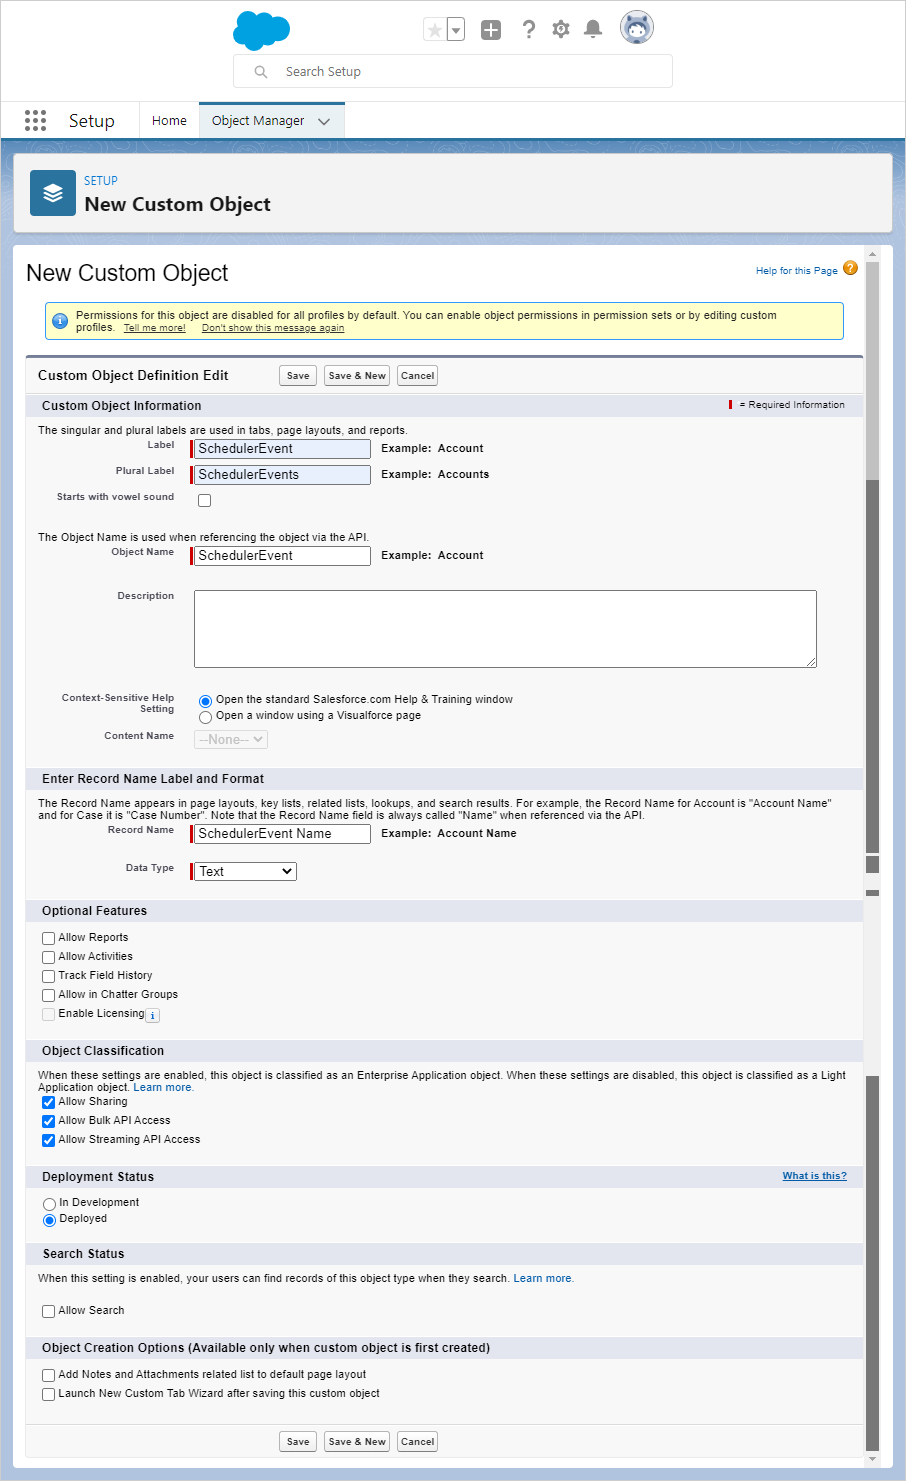
请确保记录名称与对象名称一致,例如:
对象名称: SchedulerEvent => 记录名称: SchedulerEvent Name
点击"保存"按钮。
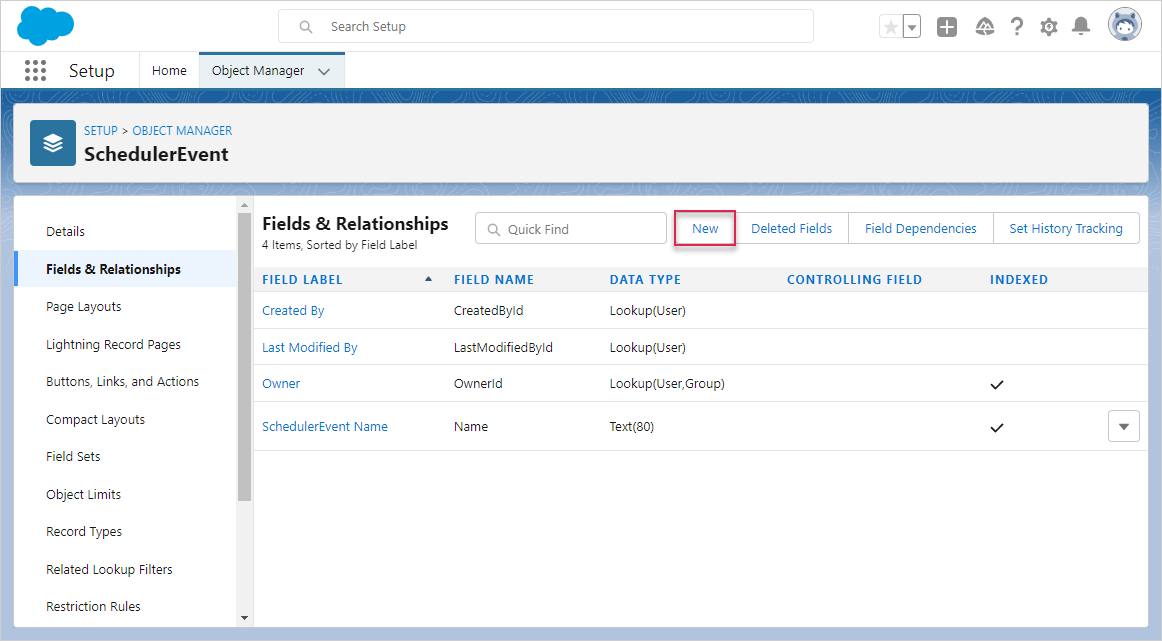
对象创建完成后,进入"字段与关系"标签页,点击"新建"按钮。
- 开始日期
选择"日期/时间"作为数据类型,然后点击"下一步"。
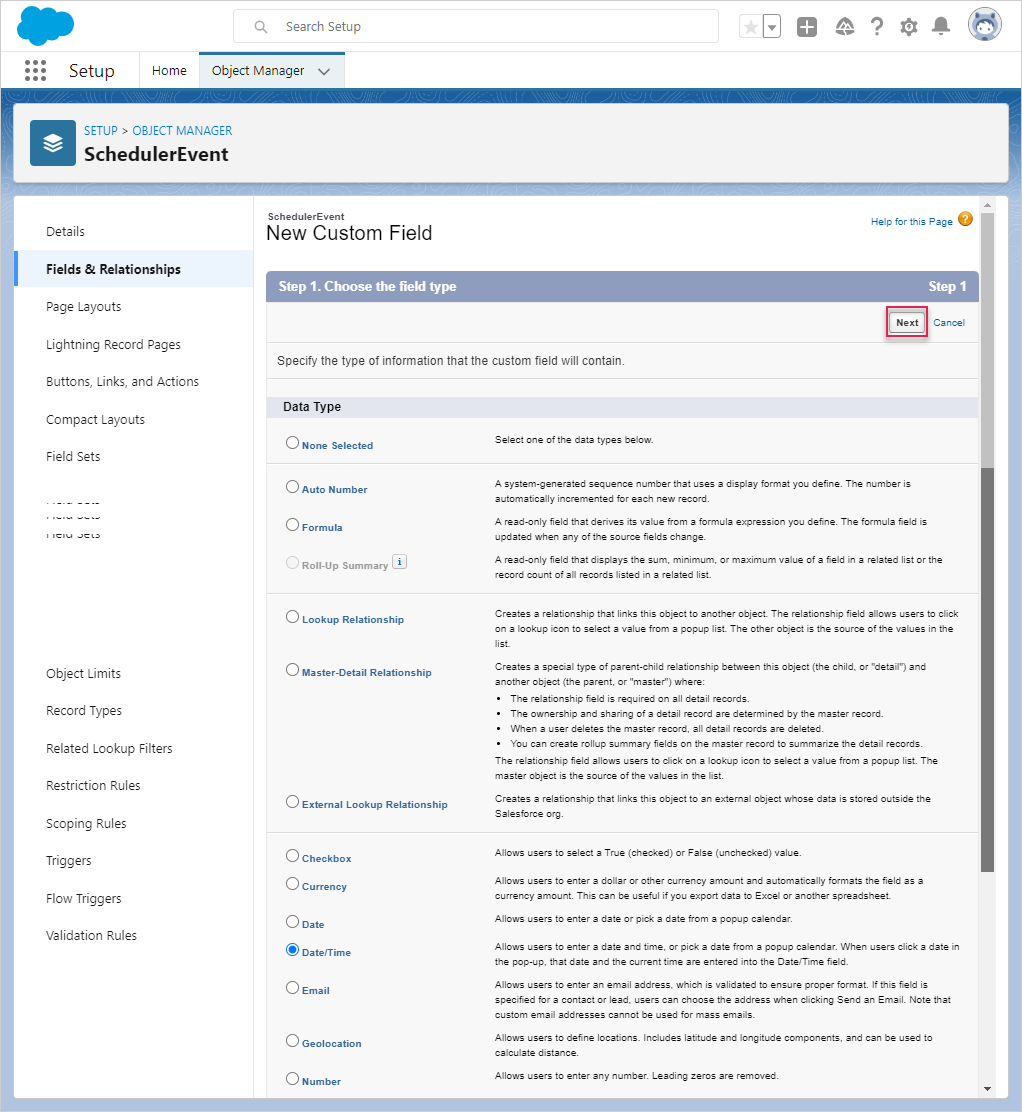
将该字段命名为"开始日期"。该字段将用于存储JSON序列化的任务属性。
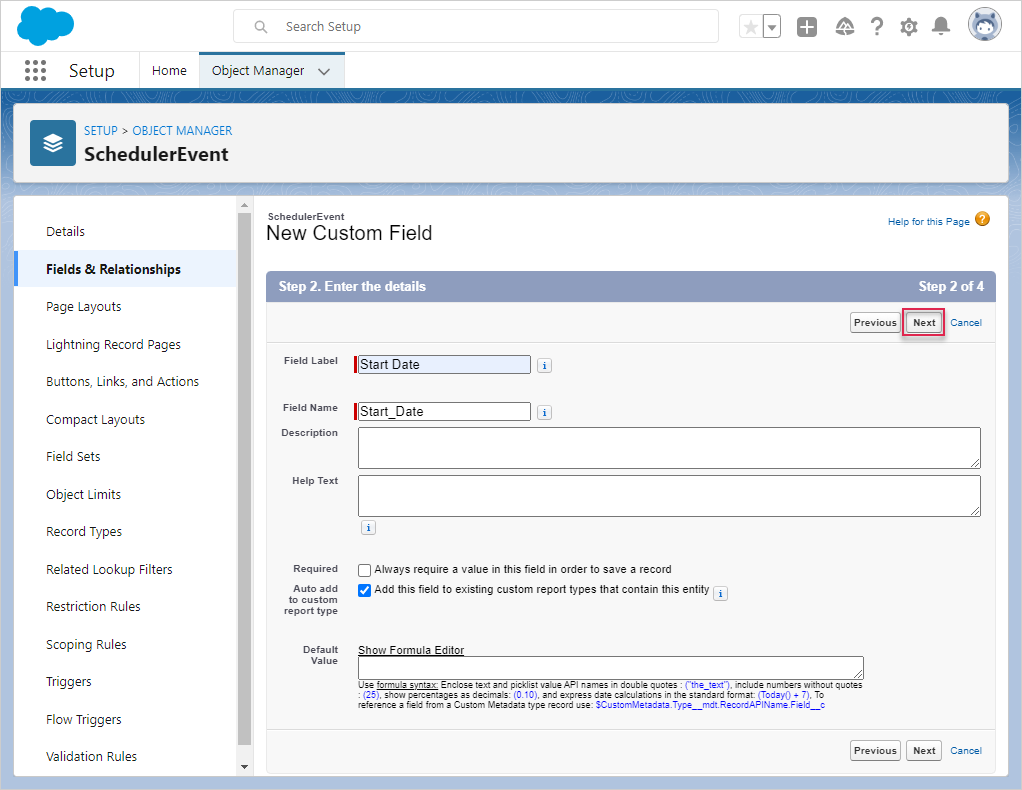
点击"下一步",并保持所有默认设置,直到出现"保存并新建"按钮。
- 结束日期
添加"结束日期"字段,选择"日期/时间"作为数据类型。

点击"下一步",并保持默认设置,直到可以使用"保存并新建"按钮。
- 文本
创建一个"文本"字段,并选择"文本"作为数据类型。
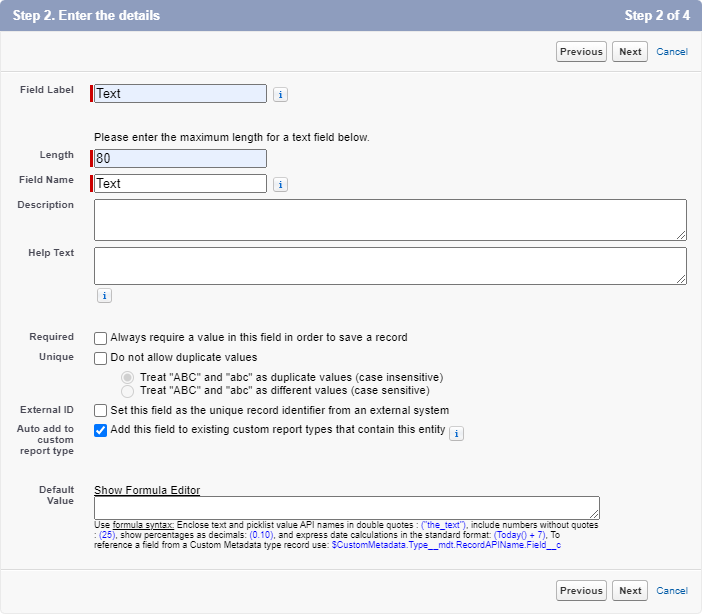
点击"下一步",并保持所有默认设置,直到"保存"按钮可用。
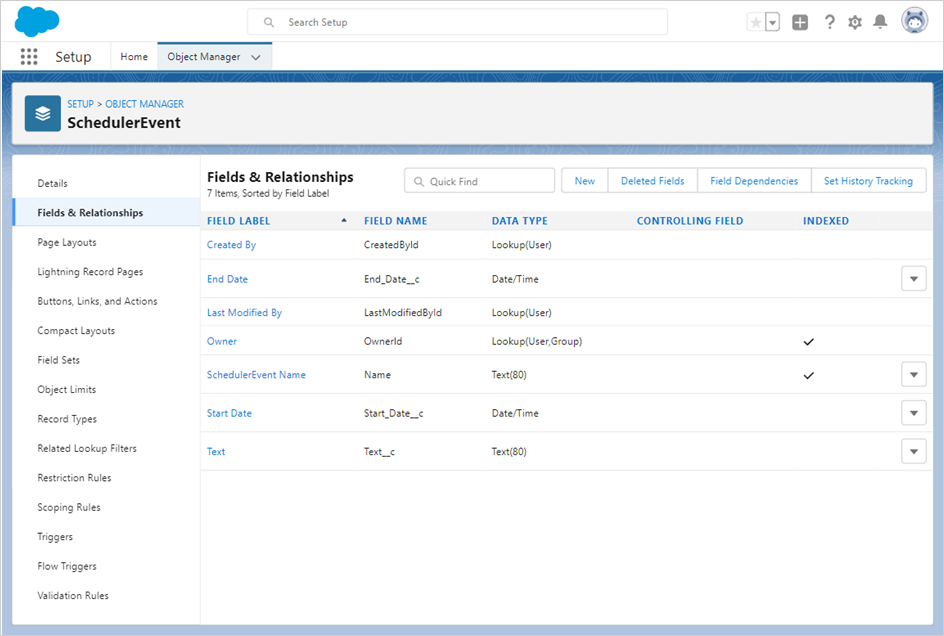
最终,字段应如下所示:
第5步:创建 Lightning Web 组件
要创建 Lightning Web 组件,请使用以下命令:
$ sfdx lightning generate component --type lwc -n scheduler -d force-app/main/default/lwc

target dir = C:UsersUsersourcesalesforcescheduler-salesforce-appforce-appmaindefaultlwc
   create force-appmaindefaultlwcschedulerscheduler.js
   create force-appmaindefaultlwcschedulerscheduler.html
   create force-appmaindefaultlwcscheduler__tests__scheduler.test.js
   create force-appmaindefaultlwcschedulerscheduler.js-meta.xml
修改 scheduler.js-meta.xml 文件中的组件定义,以便在 Lightning App Builder 中暴露该组件:
<?xml version="1.0" encoding="UTF-8"?>
<LightningComponentBundle xmlns="http://soap.sforce.com/2006/04/metadata">
    <apiVersion>57.0</apiVersion>
    <isExposed>true</isExposed>
    <targets>
        <target>lightning__AppPage</target>
    </targets>
    <targetConfigs>
        <targetConfig targets="lightning__AppPage">
            <property name="height" label="Height" type="Integer" default="800" />
        </targetConfig>
    </targetConfigs>
</LightningComponentBundle>
打开 scheduler.html 文件,插入以下代码:
<template>
    <div className="thescheduler" lwc:dom="manual"></div>
</template>
接下来,打开 scheduler.js 文件,并添加以下代码:
/* eslint-disable guard-for-in */
/* eslint-disable no-undef */
import { LightningElement, api } from "lwc";
import { ShowToastEvent } from "lightning/platformShowToastEvent";
import { loadStyle, loadScript } from "lightning/platformResourceLoader";
import { createRecord, updateRecord, deleteRecord } from "lightning/uiRecordApi";

// Static resources
import SchedulerFiles from "@salesforce/resourceUrl/dhtmlxscheduler";

// Controllers
import getEvents from "@salesforce/apex/SchedulerData.getEvents";

function unwrap(fromSF) {
    const data = fromSF.events.map((a) => ({
        id: a.Id,
        info: a.Name,
        start_date: a.Start_Date__c,
        end_date: a.End_Date__c,
        text: a.Text__c,
    }));

    return { data };
}

export default class SchedulerView extends LightningElement {
    static delegatesFocus = true;

    @api height;
    schedulerInitialized = false;

    renderedCallback() {
        if (this.schedulerInitialized) {
            return;
        }
        this.schedulerInitialized = true;

        Promise.all([
            loadScript(this, SchedulerFiles + "/dhtmlxscheduler.js"),
            loadStyle(this, SchedulerFiles + "/dhtmlxscheduler.css")
        ])
            .then(() => {
                this.initializeUI();
            })
            .catch((error) => {
                this.dispatchEvent(
                    new ShowToastEvent({
                        title: "Error loading scheduler",
                        message: error.message,
                        variant: "error"
                    })
                );
            });
    }

    initializeUI() {
        const root = this.template.querySelector(".thescheduler");
        root.style.height = this.height + "px";

        const scheduler = window.Scheduler.getSchedulerInstance();
        scheduler.templates.parse_date = (date) => new Date(date);
        scheduler.templates.format_date = (date) => date.toISOString();
        scheduler.config.header = [
            "day",
            "week",
            "month",
            "date",
            "prev",
            "today",
            "next"
        ];

        scheduler.init(root, new Date(), "week");

        getEvents().then((d) => {

            const chartData = unwrap(d);
            scheduler.parse({
                events: chartData.data,
            });
        });

        ///↓↓↓ saving changes back to SF backend ↓↓↓
        scheduler.createDataProcessor(function (entity, action, data, id) {
            switch (action) {
                case "create":
                    console.log("createEvent", data);
                    const insert = {
                        apiName: "SchedulerEvent__c",
                        fields: {
                            Name: data.info,
                            Start_Date__c: data.start_date,
                            End_Date__c: data.end_date,
                            Text__c: data.text
                        }
                    };
                    scheduler.config.readonly = true; // suppress changes
                                                      //until saving is complete
                    return createRecord(insert).then((res) => {
                        scheduler.config.readonly = false;
                        return { tid: res.id, ...res };
                    });
                case "update":
                    console.log("updateEvent", data);
                    const update = {
                        fields: {
                            Id: id,
                            Name: data.info,
                            Start_Date__c: data.start_date,
                            End_Date__c: data.end_date,
                            Text__c: data.text
                        }
                    };
                    return updateRecord(update).then(() => ({}));
                case "delete":
                    return deleteRecord(id).then(() => ({}));
            }
        });
    }
}
第6步:创建 Apex 类
下一步是创建一个类,实现 Lightning 组件与数据模型之间的交互。
$ sfdx apex generate class -n SchedulerData -d force-app/main/default/classes

target dir = C:UsersUsersalesforcescheduler-salesforce-appforce-appmaindefaultclasses
   create force-appmaindefaultclassesSchedulerData.cls
   create force-appmaindefaultclassesSchedulerData.cls-meta.xml
创建完成后,打开 SchedulerData.cls 文件,并添加如下代码:
public with sharing class SchedulerData {

    @RemoteAction
    @AuraEnabled(cacheable="true)"
    public static Map<String, Object> getEvents() {

        // fetching the Records via SOQL
        List<SchedulerEvent__c> Events = new List<SchedulerEvent__c>();
        Events = [SELECT Id, Name, Start_Date__c, End_Date__c,
            Text__c FROM SchedulerEvent__c];

        Map<String, Object> result = new Map<String, Object>{'events' => Events };
        return result;
   }
}
从 Scratch Org 拉取源代码到您的项目:
$ sfdx project retrieve start
然后将源代码重新推送到 Scratch Org:
$ sfdx project deploy start
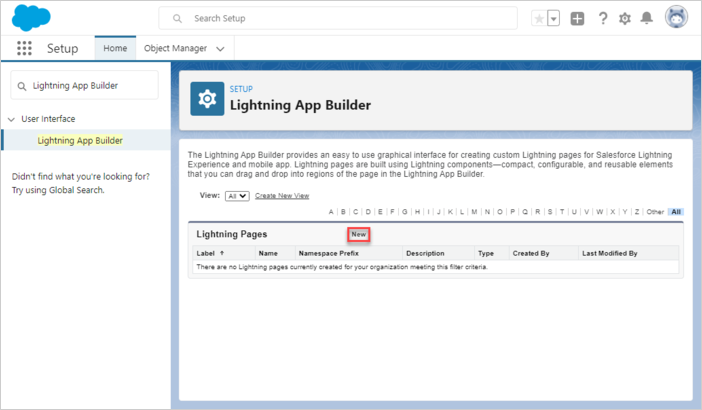
第7步:创建 Lightning 页面
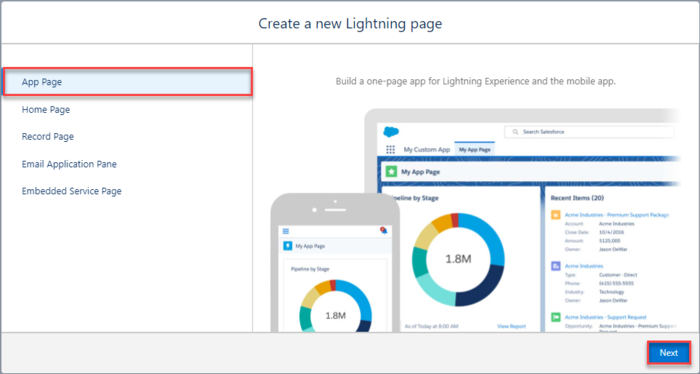
打开"Lightning App Builder",创建一个新的 Lightning 页面。
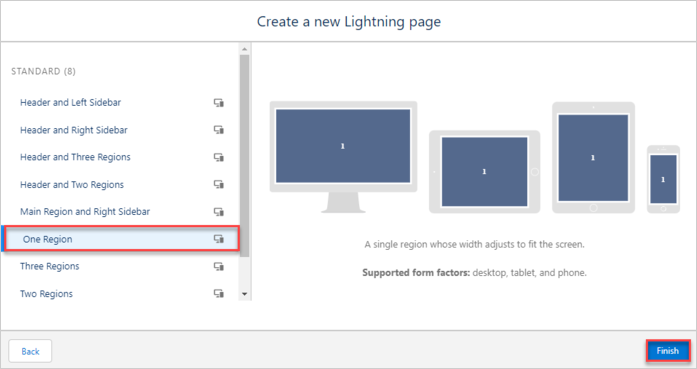
选择"App Page",输入页面名称并选择布局。

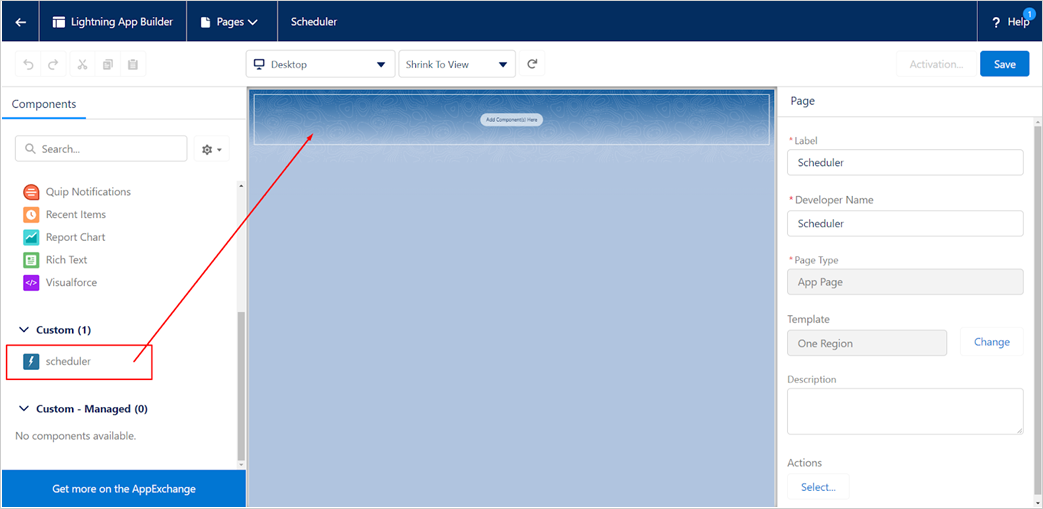
Scheduler 自定义组件应可用于新页面。将其添加到任意区域并保存。
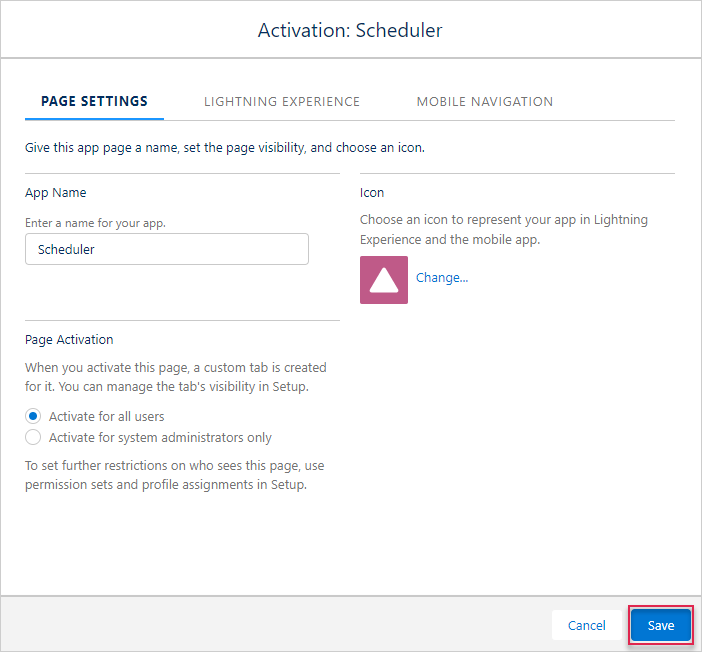
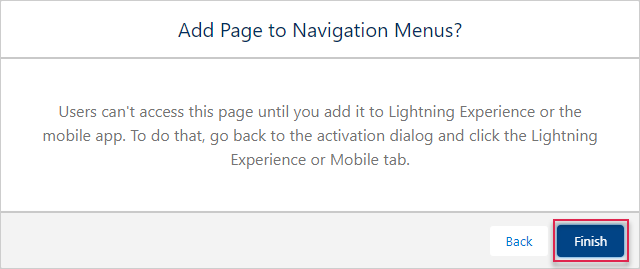
激活该页面。
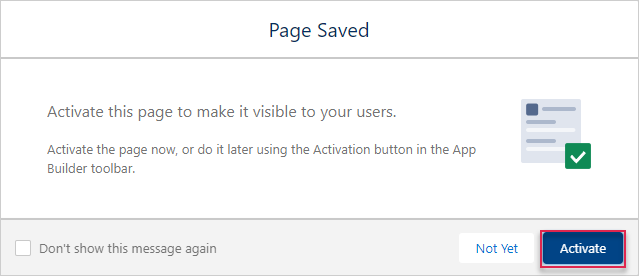
保存更改。
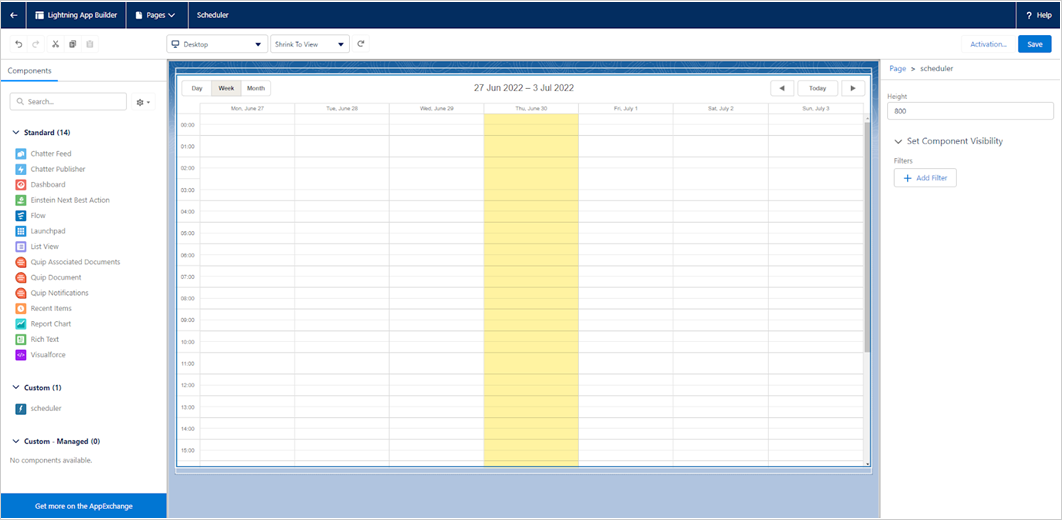
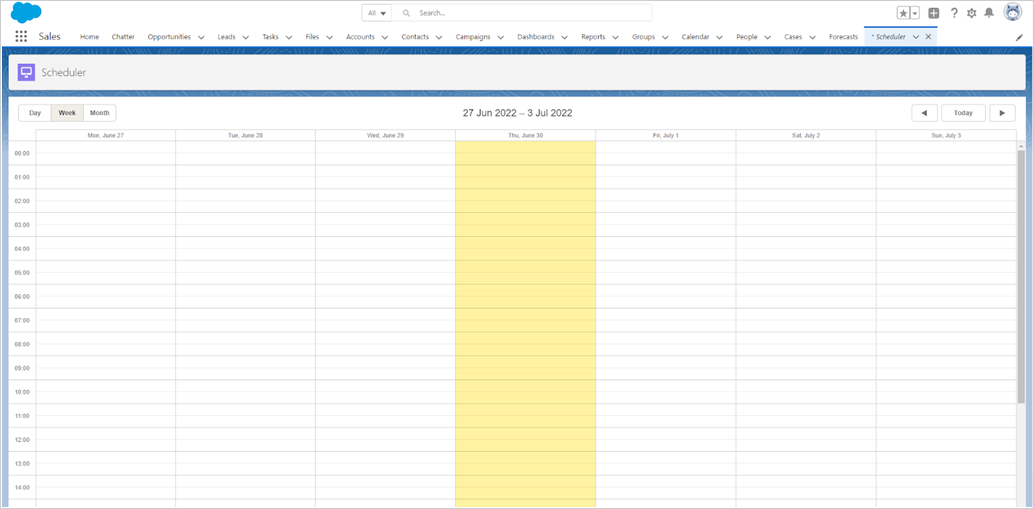
打开应用页面。在应用启动器中输入 Scheduler 即可访问。
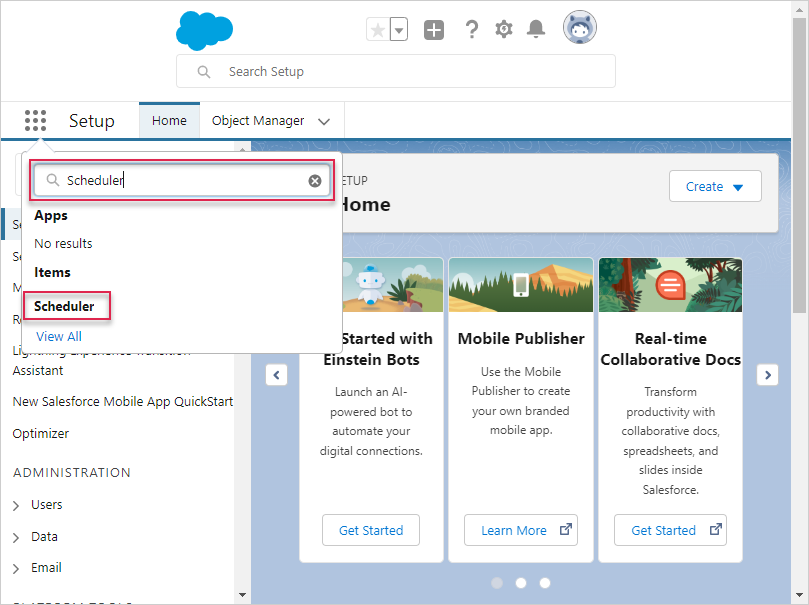
如果一切设置正确,将在 Lightning 页面上显示一个简单的 Scheduler 演示。
应用安全性
Scheduler 本身不包含针对 SQL 注入、XSS 或 CSRF 攻击等威胁的防护。确保应用安全是开发者的责任。更多详情请参见相关文档。Salesforce 设计有安全功能来保护您的数据和应用,您也可以根据组织需求实施自定义安全措施。详细信息请参考 Salesforce Security Guide。此外,此资源 介绍了关键安全实践。
故障排查
如果 Scheduler 在完成集成步骤后未显示事件,请参阅 Troubleshooting Backend Integration Issues 文章。该文档提供了识别和解决常见问题的指导。
后续步骤
至此,Scheduler 已完全可用。完整代码可在 GitHub 上获取,您可以克隆或下载以用于您的项目。
您还可以查阅 Scheduler 功能指南 或关于 与其他后端框��架集成的教程。