타임라인 뷰
이 뷰는 Scheduler PRO 버전에만 포함되어 있습니다.
타임라인 뷰는 이벤트를 수평으로 표시하며, 각각의 타임라인을 좌우로 나란히 배치합니다.

초기화
스케줄러에 타임라인 뷰를 추가하려면 다음 단계를 따르세요:
- 페이지에서 Timeline 확장 기능을 활성화하세요:
- Timeline - 'Bar' 및 'Cell' 모드용
- Timeline, Treetimeline - 'Tree' 모드용
- Timeline, Daytimeline - 'Days' 모드용
scheduler.plugins({
    timeline: true,
    treetimeline: true,
    daytimeline: true
});
- 스케줄러의 마크업에 뷰 탭을 추가하세요:
<div id="scheduler_here" class="dhx_cal_container" ...>
    <div class="dhx_cal_navline">
       ...
       <div class="dhx_cal_tab" name="timeline_tab"></div>
    </div>
    ...
</div>
- 탭의 라벨을 설정하세요:
//'timeline_tab'은 div의 이름을 참조합니다
scheduler.locale.labels.timeline_tab ="Timeline";
- createTimelineView 메서드를 호출하세요:
scheduler.createTimelineView({
     name:"timeline",
     x_unit:"minute", // X축의 단위
     x_date:"%H:%i",  // X축에 표시되는 날짜 포맷
     x_step:30,       // X축 단위의 간격
     x_size:24,       // X축에 표시되는 'x_step'의 총 개수
     x_start:16,      // X축 시작 오프셋 (x_unit 기준)
     x_length:48,     // 한 번에 스크롤되는 'x_step'의 개수
     y_unit:          // Y축에 표시되는 섹션
        [{key:1, label:"Section A"},
         {key:2, label:"Section B"},
         {key:3, label:"Section C"},
         {key:4, label:"Section D"}],
     y_property:"section_id", // 데이터를 섹션에 매핑하는 속성
     render:"bar"             // 뷰 모드
});
'Days' 모드를 사용할 때, 타임 스케일은 반드시 정확히 하루를 포함해야 합니다. 설정이 더 짧거나 길면 타임라인이 올바르게 렌더링되지 않습니다.
스케일 구성 예시
createTimelineView 메서드는 많은 파라미터를 포함하고 있지만, 실제로는 간단합니다.
예시: 09:00부터 15:00까지 30분 간격으로, 하루 단위로 스크롤되는 타임 스케일.

{
    x_unit:"minute",// 스케일 단위는 분
    x_step:30,  // 30분 간격, 예: 09:00 - 09:30
    x_size:12,  // 09:00~15:00까지 30분 구간의 개수
                // 15 - 9 = 6시간 = 360분 = 360/30 = 12
    x_start:18, // 스케일 시작은 09:00, 즉 00:00으로부터 9시간
                // 9시간 = 540분 = 540/30 = 18 'x_step'
    x_length:48,// 하루 스크롤: 1일 = 24시간 = 1440분 = 1440/30 = 48 'x_step'
    ...
}
타임라인 뷰 구성
이름에 (timeline)_some이 포함된 모든 템플릿 함수는 뷰를 생성한 후에 정의해야 합니다. 이러한 함수들은 타임라인 생성자에 의해 동적으로 할당되며 createTimelineView 호출 시 덮어쓰기 때문입니다.
타임라인 뷰의 시작 날짜 설정
예를 들어, 타임라인 뷰의 시작 날짜를 설정하는 방법은 다음과 같습니다.
모든 뷰의 시작 날짜는 scheduler.date[<viewName> +"_start"] 함수로 제어됩니다. 타임라인 스케일의 첫날을 조정하려면, scheduler.createTimelineView() 호출 후 scheduler.date.timeline_start 함수를 오버라이드하세요:
// 주의 시작을 월요일로 설정
scheduler.config.start_on_monday = true;
// 타임라인 뷰 생성
scheduler.createTimelineView({
name: "timeline",
render: "tree",
days: 7,
folder_dy: 20,
x_unit: "day",
x_date: "%D %j %F",
x_step: 1,
x_size: 7,
x_start: 0,
x_length: 7,
y_unit:[],
y_property: "section_id"
});
// 생성 후 시작 날짜 함수 오버라이드
scheduler.date.timeline_start = scheduler.date.week_start;
// �스케줄러 초기화
scheduler.init("timeline_tree", new Date(), "timeline");
타임라인 객체 API
타임라인 뷰와 상호작용할 수 있는 여러 메서드가 제공됩니다.
타임라인 뷰 생성
스케줄러에서 타임라인 인스턴스를 생성하세요:
scheduler.createTimelineView({
    name:'timeline',
    ...
});

var timeline = scheduler.matrix.timeline;
생성 후 아래의 메서드들을 사용할 수 있습니다.
타임라인 뷰 가져오기
타임라인 뷰 객체를 가져오려면 getView 메서드를 사용하세요. 뷰의 이름을 파라미터로 받습니다. 파라미터가 없으면 현재 뷰를 반환합니다.
var timeline = scheduler.getView();
timeline.x_size = 8;
scheduler.setCurrentView();
스케일 범위 설정
setRange() 메서드를 사용하여 스케일 범위를 정의할 수 있습니다. 두 개의 파라미터가 필요합니다:
- startDate - (Date) 범위 시작
- endDate - (Date) 범위 끝
timeline.setRange(startDate, endDate);
왼쪽 패널의 컬럼 지정
왼쪽 패널의 내용은 두 가지 방법으로 설정할 수 있습니다.
기본적으로는 하나의 컬럼만 포함합니다. 섹션 라벨은 y_unit 객체의 label 속성에서 가져오며, timeline_scale_label 템플릿으로 커스터마이즈할 수 있습니다.
여러 컬럼을 정의하려면 createTimelineView 메서드에서 columns 속성을 사용하세요:
scheduler.createTimelineView({
  name:    "timeline",
  x_unit:    "minute",
  x_date:    "%H:%i",
  x_step:    30,
  x_size: 24,
  x_start: 16,
  x_length:    48,
  y_unit:    sections,
  event_dy: "full",
  y_property:    "section_id",
  render:"bar",
  columns: [
    { label: "Room #",  width: 70, template: function(obj){ return obj.room_no; } },
    { label: "Type",  width: 90, template: function(obj){ return obj.room_type; } },
    { label: "Status",  width: 90, template: function(obj){ return obj.room_status; } }
  ]
});
각 컬럼 객체는 다음 속성을 가질 수 있습니다:
- label -
string- 헤더 라벨(선택) - width -
number- 컬럼 너비(선택) - template -
function- 섹션 객체를 받는 셀 템플릿 함수
특정 위치/날짜/섹션으로 스크롤
이 기능은 타임라인에서 수평 스크롤이 활성화된 경우에만 동작합니다.
특정 지점으로 스크롤하려면 scrollTo() 메서드를 사용하세요. 다양한 파라미터 타입을 지원합니다:
- Date 객체를 전달하여 특정 날짜로 스크롤:
timeline.scrollTo(new Date());
- 픽셀 값을 전달하여 특정 위치로 스크롤:
timeline.scrollTo(500);
- 날짜와 섹션 키가 포함된 객체를 전달하여 수평 및 수직으로 특정 섹션의 특정 날짜로 스크롤:
timeline.scrollTo({date:new Date(), section:4});
- left와 top 픽셀 값이 있는 객체를 전달하여 수평, 수직 위치로 스크롤:
timeline.scrollTo({left:300, top:500});
특정 위치의 좌표 얻기
- 스케일에서 특정 날짜의 X좌표를 얻으려면 **posFromDate()**를 Date 파라미터와 함께 사용하세요:
var left = timeline.posFromDate(new Date());
이 메서드는 날짜가 스케일 범위를 벗어나면 0 또는 최대 X좌표를 반환합니다.
- 특정 행의 Y좌표를 얻으려면 **getSectionTop()**을 섹션 번호와 함께 사용하세요:
var top = timeline.getSectionTop(section.key);
행을 찾을 수 없으면 -1을 반환합니다.
- 타임라인 좌표에 해당하는 날짜와 섹션을 찾으려면 **resolvePosition()**을
(left: number, top: number)객체와 함께 사용하세요:
const position = timeline.resolvePosition({top: 120, left: 400});
- 시간 스케일의 특정 left 좌표에서
Date를 얻으려면 **dateFromPos()**를 사용하세요:
const date = timeline.dateFromPos(300);
- 특정 이벤트의 top 좌표를 얻으려면 **getEventTop()**을 이벤트 객체와 함께 사용하세요:
const top = timeline.getEventTop(scheduler.getEvent(event.id));
스크롤 위치 가져오기
현재 스크롤바 위치를 확인하려면 **timeline.getScrollPosition()**을 호출하세요. 스크롤 좌표가 담긴 객체를 반환합니다:
var timeline = scheduler.getView();
timeline.getScrollPosition(); // { left: 0, top: 0 }
반환 객체는 다음을 포함합니다:
- left - (number) 수평 스크롤 위치
- top - (number) 수직 스크롤 위치
onScroll 이벤트를 사용해 스크롤 변경을 감지할 수도 있습니다. 이 이벤트는 새로운 left, top 위치를 전달받습니다:
var timeline = scheduler.getView();
timeline.attachEvent("onScroll", function(left, top){});
특정 섹션에 할당된 이벤트 가져오기
특정 섹션에 할당된 이벤트 배열을 얻으려면 **timeline.selectEvents()**를 구성 객체와 함께 사용하세요:
{
    section: string|number,
    date: Date,
    selectNested: boolean
}
설명:
- section - 섹션의 id
- date - 선택 사항, 지정한 날짜 컬럼에 겹치는 이벤트만 필터링
- selectNested - 선택 사항, true이면 섹션이 트리 타임라인 폴더일 때 모든 하위 섹션의 이벤트도 선택
이 메서드는 이벤트 객체 배열을 반환합니다.
var timeline = scheduler.getView();

var events = timeline.selectEvents({
    section: section.key,
    date: date,
    selectNested: true
});
속성의 동적 변경
모든 타임라인 객체는 scheduler.matrix 객체에 저장됩니다. 이름으로 원하는 타임라인 뷰에 접근해 속성을 업데이트할 수 있습니다. 변경 사항은 스케줄러를 새로고침한 후 적용됩니다:
scheduler.getView('timeline').x_size = 12;
scheduler.setCurrentView(); // 스케줄러를 다시 그림
여기서 'timeline'은 createTimelineView 메서드에서 지정한 이름과 일치해야 합니다:
scheduler.createTimelineView({
    name:'timeline',
    ...
});
섹션 동적 변경
타임라인 뷰에서 단위(유닛) 목록을 실시간으로 업데이트해야 할 때는 serverList 및 updateCollection 메서드 사용을 권장합니다.
데이터 로딩
Day, Month, Year와 같은 단순한 뷰와 달리, Units 및 Timeline과 같은 다중 리소스 뷰에서는 각 데이터 항목에 추가 필드가 반드시 포함되어야 합니다.
- y_property - (string) 이벤트를 특정 섹션에 할당하는 데 사용되는 데이터 프로퍼티를 지정합니다.
scheduler.createTimelineView({
name:"timeline",
...
y_unit:
[{key:1, label:"Room 1"},
{key:2, label:"Room 2"},
{key:3, label:"Room 3"}],
y_property:"room_id",
});
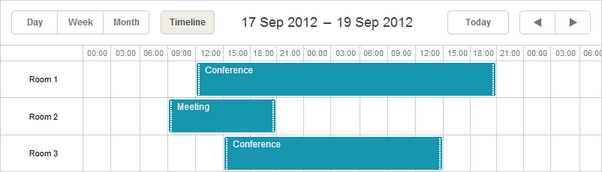
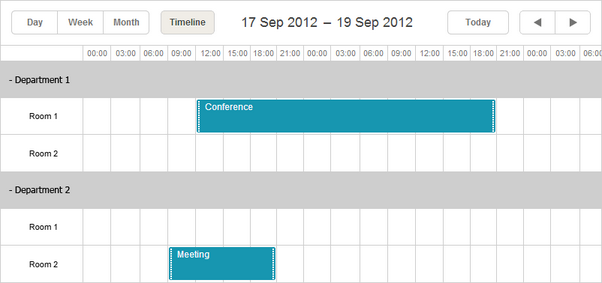
scheduler.init('scheduler_here');
scheduler.parse([
{text:"Conference", start_date:"17/09/2012 12:00", end_date:"18/09/2012 21:00",
room_id:"1"},
{text:"Meeting", start_date:"17/09/2012 09:00", end_date:"17/09/2012 21:00",
room_id:"2"},
{text:"Conference", start_date:"17/09/2012 15:00", end_date:"18/09/2012 15:00",
room_id:"3"}
]);
여러 섹션에 이벤트 할당
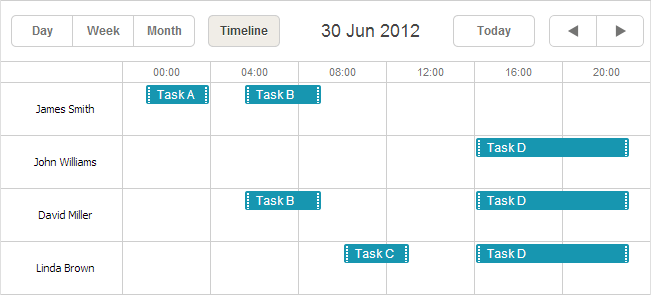
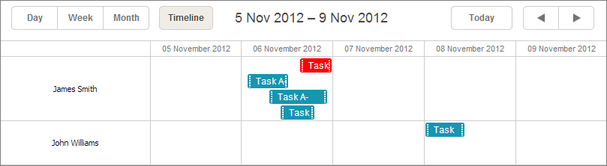
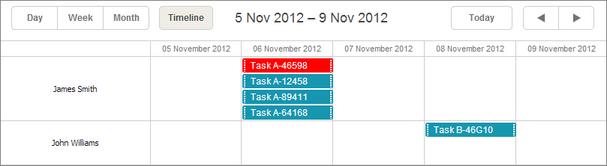
스케줄러는 하나의 이벤트를 여러 섹션에 동시에 할당하는 기능을 지원합니다.
이 기능을 활성화하려면:
- Multisection 확장 기능을 페이지에 포함합니다.
- multisection 속성을 true로 설정합니다.
- (선택 사항) "Multiselect" 확장 기능을 추가하여 스케줄러 내에서 편리하게 섹션을 전환할 수 있는 "Multiselect" 컨트롤을 제공합니다.
<script src="codebase/dhtmlxscheduler.js"></script>
<link rel="stylesheet" href="codebase/dhtmlxscheduler.css" type="text/css">

<script>
    scheduler.plugins({
        multisection: true, /*!*/
        multiselect: true,
        timeline: true
    });
    scheduler.config.multisection = true; /*!*/
    scheduler.init('scheduler_here');
</script>
설정 후, 이벤트의 관련 데이터 프로퍼티에 여러 섹션을 (기본적으로 쉼표로 구분하여, 자세한 내용은 section_delimiter 참고) 나열할 수 있으며, 해당 이벤트는 모든 지정된 섹션에 표시됩니다.
scheduler.createTimelineView({
    name: "timeline",
    y_unit: [
        {key: 1, label: "James Smith"},
        {key: 2, label: "John Williams"},
        {key: 3, label: "David Miller"},
        {key: 4, label: "Linda Brown"}],
    y_property: "section_id", /*!*/
    ...
});
scheduler.init('scheduler_here', new Date(2012, 5, 30), "timeline");

scheduler.parse([
    { id:1, text:"Task A", section_id:'1',         ...},/*!*/
    { id:2, text:"Task B", section_id:'1,3',     ...},/*!*/
    { id:3, text:"Task C", section_id:'4',         ...},/*!*/
    { id:4, text:"Task D", section_id:'2,3,4',     ...}/*!*/
]);
Multisection events in Timeline and Units view
뷰 모드
타임라인 뷰는 네 가지 고유한 모드를 제공합니다:
- Bar
- Cell (기본값)
- Tree
- Days
원하는 모드는 render 파라미터로 선택할 수 있습니다.
scheduler.createTimelineView({
    name: "timeline",
    render: "bar"
});
'Days' 모드 상세
Days 모드를 사용할 때는 다음 사항에 유의해야 합니다.
- 타임 스케일은 반드시 하루를 정확히 커버해야 합니다. 더 짧거나 긴 기간으로 설정하면 타임라인이 올바르게 렌더링되지 않을 수 있습니다:
scheduler.createTimelineView({
    name:"timeline",
    render:"days",
    days:7,
    //time scale configured to cover 1 day /*!*/
    x_unit:"minute", /*!*/
    x_date:"%H:%i",  /*!*/
    x_step:30,       /*!*/
    x_size:24,       /*!*/
    x_start:16       /*!*/
});
- 이 모드에서는 차단 및 표시 기능이 지원되지 않습니다.
- Y축 레이블 형식은 scale_label 템플릿으로 제어할 수 있습니다:
scheduler.templates.timeline_scale_label = function(key, label, section){
    // Day 뷰와 동일한 레이블 사용
    return scheduler.templates.day_date(label);
};
- 표시 구간의 시작일을 조정하려면 scheduler.date.(timeline_name)_start 함수를 사용하세요:
scheduler.date.timeline_start = function (date) {
    date = scheduler.date.week_start(date);
    date = scheduler.date.add(date, config.x_step*config.x_start, config.x_unit);
    return date;
};
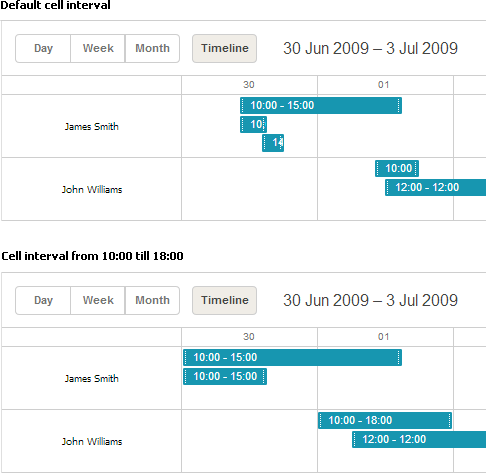
뷰 셀의 시간 간격
기본적으로 뷰의 각 셀은 하루 간격을 커버하며, 이벤트도 이에 맞게 배치됩니다. 이 간격을 사용자 정의하려면(예: 근무 시간만 집중하고 그 외 시간은 제외) 다음 중 한 가지 방법을 사용할 수 있습니다.
- first_hour 및 last_hour 파라미터 사용:
// 셀 간격을 10:00~18:00으로 제한
scheduler.createTimelineView({
    name:"timeline",
    first_hour:10,
    last_hour:18
});
Changing the time interval for the view cells
- ignore_(viewName) 함수 사용. 여기서 viewName은 createTimelineView로 생성한 타임라인 뷰의 name 옵션과 동일합니다. 이 함수는 셀 날짜를 인자로 받아, 제외할 시간대에 대해 'true'를 반환합니다:
// 셀 간격을 10:00~18:00으로 제한
scheduler.ignore_timeline = function(date){   // "timeline"은 뷰 이름
    // 근무 외 시간 제외
    if (date.getHours() < 10 || date.getHours() > 18) return true;
};
ignore_(viewName) 메서드에 대한 자세한 내용은 "뷰의 X축에서 시간 단위 숨기기" 섹션을 참고하세요.
Hiding hours in the scale of Timeline view
제외되는 구간이 타임라인 전체 구간과 같거나 더 길면 적용되지 않습니다.
예를 들어, 타임라인이 하루 전체를 커버할 때 ignore_(viewName) 함수로 하루 전체를 제외하려 하면, 해당 날짜가 스케줄러에 표시되지만 스케일이나 이벤트는 렌더링되지 않습니다.
이런 구간을 완전히 제외하려면 scheduler._click.dhx_cal_next_button 함수 내에서 x_length 설정을 동적으로 조정해야 합니다. 예를 들어, 주말을 타임라인에서 완전히 건너뛰려면 다음과 같이 할 수 있습니다:
scheduler._click.dhx_cal_next_button = function(dummy,step){
  var mode = scheduler.getState().mode;
  var minDate = scheduler.getState().min_date;
  var formFunc = scheduler.date.date_to_str("%D");

  // 주말 건너뛰기
  if(mode=='timeline'){
  if((formFunc(minDate)=='Fri' && step!=-1) || (formFunc(minDate)=='Mon' && step==-1))
      scheduler.matrix['timeline'].x_length = 24*3;
    else
      scheduler.matrix['timeline'].x_length = 24;
  }
 scheduler.setCurrentView(scheduler.date.add(
 scheduler.date[scheduler._mode+"_start"](scheduler._date),(step||1),scheduler._mode));
};
Related sample Ignoring weekends
'Bar' 및 'Cell' 모드의 Y축 섹션 데이터
'Bar' 및 'Cell' 모드에서 Y축 값을 정의하려면 y_unit 파라미터를 사용하세요.
scheduler.createTimelineView({
    name:"timeline",
    ...
    y_unit:[
        {key:1, label:"James Smith"},
        {key:2, label:"John Williams"},
        {key:3, label:"David Miller"},
        {key:4, label:"Linda Brown"}
    ]
});
각 y_unit 항목에는 다음 두 가지 필수 속성이 필요합니다.
- key - 항목의 고유 식별자
- label - 항목의 텍스트 라벨
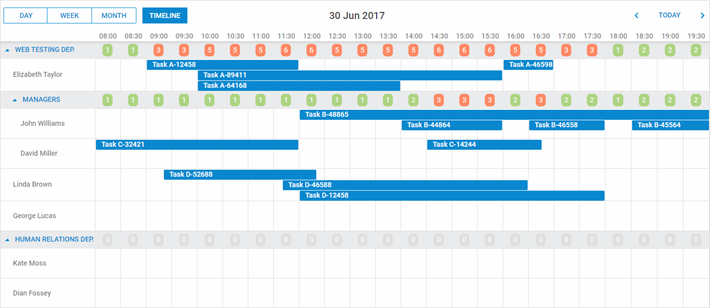
'Tree' 모드의 Y축 섹션 데이터
'Tree' 모드를 사용하면 항목을 다단계 폴더로 그룹화할 수 있어, 조직이 더 체계적일 뿐 아니라 계층 내 어느 폴더에도 이벤트를 할당할 수 있습니다.
'Tree' 타임라인을 설정하려면 'Bar', 'Cell' 모드와 동일하게 y_unit 파라미터를 사용하되, 추가 속성을 포함시킵니다.
scheduler.createTimelineView({
    name:   "timeline",
    render:"tree",
    ...
    y_unit:[
        {key:"production", label:"Production Department", children:[
            {key:"p1", label:"Managers", children:[
                {key:"pm1", label:"John Williams"},
                {key:"pm2", label:"David Miller"}
            ]},
            {key:"p2", label:"Linda Brown"},
            {key:"p3", label:"George Lucas"}
        ]},
        {key:"sales", label:"Sales and Marketing", children:[
            {key:"s1", label:"Kate Moss"},
            {key:"s2", label:"Dian Fossey"}
        ]}
    ]
});
y_unit 항목에는 다음과 같은 속성이 있습니다.
- 필수 두 가지:
- key - 항목 id
- label - 항목 라벨
- 선택 두 가지:
- open - 섹션이 처음에 펼쳐질지 여부
- children - 하위 항목 객체 배열
'Days' 모드의 Y축 섹션 데이터
'Days' 모드에서는 days 파라미터로 Y축에 표시할 일 수를 지정합니다.
scheduler.createTimelineView({
    name:"timeline",
    ...
    days:7 // Y축에 표시되는 일 수
});
서버에서 Y축 섹션 데이터 불러오기
서버에서 Y축 섹션을 불러오려면 다음과 같이 합니다.
- 클라이언트 측에서는 serverList 메서드를 사용:
scheduler.createTimelineView({
    name:"timeline",
    ...
    y_unit:scheduler.serverList("sections"),
});
여기서 serverList는 'sections'라는 옵션 목록을 불러옵니다.
- 서버 측
load 메서드의 응답에는 "데이터 포맷 예시"에서 설명한 대로 서버 리스트 이름의 컬렉션이 JSON 형식으로 포함되어야 합니다.
또는 OptionsConnector 커넥터를 사용할 수 있습니다.
<?php
    include('connector-php/codebase/scheduler_connector.php');// 파일 포함

    $res="mysql_connect(""localhost","root","");// DB 서버 연결
    mysql_select_db("sampleDB");// 데이터베이스 선택

    $list = new OptionsConnector($res, $dbtype);
    $list->render_table("types","type_id","type_id(value),name(label)");

    $scheduler = new schedulerConnector($res, $dbtype);
    // 클라이언트와 동일한 이름('sections')으로 지정
    $scheduler->set_options("sections", $list);
    $scheduler->render_table("events","id","start_date,end_date,text,type_id");
?>

응답은 JSON format의 "collections" 객체에 serverList에서 참조하는 컬렉션을 포함해야 합니다.
dhtmlxConnector를 사용하지 않고 컬렉션을 수동으로 생성할 수도 있습니다. 이 경우 컬렉션을 업데이트하려면 updateCollection 메서드를 사용하세요.
scheduler.updateCollection("sections", new_sections_array);
Loading Units sections from the server
항목의 동적 추가/삭제
항목을 동적으로 추가하거나 제거하려면 다음 메서드를 사용할 수 있습니다.
scheduler.createTimelineView({
    name:   "timeline",
    render:"tree",
    ...
    y_unit:[
        {key:"production", label:"Production Department", children:[
            {key:"p1", label:"Managers", children:[
                {key:"pm1", label:"John Williams"},
                {key:"pm2", label:"David Miller"}
            ]},
            {key:"p2", label:"Linda Brown"},
            {key:"p3", label:"George Lucas"}
        ]},
        {key:"sales", label:"Sales and Marketing", children:[
            {key:"s1", label:"Kate Moss"},
            {key:"s2", label:"Dian Fossey"}
        ]}
    ]
});
scheduler.addSection( {key:"pm3", label:"James Smith"}, "p1");
scheduler.addSection( {key:"s3", label:"Alex White"}, "sales");
scheduler.deleteSection("p3");
addSection 및 deleteSection 메서드는 스케줄러에서 'Tree' 타임라인 모드가 활성화되어 있어야 동작합니다.
두 번째 X축
기본 X축 위에 두 번째 X축을 추가하여 주 시간 간격을 그룹화할 수 있습니다.
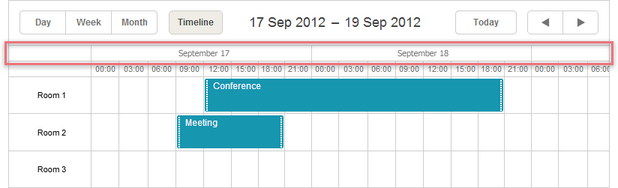
두 번째 스케일을 추가하려면 second_scale 파라미터를 사용하세요.
 scheduler.createTimelineView({
    name:    "timeline",
    ...
    second_scale:{
        x_unit: "day", // 축 단위 (기본값은 'minute')
        x_date: "%F %d" // 날짜 형식 ("July 01")
    }
});
이벤트 셀 전체로 늘리기
이벤트가 기간에 상관없이 셀 전체 너비를 채우도록 하려면 round_position 파라미터를 활성화하면 됩니다.
scheduler.createTimelineView({
    name:"timeline",
    render:"bar",
    ...
    round_position:true
});
round_position:false (기본값)일 때:
round_position:true일 때:
이벤트 정렬
기본적으로 타임라인 뷰의 이벤트는 시작일 기준으로 정렬됩니다. 직접 정렬 기준을 지정하려면 sort 파라미터에 함수를 할당하세요.
이 함수는 인접한 두 이벤트를 받아 다음 값을 반환합니다.
- 1: 첫 번째 이벤트가 두 번째 이벤트보다 먼저 와야 함
- -1: 두 번째 이벤트가 첫 번째보다 먼저 와야 함
- 0: 두 이벤트가 동일하다고 간주
scheduler.createTimelineView({
    name:   "timeline",
    render:"bar",
    ...
    sort:function(a, b){
        if (a.text.length > b.text.length) {
            // a가 b보다 먼저
            return -1;
        } else if(a.text.length < b.text.length) {
            return 1;
        } else{
            return +a.start_date > +b.start_date ? 1 : -1;
        }
    }
});
수평 스크롤
타임라인 뷰는 네비게이션 버튼 없이도 일, 주, 월 단위로 수평 스크롤을 지원합니다.
수평 스크롤을 활성화하려면 createTimelineView 메서드에서 scrollable 속성을 설정하세요. column_width 및 scroll_position도 함께 설정할 수 있습니다.
scheduler.createTimelineView({
    name: "timeline",
    x_unit:    "minute",
    x_date:    "%H:%i",
    x_step:    30,
    x_size: 24*7,
    x_start: 16,
    x_length: 48,
    y_unit:    sections,
    y_property:    "section_id",
    render: "bar",
    scrollable: true, /*!*/
    column_width: 70, /*!*/
    scroll_position:new Date(2018, 0, 15) /*!*/
});
- scrollable - (boolean) 수평 스크롤 활성화; 기본값 false. false 또는 미설정 시 컬럼이 타임라인 너비에 맞게 축소됩니다. true면 컬럼이 column_width 이하로 축소되지 않으며, 필요시 스크롤바가 나타납니다.
- column_width - (number) 옵션, 타임라인 날짜 컬럼의 최소 너비; 기본값 100.
- scroll_position - (Date) 옵션, 타임라인의 초기 스크롤 위치를 설정하며,
timeline.scrollTo()와 동일한 입력을 받습니다.
타임라인 뷰는 scrollable이 활성화되면 기본적으로 스마트 렌더링을 사용합니다. 이는 성능을 최적화하여 보이는 행, 열, 이벤트만 렌더링하고, 스크롤 시 나머지를 로드합니다.
Horizontal scroll for Timeline view
타임라인 스크롤은 무한하지 않으며 시간 범위가 제한됩니다. 시간 구간 간 이동에는 네비게이션 컨트롤이 여전히 필요합니다.
오토스크롤 설정
타임라인 뷰포트 가장자리 근처에서 이벤트를 이동하거나 크기 조정시 오토스크롤이 기본적으로 활성화됩니다.
오토스크롤 민감도와 속도는 createTimelineView 메서드 내 autoscroll 객체로 조정할 수 있습니다.
scheduler.createTimelineView({
    name:"timeline",
    ...
    autoscroll: {            /*!*/
        range_x: 200,         /*!*/
        range_y: 100,         /*!*/
        speed_x: 20,          /*!*/
        speed_y: 10            /*!*/
    }                        /*!*/
});
- range_x - (number) 수평 오토스크롤이 트리거되는 뷰포트 가장자리까지의 거리
- range_y - (number) 수직 오토스크롤이 트리거되는 뷰포트 가장자리까지의 거리
- speed_x - (number) 수평 오토스크롤 속도
- speed_y - (number) 수직 오토스크롤 속도
섹션 컬럼 헤더
기본적으로 섹션 컬럼 위의 헤더는 비어 있습니다. locale 객체를 사용해 라벨을 추가할 수 있습니다.
scheduler.locale.labels.<timelineName>_scale_header = "Label";
<timelineName>은 createTimelineView에서 지정한 타임라인 뷰 이름으로 대체하세요. 예시:
scheduler.locale.labels.timeline_scale_header = "Users";
셀 내 커스텀 콘텐츠
타임라인 셀 안에 커스텀 콘텐츠를 표시할 수 있습니다. Cell 모드뿐 아니라 모든 타임라인 모드에서 가능합니다.
모든 타임라인 모드에서 셀 콘텐츠 템플릿을 정의할 수 있습니다.
Display labels in timeline cells
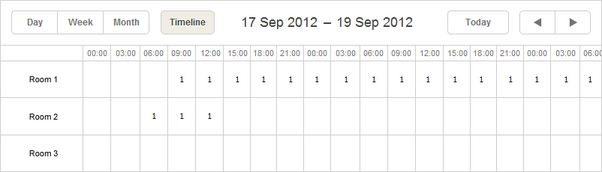
특정 타임라인에 대해 이 기능을 활성화하려면 createTimelineView에서 cell_template 속성을 true로 설정하세요.
scheduler.createTimelineView({
    cell_template: true,
    ...
});
활성화 후에는 지정한 템플릿이 호출됩니다. 예를 들어 아래는 "tree" 타임라인 모드에서 날짜별 이벤트 수를 표시하는 예시입니다.
<style>
    .dhx_matrix_cell div.load-marker{
        position: absolute;
        width: 40%;
        height: 25px;
        transform: translate(70%, 20%);
        line-height: 25px;
        text-align: center;
        border-radius: 7px;
        color: white;
    }
    .load-marker-no{
        background: #e0e0e0;
    }
    .load-marker-light{
        background: #aed581;
    }
    .load-marker-high{
        background: #ff8a65;
    }

</style>

scheduler.templates.timeline_cell_value = function (evs, date, section){
    if(section.children){
        var timeline = scheduler.getView();

        var events = timeline.selectEvents({
            section: section.key,
            date: date,
            selectNested: true
        });

        var className = "";
        if(!events.length){
            className = "load-marker-no";
        }else if(events.length < 3){
            className = "load-marker-light";
        }else{
            className = "load-marker-high";
        }

        return "<div className='load-marker "+className+"'>"+
            events.length
        +"</div>";

    }

    return "";
};
Display labels in timeline cells
섹션 높이 변경
기본적으로 섹션과 이벤트의 높이는 createTimelineView의 dy 및 event_dy 설정으로 제어됩니다.
섹션 객체에 height 속성이 있으면 해당 값이 dy 설정을 덮어씁니다.
scheduler.createTimelineView({
    name:    "timeline",
    ...
    y_unit:    [
        {key: 1, label: "Room 1", height: 60},
        {key: 2, label: "Room 2", height: 60},
        {key: 3, label: "Room 3", height: 120},
        {key: 4, label: "Room 4", height: 900},
    ],
스케줄러 초기화 후에도 height 속성을 동적으로 변경할 수 있습니다.