Radio
A set of radio buttons
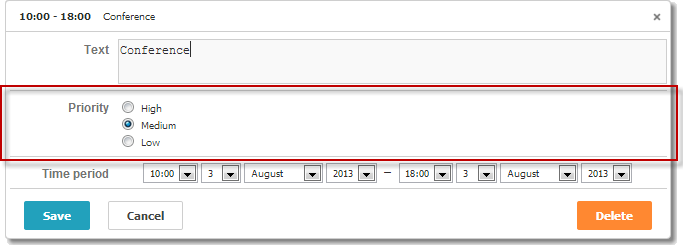
Enable the editors extension to use the control in the lightbox
scheduler.plugins({
    editors: true /*!*/
});

var priorities = [
    { key: 1, label: 'High' },
    { key: 2, label: 'Medium' },
    { key: 3, label: 'Low' }
];

scheduler.locale.labels.section_priority = 'Priority';

scheduler.config.lightbox.sections = [
    { name:"text", height:50, map_to:"text", type:"textarea", focus:true },
    { name:"priority", height:58, options:priorities,
                map_to:"priority", type:"radio", vertical:true},
    { name:"time", height:72, type:"time", map_to:"auto"}
];
Initialization
To add the Radio control to the lightbox, follow these steps:
- Enable the 'editors' extension on the page:
scheduler.plugins({
    editors: true
});
- Add the section to the lightbox configuration:
scheduler.config.lightbox.sections = [
    { name:"description", ... },
    { name:"radiobutton", height:58, options:priorities,
    map_to:"priority", type:"radio", vertical:true},
    { name:"time", ...}
];
- Set the label for the section:
scheduler.locale.labels.section_priority = 'Priority';
Properties
The following properties are mostly important and commonly set for the 'radio' control (see the full list here):
| name | (string) the section's name |
| height | (number) the section's height |
| map_to | (string) the name of a data property that will be mapped to the section |
| type | (textarea,time,select,template,multiselect,radio,checkbox,combo) the type of the section's control |
| options | (array of objects) defines select options of the control (for 'select', 'multiselect', 'radio', 'combo' controls). Each object in the array specifies a single option and takes these properties:
|
| vertical | (boolean) specifies, whether radio buttons should be placed vertically(true) or horizontally (for the 'multiselect' and 'radio' controls) |
Populating the control with data
Generally, to set values for the radio buttons you should use the options parameter:
scheduler.config.lightbox.sections =
    {      name:"alert", type:"select",
        ...
        options:[
            { key: 1, label: 'High' },
            { key: 2, label: 'Medium' },
            { key: 3, label: 'Low' }
    ]},
    ...
];
Items in the options parameter must have 2 mandatory properties:
- key - the option's id
- label - the option's label
Getting the radio buttons values from the server
To set values for radio buttons, using data retrieved from the server, use the serverList method:
scheduler.config.lightbox.sections = [
    {name:"description", ...},
    {name:"priority", map_to:"priority", type:"radio",
          options:scheduler.serverList("priority")},
    {name:"time", ...}
];

scheduler.load("/api/types");
The data response for the load method should contain a collection with the server list name specified in JSON of the following format:
{
   "data":[
      {
          "id":"1",
          "start_date":"2019-03-02 15:00:00",
          "end_date":"2019-03-04 16:00:00",
          "text":"Interview",
          "priority":1
      },
      {
          "id":"2",
          "start_date":"2019-03-02 17:00:00",
          "end_date":"2019-03-04 18:00:00",
          "text":"Performance review",
          "type":2
      }
   ],
   "collections": {/*!*/
      "type":[/*!*/
         {"value":1,"label":"Low"},/*!*/
         {"value":2,"label":"Medium"},/*!*/
         {"value":3,"label":"High"}/*!*/
      ]/*!*/
   }/*!*/
}
Example backend handler (Node.js/Express):
app.get("/api/types", async (req, res) => {
  const data = await eventsService.list();
  const collections = {
    type: [
      { value: 1, label: "Low" },
      { value: 2, label: "Medium" },
      { value: 3, label: "High" }
    ]
  };
  res.json({ data, collections });
});
Note, you can use the updateCollection method to update the list of retrieved options
Event handling for the Radio Control
By default, dhtmlxScheduler API doesn't provide any specific event handlers for radio buttons in the Scheduler lightbox.
But you can assign a click handler for the Lightbox Radio controls like this:
- Get radio elements after the lightbox will be opened.
scheduler.attachEvent("onLightbox", function(){
    var node = scheduler.formSection("type").node;
    var radios = node.getElementsByTagName("input");
    ...
});
- Attach the onclick event to the found radio buttons of Lightbox.
scheduler.attachEvent("onLightbox", function(){
    ...
    for(var i = 0; i < radios.length; i++){
      radios[i].onclick = onRadioClick;
    }
});
- Finally, you should specify a function that will be executed after clicking the radio button.
function onRadioClick(event){
    var e = event || window.event,
        node = this;

    dhtmlx.message(node.value);
}
Related sample Event handling for the Radio Control