Integration with Angular
You should be familiar with basic concepts and patterns of Angular before reading this documentation. To refresh your knowledge, please refer to the Angular documentation.
DHTMLX Event Calendar is compatible with Angular. We have prepared code examples on how to use DHTMLX Event Calendar with Angular. For more information, refer to the corresponding Example on GitHub.
Creating a project
Before you start to create a new project, install Angular CLI and Node.js.
Create a new my-angular-event-calendar-app project using Angular CLI. Run the following command for this purpose:
ng new my-angular-event-calendar-app
If you want to follow this guide, disable Server-Side Rendering (SSR) and Static Site Generation (SSG/Prerendering) when creating new Angular app!
The command above installs all the necessary tools, so you don't need to run any additional commands.
Installation of dependencies
Go to the new created app directory:
cd my-angular-event-calendar-app
Install dependencies and start the dev server. For this, use the yarn package manager:
yarn
yarn start
The app should run on a localhost (for instance http://localhost:3000).
Creating Event Calendar
Now you should get the DHTMLX Event Calendar source code. First of all, stop the app and proceed with installing the Event Calendar package.
Step 1. Package installation
Download the trial Event Calendar package and follow steps mentioned in the README file. Note that trial Event Calendar is available 30 days only.
Step 2. Component creation
Now you need to create an Angular component, to add Event Calendar into the application. Create the event-calendar folder in the src/app/ directory, add a new file into it and name it event-calendar.component.ts. Then complete the steps described below.
Import source files
Open the file and import Event Calendar source files. Note that:
- if you use PRO version and install the Event Calendar package from a local folder, the imported path looks like this:
import { EventCalendar } from 'dhx-eventcalendar-package';
- if you use the trial version of Event Calendar, specify the following path:
import { EventCalendar } from '@dhx/trial-eventcalendar';
In this tutorial you can see how to configure the trial version of Event Calendar.
Set the container and initialize Event Calendar
To display Event Calendar on the page, you need to set the container to render the component inside and initialize Event Calendar using the corresponding constructor:
import { EventCalendar } from '@dhx/trial-eventcalendar';
import { Component, ElementRef, OnInit, ViewChild, OnDestroy, ViewEncapsulation } from '@angular/core';

@Component({
    encapsulation: ViewEncapsulation.None,
    selector: "event-calendar", // a template name used in the "app.component.ts" file as <event-calendar />
    styleUrls: ["./event-calendar.component.css"], // include a css file
    template: `<div #container className="widget"></div>`,
})

export class EventCalendarComponent implements OnInit, OnDestroy {
    // initialize container for Event Calendar
    @ViewChild('container', { static: true }) calendar_container!: ElementRef;

    private _calendar!: EventCalendar;

    ngOnInit() {
        // initialize the Event Calendar component
        this._calendar = new EventCalendar(this.calendar_container.nativeElement, {});
    }

    ngOnDestroy(): void {
        this._calendar.destructor(); // destruct Event Calendar
    }
}
Adding styles
To display Event Calendar correctly, you need to provide the corresponding styles. For this purpose, you can create the event-calendar.component.css file in the src/app/event-calendar/ directory and specify important styles for Event Calendar and its container:
/* import Event Calendar styles */
@import "@dhx/trial-eventcalendar/dist/event-calendar.css";

/* specify styles for initial page */
html,
body {
    margin: 0;
    padding: 0;
    height: 100%;
}

/* specify styles for the Event Calendar container */
.widget {
    height: 100%;
}
Loading data
To add data into Event Calendar, you need to provide a data set. You can create the data.ts file in the src/app/event-calendar/ directory and add some data into it:
export function getData() {
    return [
        {
            id: '27',
            type: 'work',
            start_date: new Date('2024-06-10T14:00:00'),
            end_date: new Date('2024-06-10T18:30:00'),
            text: ' Olympiastadion - Berlin ',
            details: ' Berlin, GER '
        },
        {
            id: '28',
            type: 'rest',
            start_date: new Date('2024-06-12T14:00:00'),
            end_date: new Date('2024-06-12T16:00:00'),
            text: ' Commerz Bank Arena ',
            details: ' Frankfurt, GER '
        },
        {
            id: '29',
            type: 'meeting',
            start_date: new Date('2024-06-13T11:00:00'),
            end_date: new Date('2024-06-13T16:00:00'),
            text: ' Olympic Stadium - Munich ',
            details: ' Munich, GER '
        }
    ];
}
Then open the event-calendar.component.ts file. Import the file with data and specify the corresponding data properties to the configuration object of Event Calendar within the ngOnInit() method, as shown below.
import { EventCalendar } from '@dhx/trial-eventcalendar';
import { getData } from "./data"; // import data
import { Component, ElementRef, OnInit, ViewChild, OnDestroy, ViewEncapsulation } from '@angular/core';

@Component({
    encapsulation: ViewEncapsulation.None,
    selector: "event-calendar",
    styleUrls: ["./event-calendar.component.css"],
    template: `<div #container className="widget"></div>`,
})

export class EventCalendarComponent implements OnInit, OnDestroy {
    @ViewChild('container', { static: true }) calendar_container!: ElementRef;

    private _calendar!: EventCalendar;

    ngOnInit() {
        const events = getData(); // initialize data property
        this._calendar = new EventCalendar(this.calendar_container.nativeElement, {
            events, // apply event data
            date: new Date(2024, 5, 10),
        });
    }

    ngOnDestroy(): void {
        this._calendar.destructor();
    }
}
You can also use the parse() method inside the ngOnInit() method of Angular to load data into Event Calendar.
import { EventCalendar } from '@dhx/trial-eventcalendar';
import { getData } from "./data"; // import data
import { Component, ElementRef, OnInit, ViewChild, OnDestroy, ViewEncapsulation } from '@angular/core';

@Component({
    encapsulation: ViewEncapsulation.None,
    selector: "event-calendar",
    styleUrls: ["./event-calendar.component.css"],
    template: `<div #container className="widget"></div>`
})

export class EventCalendarComponent implements OnInit, OnDestroy {
    @ViewChild('container', { static: true }) calendar_container!: ElementRef;

    private _calendar!: EventCalendar;

    ngOnInit() {
        const events = getData();
        this._calendar = new EventCalendar(this.calendar_container.nativeElement, {
            date: new Date(2024, 5, 10),
        });

        // apply the data via the parse() method
        this._calendar.parse(events);
    }

    ngOnDestroy(): void {
        this._calendar.destructor();
    }
}
The parse(data) method provides data reloading on each applied change.
Now the Event Calendar component is ready to use. When the element will be added to the page, it will initialize the Event Calendar with data. You can provide necessary configuration settings as well. Visit our Event Calendar API docs to check the full list of available properties.
Handling events
When a user makes some action in the Event Calendar, it invokes an event. You can use these events to detect the action and run the desired code for it. See the full list of events.
Open the event-calendar.component.ts file and complete the ngOnInit() method as in:
// ...
ngOnInit() {
    this._calendar = new EventCalendar(this.calendar_container.nativeElement, {
        date: new Date(2024, 5, 10),
    });

    this._calendar.events.on("add-event", (obj) => {
        console.log(obj);
    });
}

ngOnDestroy(): void {
    this._calendar.destructor();
}
Step 3. Adding Event Calendar into the app
To add the EventCalendarComponent component into the app, open the src/app/app.component.ts file and replace the default code with the following one:
import { Component } from "@angular/core";

@Component({
    selector: "app-root",
    template: `<event-calendar/>` // a template created in the "event-calendar.component.ts" file
})
export class AppComponent {
    name = "";
}
Then create the app.module.ts file in the src/app/ directory and specify the EventCalendarComponent as shown below:
import { NgModule } from "@angular/core";
import { BrowserModule } from "@angular/platform-browser";

import { AppComponent } from "./app.component";
import { EventCalendarComponent } from "./event-calendar/event-calendar.component";

@NgModule({
    declarations: [AppComponent, EventCalendarComponent],
    imports: [BrowserModule],
    bootstrap: [AppComponent]
})
export class AppModule {}
The last step is to open the src/main.ts file and replace the existing code with the following one:
import { platformBrowserDynamic } from "@angular/platform-browser-dynamic";
import { AppModule } from "./app/app.module";
platformBrowserDynamic()
    .bootstrapModule(AppModule)
    .catch((err) => console.error(err));
After that, you can start the app to see Event Calendar loaded with data on a page.
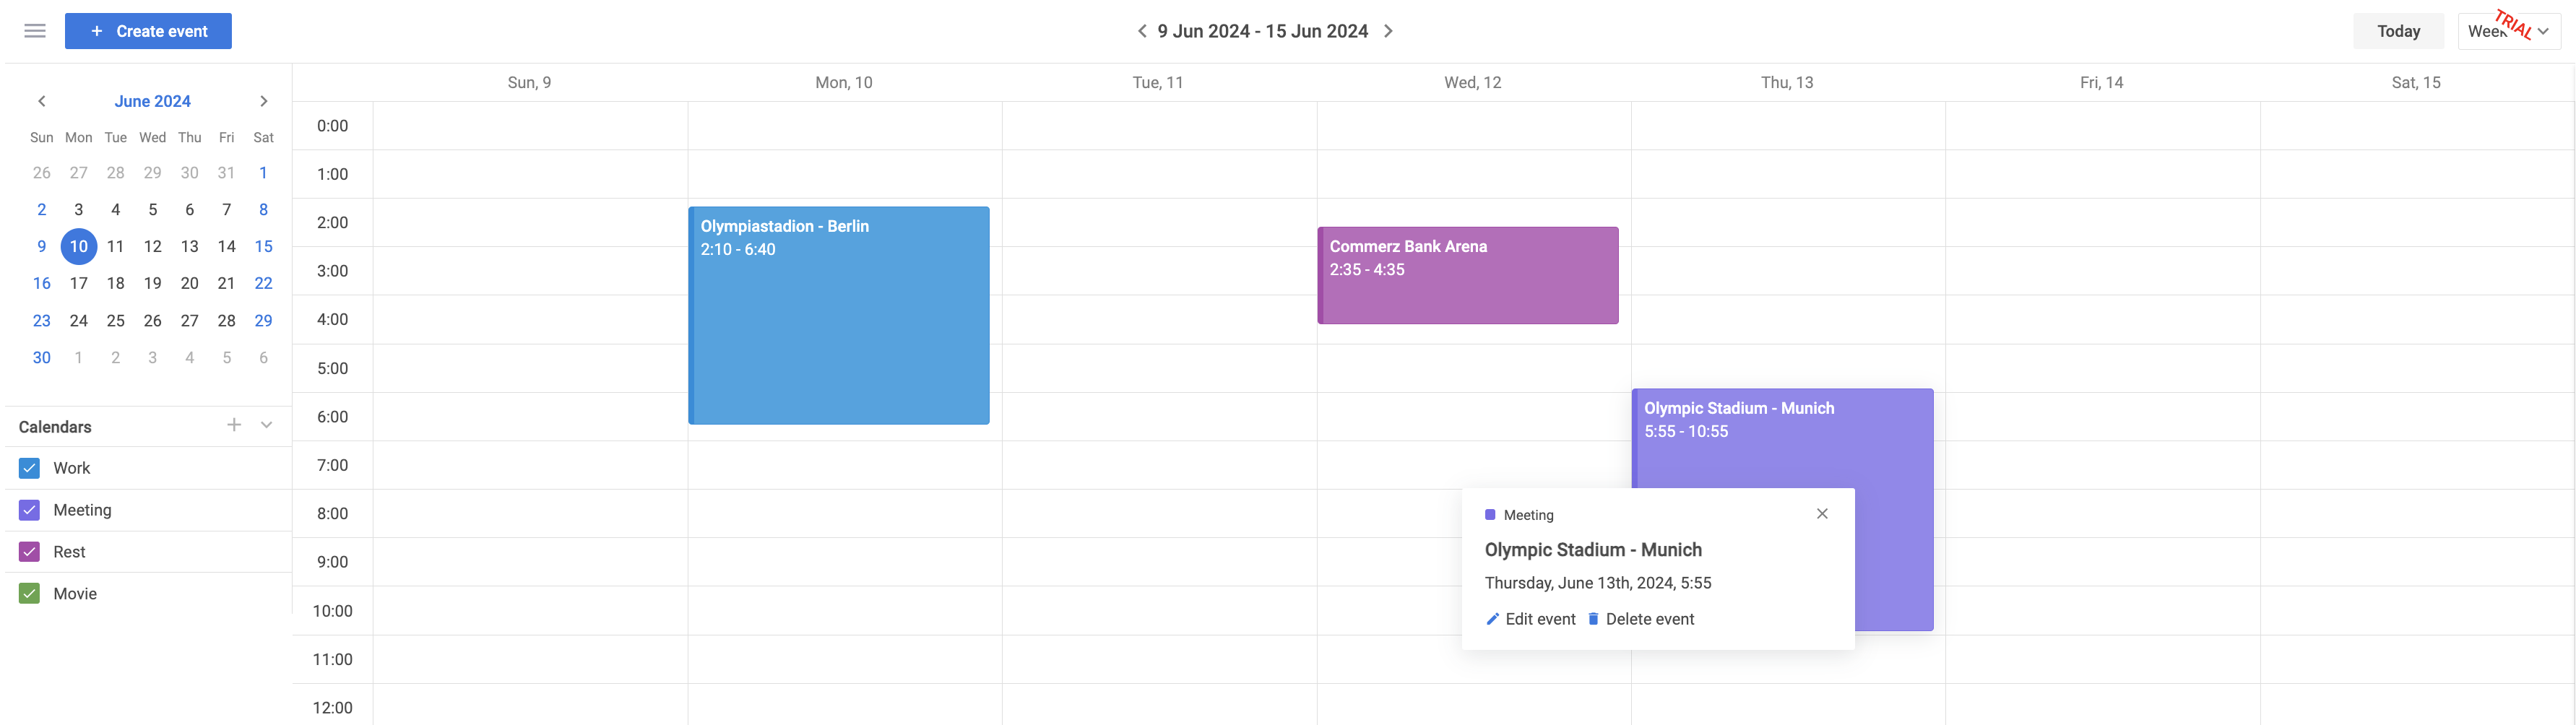
Now you know how to integrate DHTMLX Event Calendar with Angular. You can customize the code according to your specific requirements. The final example you can find on GitHub.