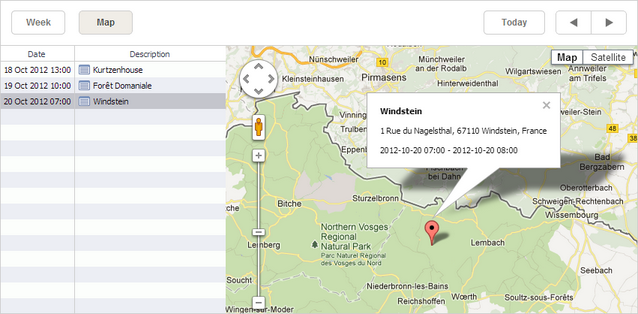
Map View
The Map view presents a list of upcoming events and maps to show or edit the event's location or to set the location for new events.
Initialization
To use Google Maps, you need to add your own google API key on your page.
To add the Map view to the scheduler, follow these steps:
- Include the code file of the desired map on the page as follows:
<-- use your own Google API key to include Google Maps-->
<script src="//maps.google.com/maps/api/js?key="[your" Google API key]&sensor="false""
    type="text/javascript"></script>
You can change the map provider and its settings later on, if needed. The changes will be applied on the next rendering of the map.
- Activate the Map view extension:
scheduler.plugins({
    map_view: true
});
- Add the view's tab to the scheduler's markup:
<div id="scheduler_here" class="dhx_cal_container" ...>
    <div class="dhx_cal_navline">
       ...
       <div class="dhx_cal_tab" data-tab="map"></div>
    </div>
    ...
</div>
- Set the label for the tab:
//'map_tab' is the name of our div
scheduler.locale.labels.map_tab = "Map";
- Define an additional section in the lightbox to manage the event location:
scheduler.config.lightbox.sections="["
    {name:"description", height:50,map_to:"text", type:"textarea", focus:true},
    {name:"location", height:43, map_to:"event_location", type:"textarea"},
    {name:"time", height:72, type:"time", map_to:"auto"}
]
- Set a label for the section:
scheduler.locale.labels.section_location = "Location";
- Initialize the scheduler:
//'map' is the default name of the Map view
scheduler.init('scheduler_here',new Date(2024,5,11),"map");
Setting the map provider
dhtmlxScheduler supports the following map providers: Google Maps, OpenStreetMaps и Mapbox.
To use some map provider, you need to:
- Include the corresponding map library on the page, for example, Google Maps:
<-- use your own Google API key to include Google Maps-->
<script src="//maps.google.com/maps/api/js?key="[your" Google API key]&sensor="false""
    type="text/javascript"></script>
- If necessary, specify the settings via the map_settings configuration option, e.g.:
scheduler.config.map_settings = {
    initial_position: {
       lat: 48.724,
       lng: 8.215
    }
}
...
scheduler.init('scheduler_here',new Date(2024,5,11),"map");
- Set the name of the chosen map provider in one of the following ways:
- via the map_view_provider configuration option:
scheduler.config.map_view_provider = "googleMap";
...
scheduler.init('scheduler_here',new Date(2024,5,11),"map");
Possible values are the following: "googleMap", "openStreetMaps", "mapbox".
- via the view_provider attribute of the map_settings configuration option:
scheduler.config.map_settings = {
    view_provider: "googleMap"
}
...
scheduler.init('scheduler_here',new Date(2024,5,11),"map");
Map-related configuration options
scheduler.config object
- map_end - sets the date to display events until
- map_start - sets the date to start displaying events from
Starting from v7.1, other map configuration options are specified within the object of the map_settings property. The default map settings are the following:
scheduler.config.map_settings = {
    initial_position: {
       lat: 48.724,
       lng: 8.215
    },
    error_position: {
       lat: 15,
       lng: 15
    },
    initial_zoom: 1,
    zoom_after_resolve: 15,
    info_window_max_width: 300,
    resolve_user_location: true,
    resolve_event_location: true,
    view_provider: "googleMap"
}
...
scheduler.init('scheduler_here',new Date(2024,5,11),"map");
The configuration object contains the following properties:
- initial_position - sets the initial position of the map
- error_position - sets the position that will be displayed on the map in case the event's location can't be identified
- initial_zoom - sets the initial zoom of the map in the Map view
- zoom_after_resolve - sets the zoom that will be used to show the user's location, if the user agrees to the browser's offer to show it
- info_window_max_width - the maximum width of the map's popup marker in the Map view
- resolve_user_location - enables/disables prompts, asking the user to share his location for displaying on the map
- resolve_event_location - activates attempts to resolve the event's location, if the database doesn't have the event's coordinates stored
- view_provider - specifies the map provider
You can also provide custom settings for a map inside the map_settings object, for example some tokens:
scheduler.config.map_settings.accessToken = "pk.eyJ...";
scheduler.xy object
- scheduler.xy.map_date_width - the width of the date column
- scheduler.xy.map_description_width - the width of the description column
Creating a custom map adapter
If the default map providers don't suit your needs, you can create a custom map adapter by adding a class that will implement the interface of your map adapter. It should contain the following methods:
interface IMapAdapter {
    // initializes a map instance with the provided options
    initialize(container: HTMLElement, options: IMapSettings): void;

    // removes the map instance when user switches from the map view,releases resources
    destroy(container: HTMLElement): void;

    // adds a marker on the map based on the event details
    addEventMarker(event: ICalendarEvent): void;

    // removes the marker corresponding to the eventId
    removeEventMarker(eventId: string): void;

    // updates the marker based on the event details
    updateEventMarker(event: ICalendarEvent): void;

    // removes all events from the map
    clearEventMarkers(): void;

    // centers the Map view at the specific location
    setView(latitude: number, longitude: number, zoom: number): void;

    // called when an event in the scheduler is clicked
    onEventClick(event: ICalendarEvent): void;

    // takes a string address as an argument and must resolve
    // with the {lat: number, lng: number} object with the corresponding address
    resolveAddress(address: string): Promise<IMapPosition>;
}
Requirements to data items
To be correctly rendered on the Map view, data items must contain a number of additional properties. The final list of mandatory properties (that data items should have) looks as in:
- start_date (Date or string) - the date when the event is scheduled to begin. The default format - '%Y-%m-%d %H:%i'.
- end_date (Date or string) - the date when the event is scheduled to be completed. The default format - '%Y-%m-%d %H:%i'.
- text (string) - the event's text.
- location - (string) the location of an event.
- lat - (number) the latitude of the event's location.
- lng - (number) the longitude of the event's location.
Make sure that your .php file conforms to your database data.
Localization tips
The Map view has 4 labels defined in the locale:
- scheduler.locale.labels.(mapName)_tab - the name of the map's tab
- scheduler.locale.labels.section_(sectionName) - the section label in the lightbox
- scheduler.locale.labels.marker_geo_success - the text in the marker's tooltip in case of successful geolocation response
- scheduler.locale.labels.marker_geo_fail - the text in the marker's tooltip in case of unsuccessful geolocation response
The 2 first labels are commonly specified, while adding the view tab to the scheduler, but the remaining marker labels should be redefined, only if you localize the application to a language, different from English.
Customizing markers
Starting from v7.0 you can customize the shape of markers by redefining the createMarker() method of the Map View:
const { AdvancedMarkerElement,
    PinElement } = await google.maps.importLibrary("marker");
scheduler.ext.mapView.createMarker = function(config){
    const pinViewGlyph = new PinElement({
        glyphColor: "white",
    });
    return new AdvancedMarkerElement({
        ...config,
        content: pinViewGlyph.element,
    });
};
You can find more information in the Google Maps documentation.
GUI details
- Selected events are highlighted. If the selected event occupies several days, all related records are highlighted.
- To create a new event - double click on an empty cell in the list or on the desired location on the map.
- To edit or delete an event - double click on the 'details' icon on the left side of the event's description.
- To overview an event - click on the event's marker on the map.